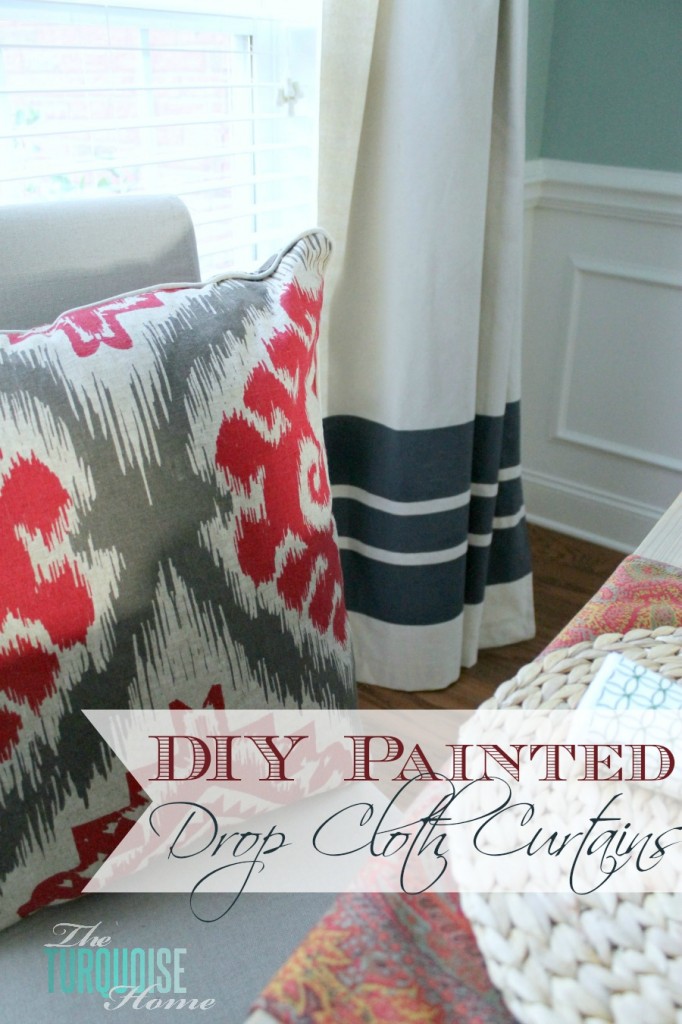
DIY Drop Cloth Curtains
Learn how to make these no-sew drop cloth curtains for a quick and easy curtain solution! I added some stripes for personalization!
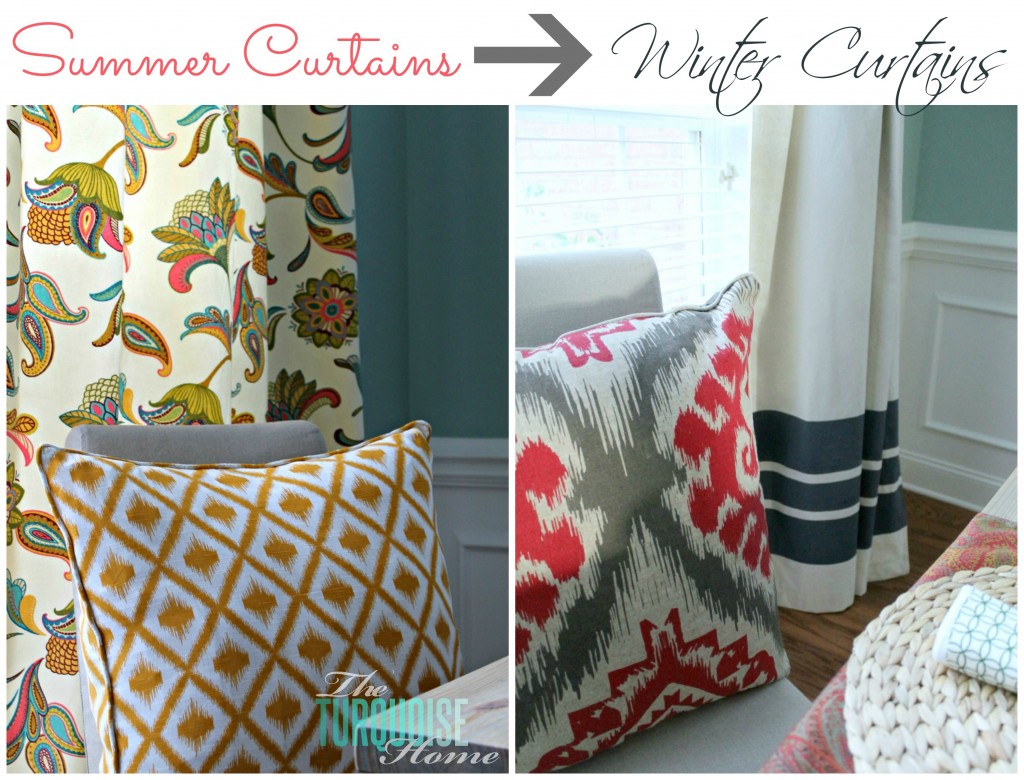
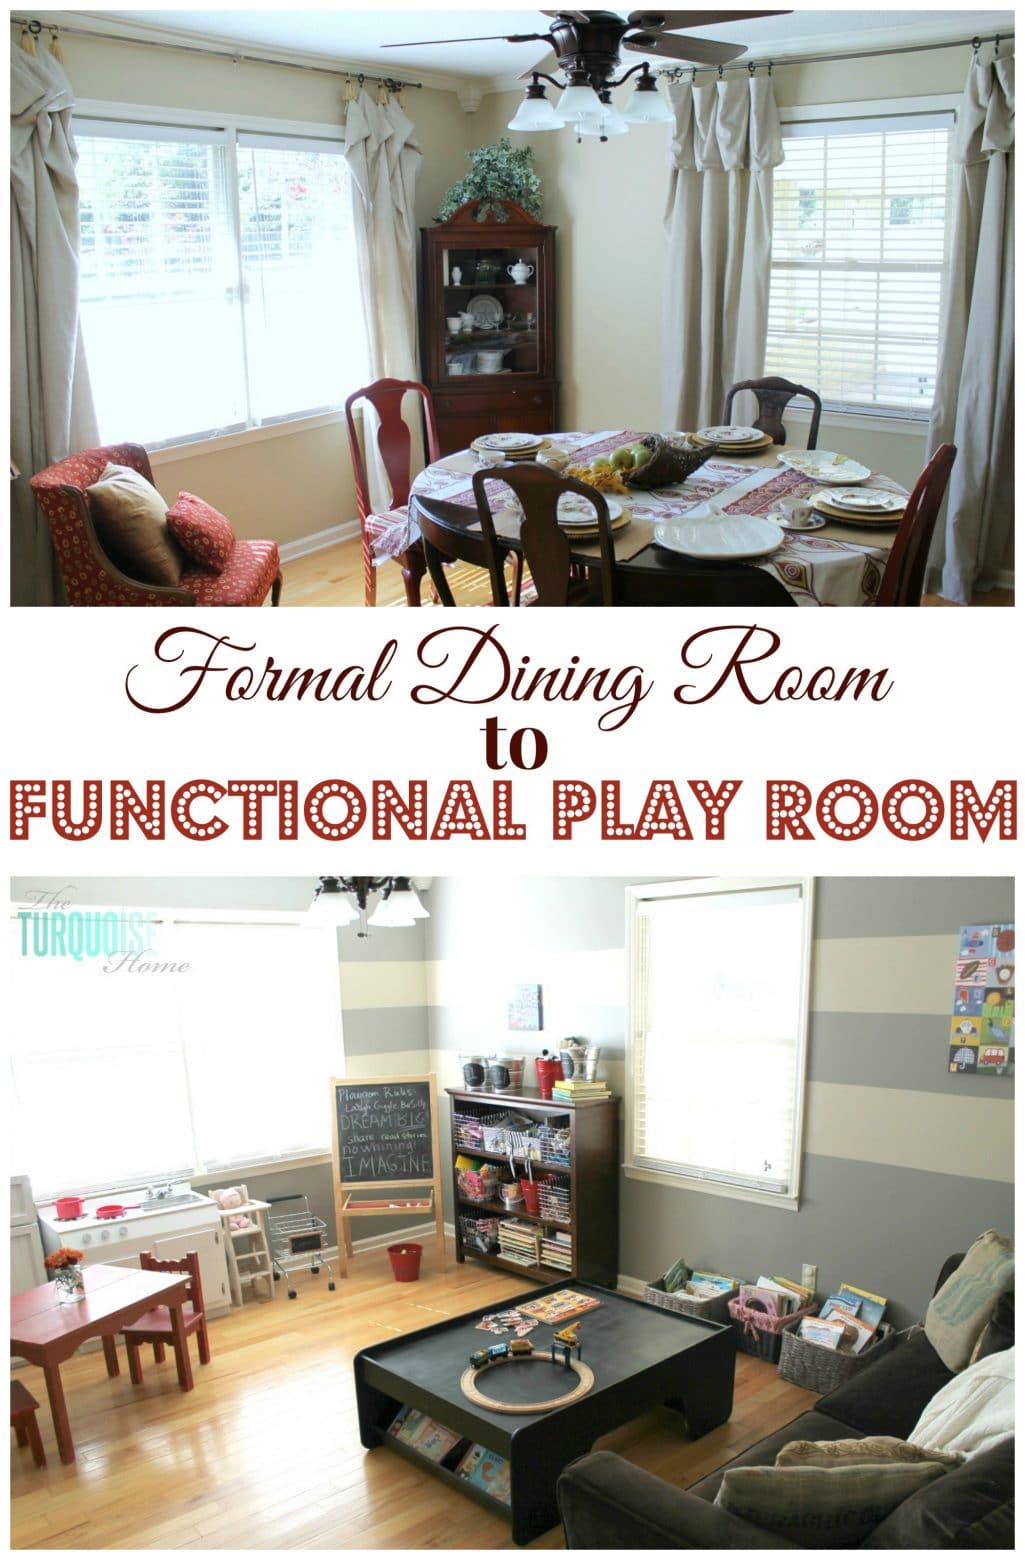
I mentioned a few of weeks ago that I was changing out the curtains in my dining rom for some more subdued textiles.
I love my floral, summer-y curtains. But, they are just that: summer-y. They don’t really look great as a backdrop for my rustic, glam Christmas tree. {I had several people ask me what I was going to do with my old curtains, because they loved them and didn’t want them to leave. But don’t worry, I plan to put them back up when Spring rolls around. :)}
I can rarely find curtains that I just love. So, I picked up two drop cloths at my local hardware store. They were right around $10 each, so $20 for two curtain panels is a great deal.
I knew I wanted to add a little something to the otherwise plain panels. I decided on painted navy stripes to ground them in the room. I used some leftover Hale Navy paint from painting my front door. Love it when I can use up some old paint!
Supplies:
2 drop cloths {found in the paint section in any hardware store}
Hem tape or a sewing machine
Cardstock or some other spacing guide
Roller paint brush
Painter’s tape
Paint
But first, I washed and dried my drop cloths, which really helped to soften them up. And then I ironed them and hemmed them. I would give a tutorial on how to hem, but it’s so basic and I honestly am a terrible seamstress. So it’s better that you just google it and learn from someone else.
The great thing about drop cloths is that they are already hemmed on all sides, so I just had to hem the bottom where I cut off the extra long fabric. Woohoo! And I imagine you could even use hem tape if you don’t have a sewing machine, or have an aversion to yours like I do. 🙂
Painting on the stripes was super simple, although it did take me a couple of tries to get the taped lines down without them looking terribly wonky. I tried at first to measure a certain point up the wall on both panels and go from there, but that didn’t work.
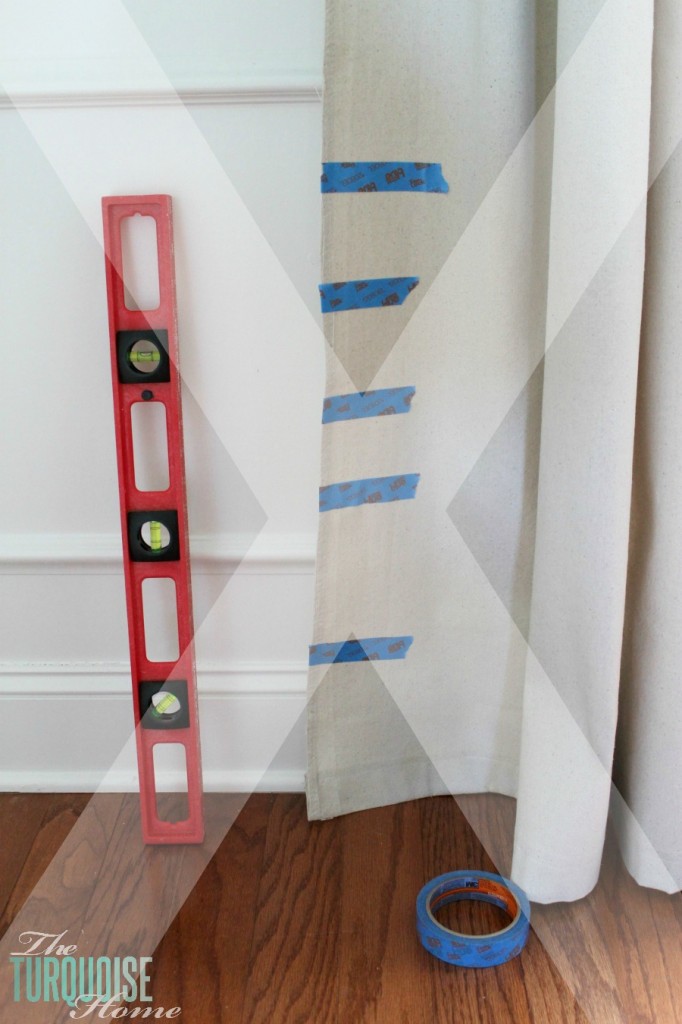
I finally figured that if I measured up from the bottom, which was semi straight, then I would end up with a pretty straight stripe.
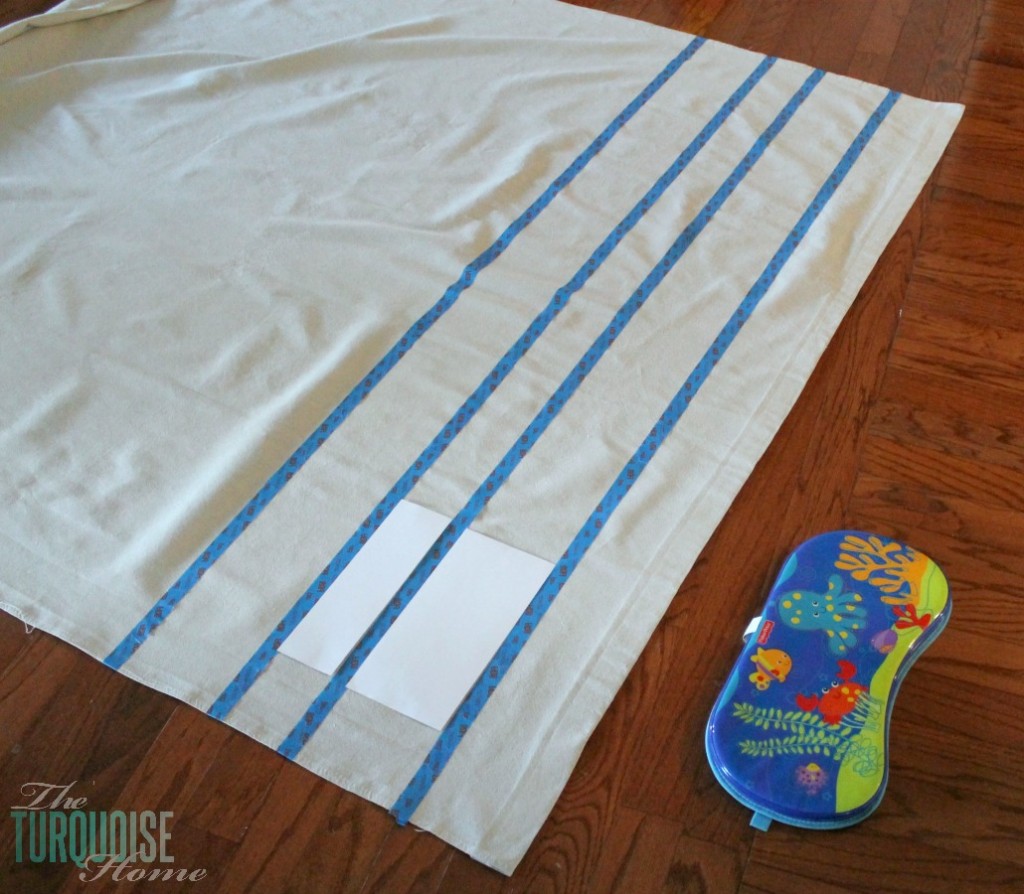
I cut some spacing guides from cardstock, which made it pretty easy to lay down the tape in a straight line. I just moved the spacing guide down the cloth as I taped and it kept it all in a nice line! I grabbed the kneeling pad that came with Miss A’s baby bathtub. Definitely find something soft for your knees if you’re going to be painting curtains on the floor. Trust me!
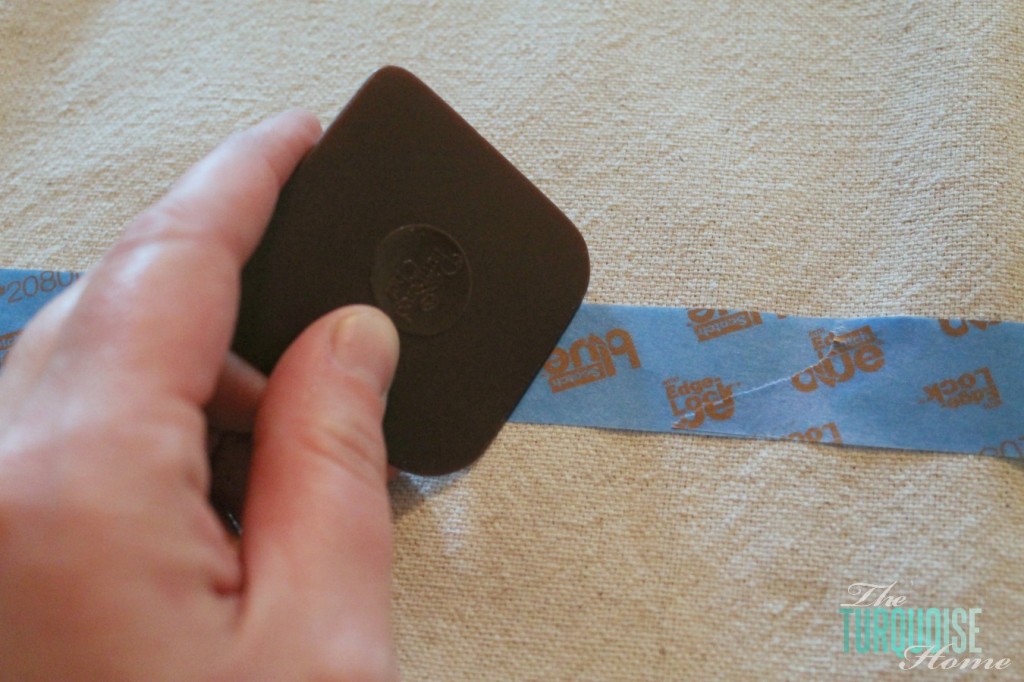
Crucial step for straight lines: I used a Pampered Chef dish scraper tool to press down on the tape before I started painting. It really worked to make sure the tape was sealed down. I’m sure you can use any kind of hard plastic item like a debit card.
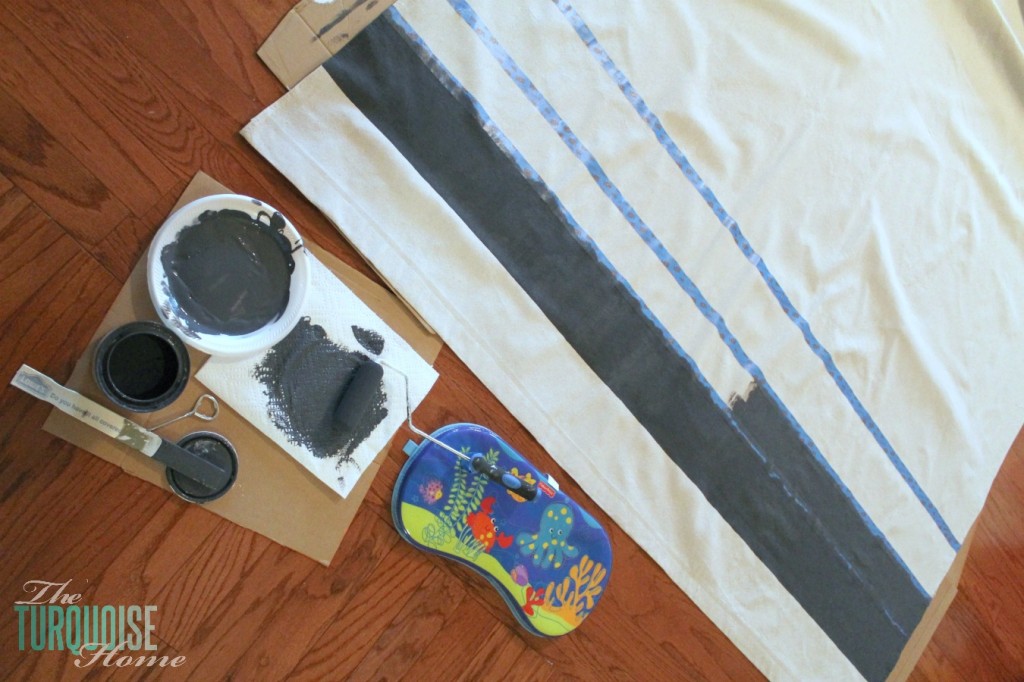
When I was painting, I made sure to roll away from the tape, so as not to push paint under the tape. And it worked! I got really straight lines. Yay!! {I put cardboard underneath the curtains while I was painting, so that I didn’t paint my floors.}
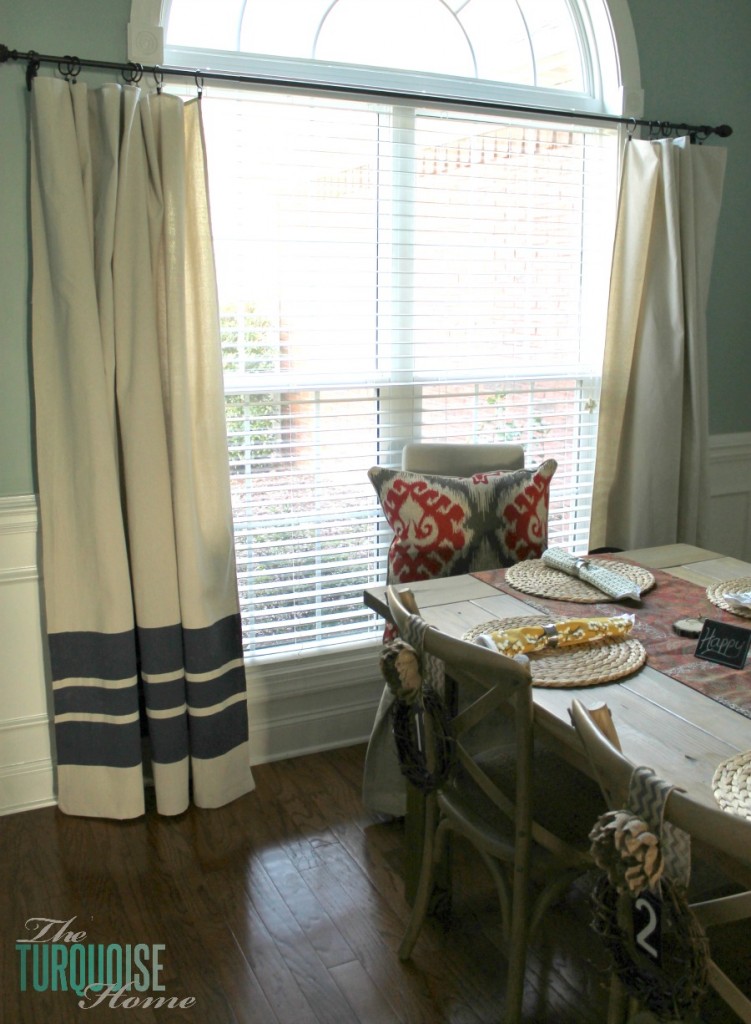
I decided to make fairly wide stripes, although if I did it again, I think I would make thinner stripes. And I just used the width of the painter’s tape to make the line between the stripes. I was lazy and didn’t want to tape down wider spaces between them. 🙂

I think they turned out great! And I’m so glad that this little project only cost me about $25 including the cloths, brush and tape. As I mentioned, I used paint on hand, so it would have been a little more if I had to buy the paint.
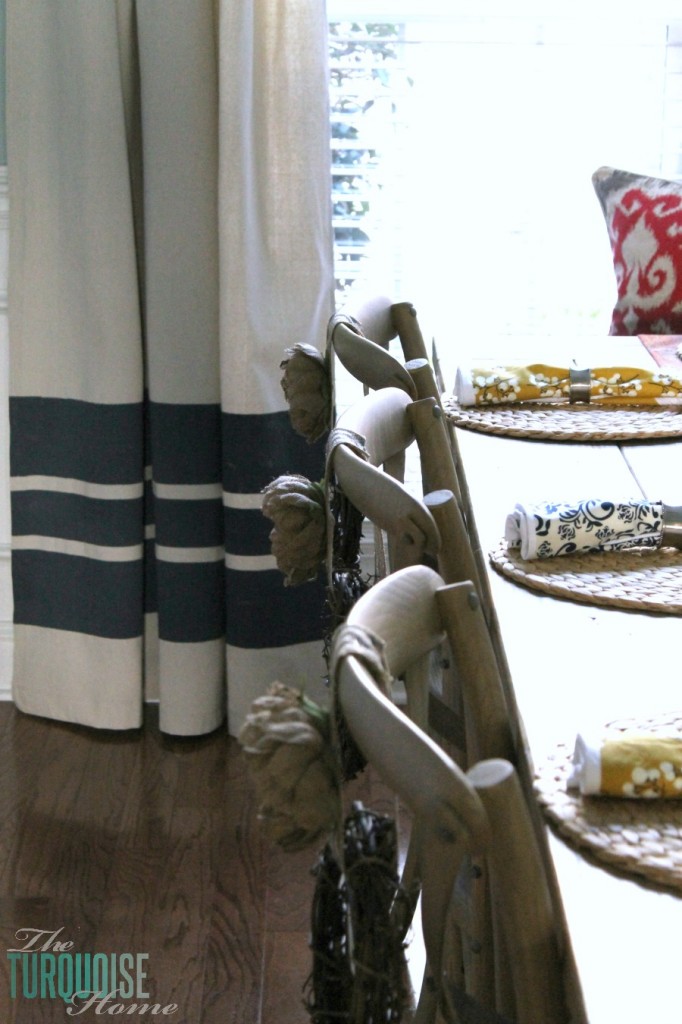

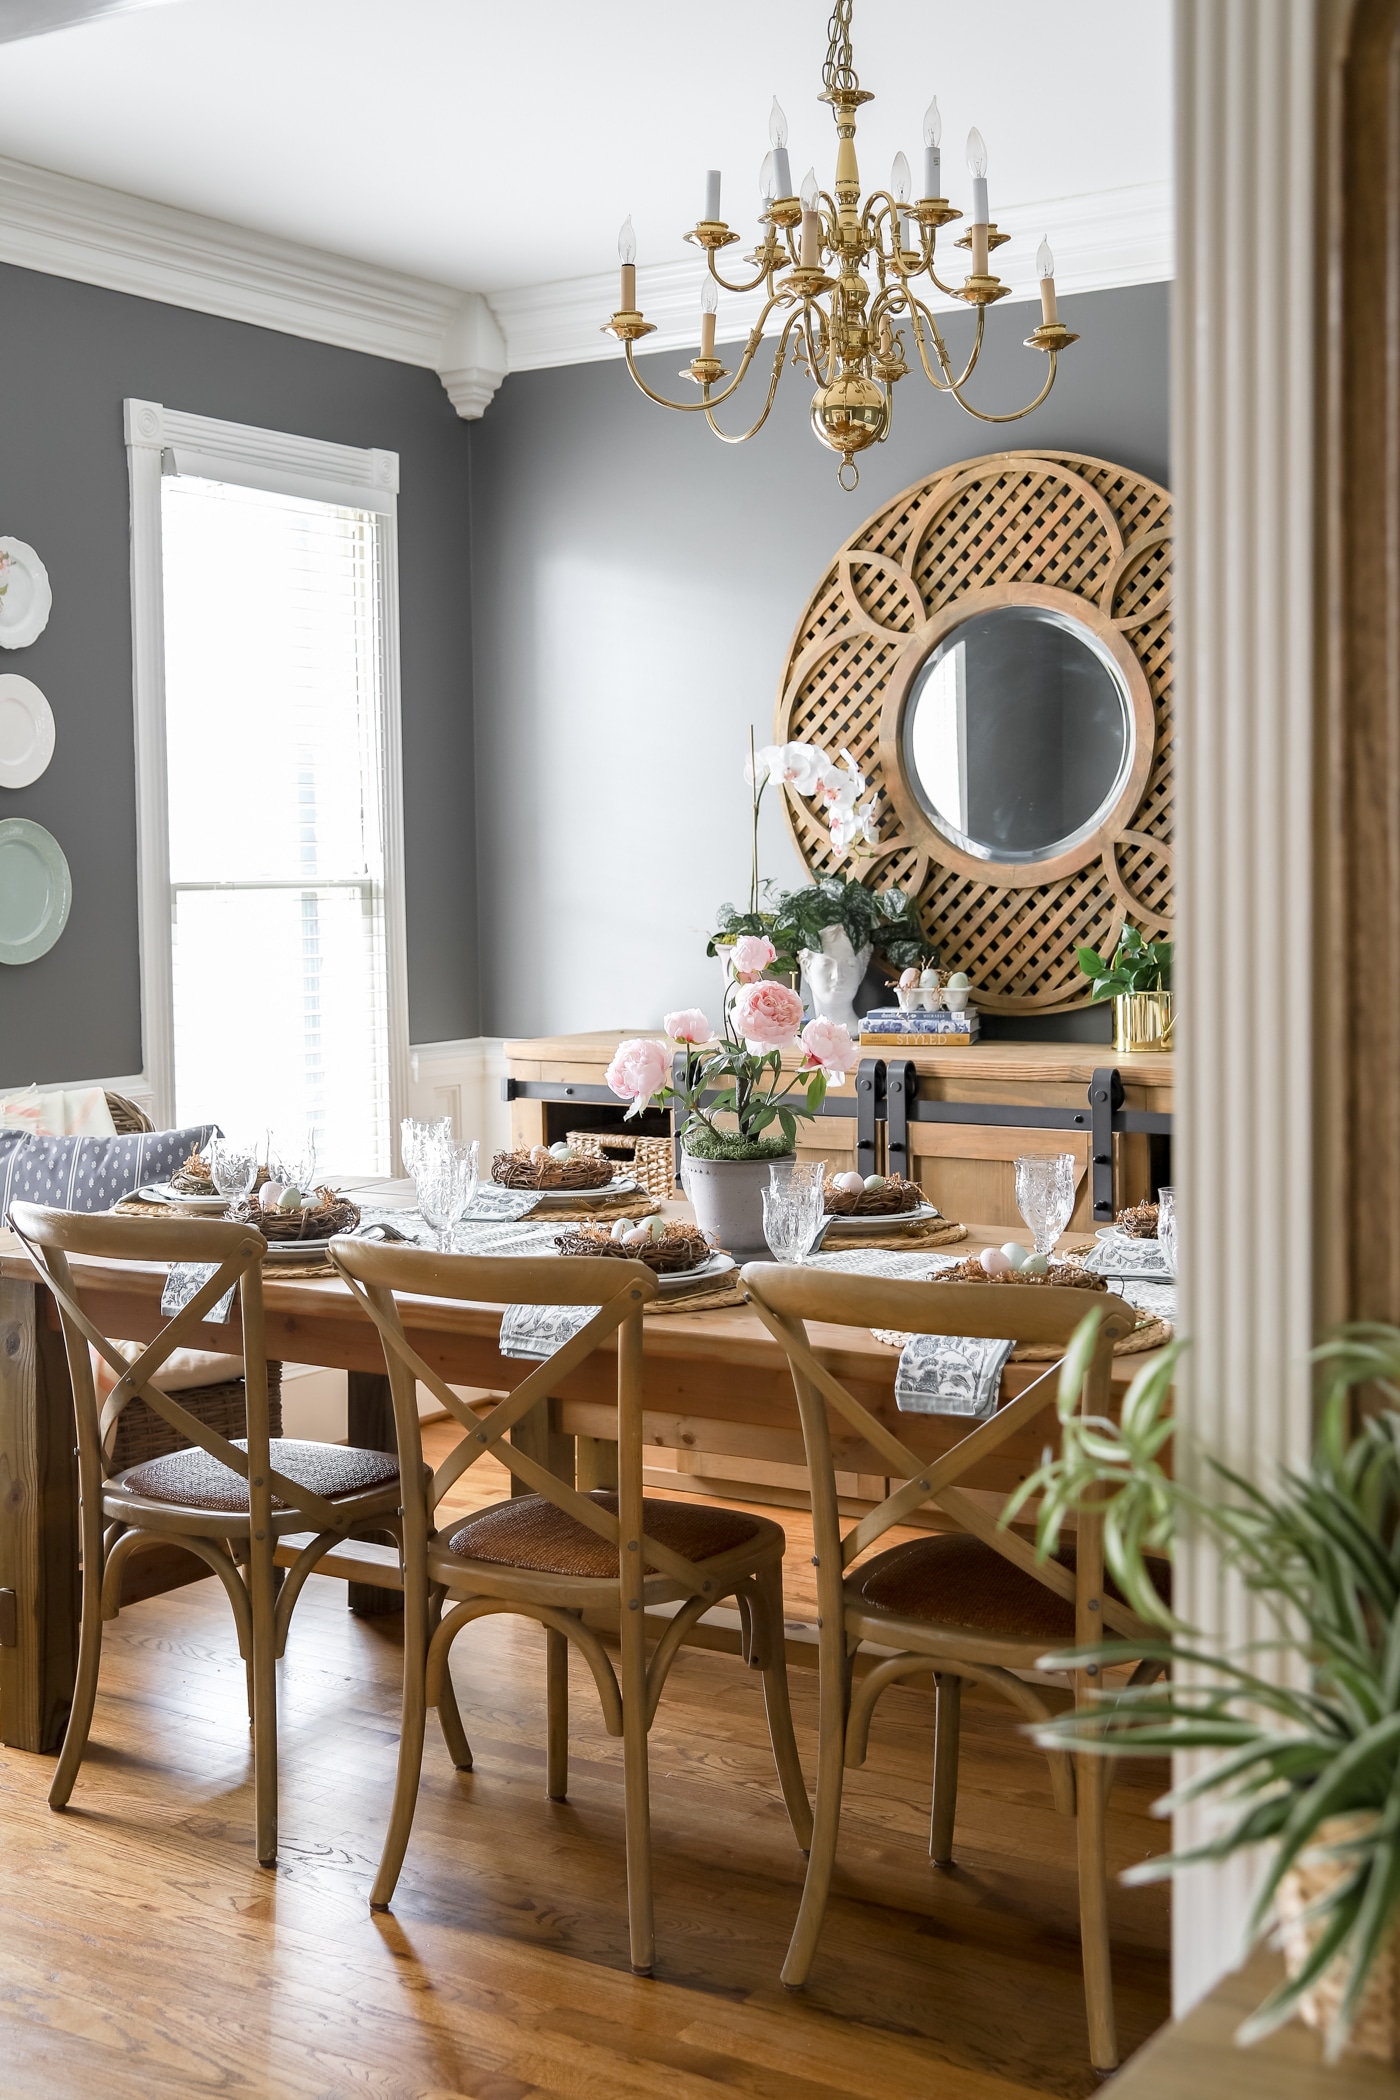
I think these will make the perfect backdrop for all of my seasonal and winter decorations. And I’m sure when the weather gets warm, I’ll be glad to pull out the floral curtains again!
Have you ever made anything with a drop cloth? They are super cheap and versatile, so I know there are so many creative ideas out there.
Funny story: I’m not saying I “recommend” this… but I ordered the woven window shade before we decided to re-case the window. Do you see where this is going? Yup. It was too big. Well, we decided we didn’t have anything to lose since it was custom ordered, and we rolled it up super tight, tied it up (several inches in from the ends), and shortened it with the chop saw. And it worked!
These are beautiful! Just bought a house (read broke) needed curtains and I’ve clme across the drop cloth option. These are the best I’ve seen by far! Question for you – how are they at night? I’m not expecting blackout but is their decent privacy?
Unlocker is a software which is used to delete a file in Windows that can not be remove earlier.
I like your article for information
I have washed and ironed (…and ironed and ironed) my drop cloths already, but have been stumped as to what color to use for the accents. Then I saw your post! Love your stripes and love the color. It looks to me like a dark gray?? Do you know the name of the paint color? Thanks:)
Very Creative idea with the curtains! Love how simple yet bold of a statment they put off. I’m attempting, (just started today using solid black (Valspar flat Acrylic latex and primer in one) to paint a entire backdrop, for photography use, (black for now and im using a regular canvas drop cloth. Just need something to make my subjects pop. I know I can easily just buy a backdrop online and save the hassel but I love DIYs. Do you have suggestions on paint brand or any helpful hints for that matter, so I end up with a nice solid black. Without worring about cracking!….. I’m not too far into the project to switch paints!
thanks 🙂
Hi Holly – if you haven’t done it yet, just add some fabric medium {found in the paint section at the craft store}. It should keep it from cracking!
Found this project as I was searching drop cloth curtains on Pinterest. I love how yours came out. I think the wide stripes are great! Question–how did you hang on the curtain rod?
Thanks so much, Jenn! I used drapery clip rings like THESE. That’s pretty much how I hang most of the curtains in my house. I love them!
I love this!!! I never thought about using drop clothes as curtains, such a great idea. I was wondering where did u get the red and gray pillow from?
Just wanted to let you know I was featuring these in my drop cloth curtain post. I left mine plain (at least for now) and wanted to show off some of my faves that were painted!
Stacy
Aww, thanks so much for the feature!
Hey It’s Deonna from the Child at Heart blog. I am going to use your tutorial this weekend. I have a huge window seat and it needs curtains since all of the blinds came crashing down last week. 🙂 I’ll share pics!!
Hi there – LOVE, love your Blog and your very creative ideas.
I would like to do drop cloth curtains in my diningroom and I have some questions :
1. Did you have to hem for the rod ?
2. Do you happen to know if there is one type of drop cloth that is better than another ?
any thanks.
Hi Sandy, thank you so much!! 🙂 I didn’t hem the top for the rod since I was just using clips. And I didn’t care if it was just them hemmed edge it came with. And I have no idea about the different qualities of drop cloths. I just grabbed the first ones I saw at the hardware store!
Fabulous styling for so little money! I use drop cloths for upholstering, drapes, placemats, runners and just about anything else I make these days. It’s so much unbleached cotton for such a small price.
Awesome idea!
I have a burlap curtain hung in our son’s nursery and have plans to paint it, someday…maybe! Thanks so much for sharing your tutorial! Beautiful dining room by the way!
You did an awesome job with the curtains. They really look like you purchased them from a retail store.
Aww, thanks so much, ChiChi!
Hi!
Just found this tutorial and your blog, I love it! Drop cloth curtains are such a great Idea! Also look forward to seeing your Rustic Glam x-mas tree!
These came out great! I’ve made some drop cloth curtains but I love the black stripes that you added! 🙂
Those looks great! I’ve always been hesitant to try the drop cloth curtains because we have cream carpet. I thought the cream on cream wouldn’t be good…but I love yours. You might have convinced me to give it a shot! Coming over from TT&J.
Oh, I think they would look great with cream carpet, especially if you add something to the bottom like I did. It’ll break it up nicely!!
I think would look awesome even with cream carpet … especially if you did a stripe! Maybe even stripes all the way up??
These look so awesome!! Your lines look totally perfect, I have yet to do this, but I need to! I love them!
These are so beautiful, and they look stunning in the room! I never would have guessed that they started out as drop cloths. Thanks so much for sharing, Laura!
~Abby =)
Thanks Abby!
Yup, these are great Lauren! I love drop cloth anything in general but these curtains with the navy paint – beautiful!
Love these. Great job!
Can certainly understand why you had so many comments on your awesome curtain panels. What size drop clothes did you use? Love the navy stripes. I think if you used little vinegar in wash with cold water you might be able to wash them. Or when I want to refresh something I use a dryer sheet and pop the item in dryer for just a few minutes. I do that with my mattress pad every week.
I thought about having long panels, flipping over the excess for a valance ,maybe put some trim on bottom of valances. I’d maybe sew rod pocket so I could use it or the clips depending on what wild urge I had at time. I tend to change things when I get bored with something.
My problem is I have too many ideas (most of which I find online), have trouble deciding which one to use. I want some new bedroom curtains for winter so will need to buff up the panels with something on back of them to keep out the cold.
Great post and project, really got me thinking. Happy weekend.
Hi JaneEllen, I think I used the 9×6 foot drop cloths. They were plenty big for what I needed them for. I’ve seen where someone flopped the extra fabric over the top for a valance and it looked great. Let me know if you do some!
How pretty! I like the fat stripes myself, they make a nice statement. Your Christmas stuff will look great with them!
This is great! I love how simple it is. Thanks for the tip on using something to press down the tape, I always get seeping paint! I have to ask, where did you find the yellow and white ikat pillows? Or is it fabric? Your home is beautiful!
I found you on the Love Grows Wild Link Party. 🙂
Those yellow and white ikat pillows are some some salvage store in Nashville … so I have no idea where to find more! Wish I could be more help! 🙂 Thanks for stopping by!!
Your drapes look lovely. I love how you will change them for the different seasons. I am doing some for my porch and I am not even painting them – I love them.
Patty at Home and Lifestyle Design
The curtains look great! I love the way you styled your dining room!
I love these curtains; the stripes add that something extra special.
I just have to say….so many times when I see something I LOVE out on a linky party and click on it, it leads me to theturquoisehome.com I love your site and this is a great post! I just did one on Roman Shades, this would be really nice to try though, probably a lot quicker! Thanks again for the inspiration Laura!!
Aww, you are so sweet. Thanks for coming by and leaving a comment, Heidi!!
Love these and adding the stripes is perfect. They look so pretty in your dining room. I love your table and chairs, one of my favorites. Thanks tons for linking to Inspire Me. Hugs, Marty
Love, love your curtains! I am in the process of making new ones for my porch and I think you just gave me some great inspiration. 🙂 I would love if you stop by and link up this wonderful post to my party which is live now! Hope to see you there! Hugs, Maria
Love these! thanks for the great idea…I’ve been putting off painting my drop cloth curtains b/c I was planning on painting stripes all the way up….just seemed like SO much work, and where would I spread out, etc. I can do this! love the punch of color at one end!! Totally pinning 🙂
Oh! You can so do it!! I believe in you, girl!!
Love love love those wide stripes!! I’ve been contemplating drop cloth curtains in my dining area… would be much cheaper than the ones I found in a catalog that shall remain nameless but rhymes with Mallard. Ha!
On another note… where did you find your dining furniture? It’s gorg!
Ummm, for sure … much cheaper!! 🙂 That’s always the way I tend to go – cheap!
Thanks so much about the furniture! I made the farmhouse table … and the post is listed on my sidebar over there —>>> The x-back chairs came from Overstock.com. LOVE them! And the end chairs came from a little store called PD’s in downtown Franklin, Tennessee. A mish mash of furniture, if you will. 🙂
I made drop cloth curtains for my bedroom, but didn’t add any embellishment to them. I really like the stripes and just may do that for our keeping room- thanks for the inspiration! 🙂
They look lovely! I have painted curtains before and it was not my favorite project, but yours turned out great. Using the dish scraper tool is a great tip. I love the way the whole look of the room changes with new curtains and pillows!
Laura, You are a girl after my own heart with the drop cloth curtains!!! I use drop clothes for everything….headboard, valances, bed skirt, pillows… The blue accent that you added at the bottom of your curtain is perfect. I would love it if you linked up your drop cloth curtains project to the Link It or Lump It Link Party!
Ooohhh, I’ve just started using drop cloths, but my wheels are spinning. Love these cheap solutions!
So simple and effective – looking great 😀
I love the painted curtains, very pretty!
Your curtains look fabulous, Laura! I love the idea of having different curtains for summer and winter. I would love it if you’d link this up to my Frugal Crafty Home Blog Hop–we love to see easy DIY projects like this. Thanks & have a great night!
These turned out gorgeous! I love how you used that PC scraper to help with the tape lines. That is such a handy tool. I love your table decorations as well.
Thanks so much, Megan!
These look really great. I have been wanting to paint some striped drapes, I need to just do it. Thanks for the inspiration!
Hi, again!
I wanted you to know that I linked this awesome tutorial in my post today about fall updates to my living room.
I loved your idea so much, I had to share. Hope that’s okay? It’s linked back to this post.
Let me know what you think.
Take care,
Dana
Absolutely, Dana! always feel free to link back to my posts. 🙂 So glad you enjoyed this!
These are so deliciously gorgeous!! I love how easily drop cloths are turned into things of beauty!
I am planning on making a set of DIY curtains from drop clothes but I am going to use mine outside. I hope they can stand up to the sun. I like how you added the stripes to the bottom. I may have to borrow that idea! Thanks.
Borrow away, Rhonda! I’d love to know how they hold up outside. I think they will probably do great!
Love this! So warm and cozy for the fall and winter seasons… I love the texture of drop cloths. I’m considering covering up an old bulletin board soon to give it an update, and also recovering an old chair with some!
I think I’m going to start using them all over the house, too! Really love the fabric!
They turned out great! And I love the wide stripes!! You have tall ceilings… they needed to be hefty. Fabulous, dahling!!
Thanks, friend! 🙂
Love them! : ) So creative!
Thank you. 🙂
The stripes are just what the curtains needed. You made the whole process seem so simple. I hem fabric panels all the time — I can sew a hem, not make any type of clothing. I have white panels in my living room and need to ground them, too. I can’t decide what I want yet, but your idea is worth considering. I like everything you did!
Love Love Love, Miss Laura!! May I ask what kind of paint you used on them?? And do you think you can wash them and the paint will stay in place?? I am sooooo preparing to copy these hardcore!! 😉
Hey girl! I used semi-gloss paint I had on hand. I was planning on adding fabric medium, but couldn’t find my bottle of it when I went to paint the curtains, so I left it out. I’d recommend using fabric medium, though, because then it wouldn’t be quite as stiff and I think it would wash better. I don’t plan on washing these, so I’m not sure how they’ll do. But I used acrylic craft paint and fabric medium on my other painted curtains and I CAN wash them. Hope this helps!! 🙂
I am panning on making drop cloth curtains for my house. I have not been able to find anywhere how the medium and acrylic craft paint should be mixed, do you know? or how did you do it that it seemed to work?
You can just stir them together in a bowl with a spoon … at least that’s what I did. 🙂
They look great! And I really like the wide stripes. Pinned this and hopefully will be duplicating soon. Kim