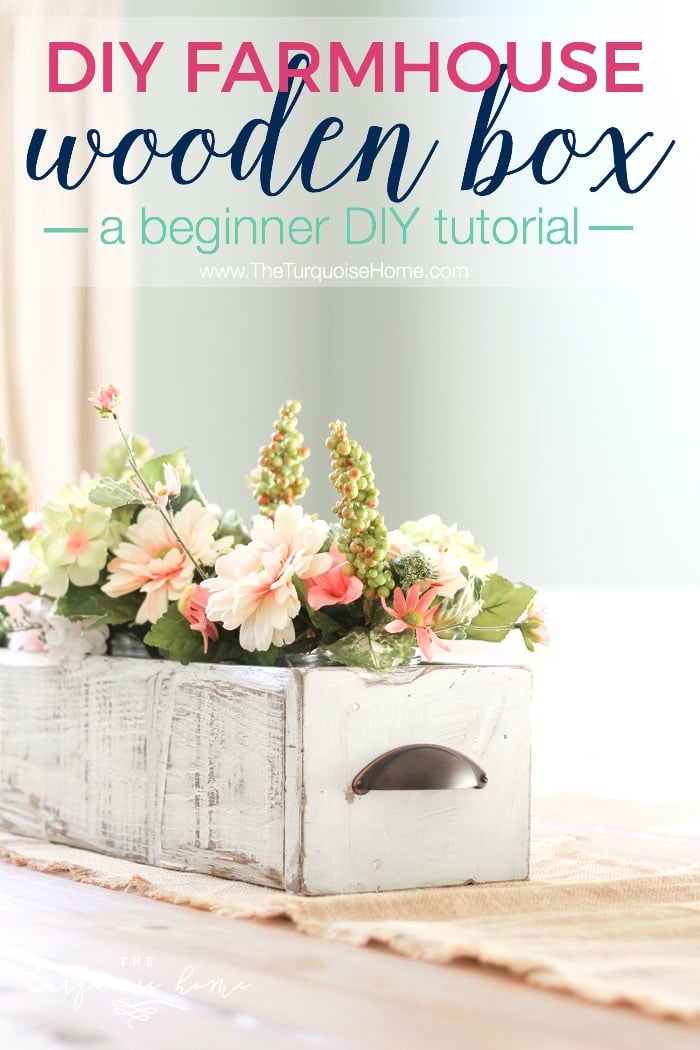
DIY Wooden Box Centerpiece
Build your own DIY Wooden Box. Simple and easy step-by-step instructions to build your own. Perfect for a table centerpiece or use in your home decor.
Yay! It’s another one of my most favorite projects made with my favorite tool in my toolbox: the Kreg Jig.
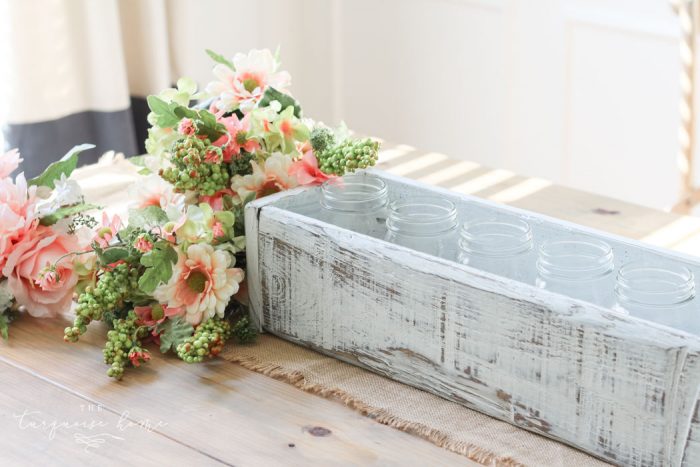
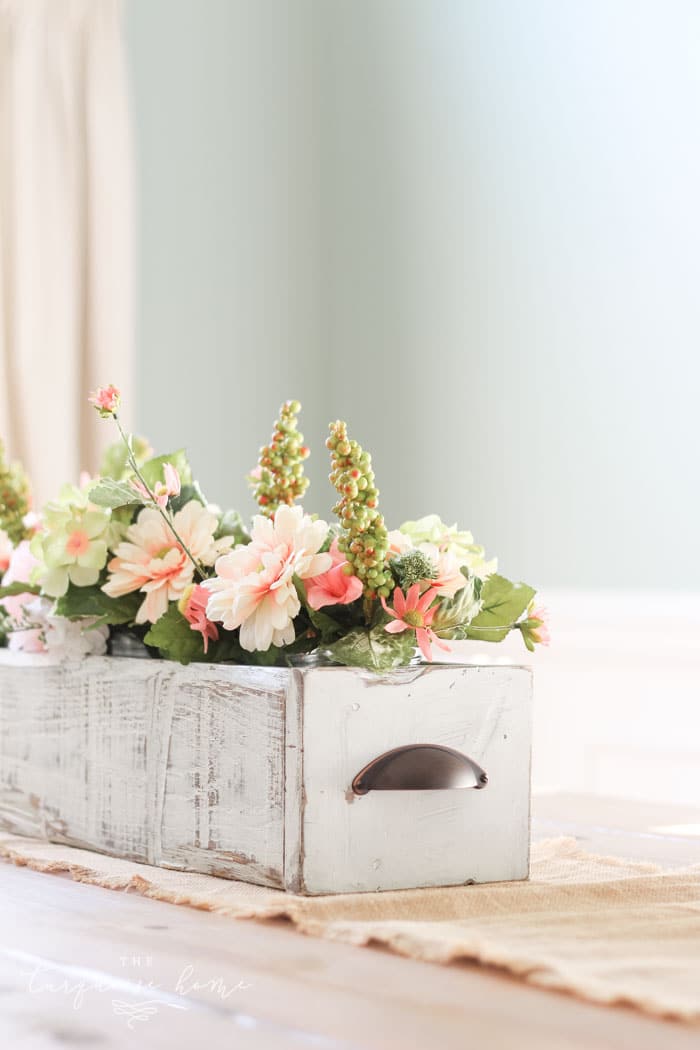
This DIY Wooden Box Centerpiece was made with scrap wood, a few screws and some paint. Super simple and voila – a cute centerpiece for your table, mantel or wherever you want to put it!
I’m so in love with how mine turned out! The rustic elements and the fact that it cost me almost no money out-of-pocket to build it just makes me smile.
I made my box to go on my dining room table, which is a large table. You’ll want to get a good idea of where you want to put yours and then decide the dimensions.
And also think about what you want to put inside. If you want to put mason jars in it, then you’ll want to make it large enough for that. So, definitely think this through before starting your project.
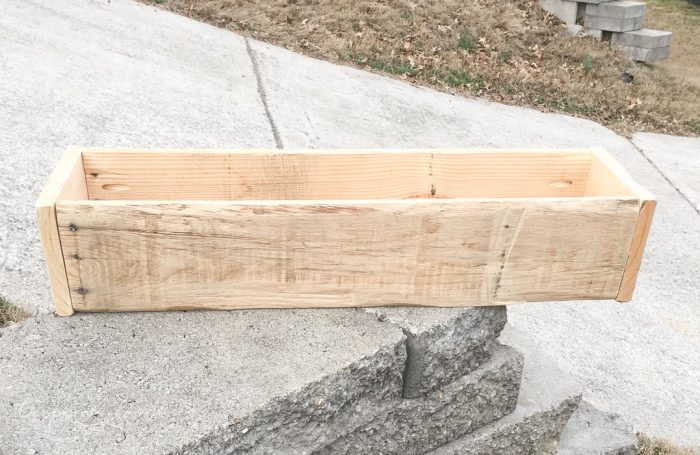
Here are the dimensions of the box I made: 27.5 inches long, 7 inches wide and 5.5 inches tall. I used 1×6 boards, so you’ll need to adjust your boards according to what you want to make.
Also, it doesn’t have to be exact. I had several scrap 1×6 boards from various projects and just figured out the best way to use them. I had two really pretty rustic boards that I used for the long sides and then I had a very plain board that I used for the bottom, since no one would be looking at it. So, just make it your own. The imperfections add to the charm!
- Tools Needed to Make a DIY Farmhouse Wooden Box
- Steps to Make a DIY Wooden Box Centerpiece
- 1. Decide on the Box Size You Want.
- 2. Cut Your Wood Pieces.
- 3. Use the Kreg Jig to drill pocket holes on the underneath side of the pieces that will be the bottom of your box.
- 4. Then you’ll use your Kreg Jig to drill 2 holes on the short, inside ends of the side pieces.
- RELATED: 10 Amazing Kreg Jig Projects
- 5. Attach the Bottom Piece to the Side Pieces.
- 6. Screw the End Pieces on to the Sides and the Bottom.
- 7. Finish the Box with Stain or Paint or Both!
- 8. Add Handles or Pulls.
Tools Needed to Make a DIY Farmhouse Wooden Box
- Wood pieces. If you want to build a box just like mine (and don’t want to have to figure out your own measurements 😜) then you’ll need a 1x6x8 piece of wood cut down to these measurements:
- 3 boards at 26 inches long for the sides and the bottom
- 2 boards at 7 inches long for the end pieces NOTE: I would wait until you’ve assembled the bottom and sides before you cut your end pieces, that way you can measure them exactly to fit your box.
- Kreg Jig – the most valuable tool in my toolbox. It’s a pocket hole system and it makes joining pieces of wood easy as pie! I love it!! Find 10 amazing ways to use your Kreg Jig HERE.
- Kreg Pocket Hole Screws – Since I was joining wood that was 3/4 inch thick, I used the 1 1/4 inches Kreg Screws. This PDF will tell you the correct screw size you will need based on the wood you’re using.
- Screw driver
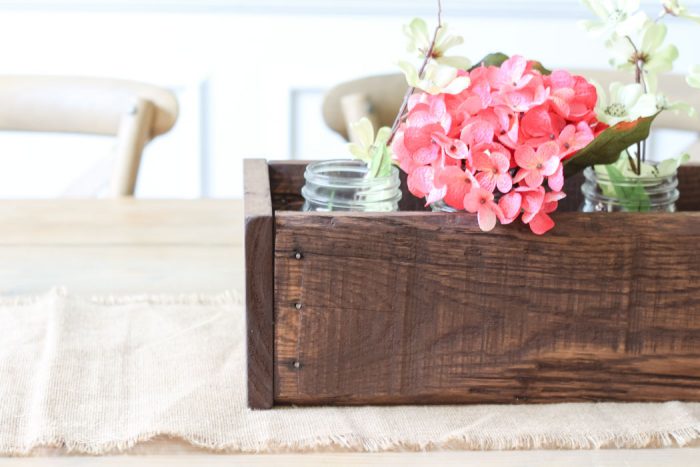
- Stain – I used Dark Walnut by Minwax
- Paint – I used Amy Howard’s One Step Paint in Bauhaus Buff
- Clear Wax
- Paint brush
- Wax brush or lint-free cloth
- Handles (2), optional
- Drill bit (if you choose to do handles)
Steps to Make a DIY Wooden Box Centerpiece
1. Decide on the Box Size You Want.
I talked about this in the opening of this post, but you’ll want to decide how large to make your box. Mine is large, because I wanted it to sit on my large dining table. But you can make yours how large or small that you desire.
2. Cut Your Wood Pieces.
I shared in the “Tools Needed” section that I used several scrap 1×6 pieces of wood. This will be basic info for some, but anytime you buy a piece of wood in my neck of the woods, the name of the size of the wood isn’t actually the size of the wood. One inch deep is actually 3/4 inch deep. And 6 inches wide is actually 5.5 inches wide. So, be sure to measure your actual boards and not just go by my measurements exactly. Make adjustments as needed.
3. Use the Kreg Jig to drill pocket holes on the underneath side of the pieces that will be the bottom of your box.
I did 3 holes on each long side and 2 holes on each short side. And I realized this picture is after I’ve already assembled the box, but you’ll want to put these holes in first!
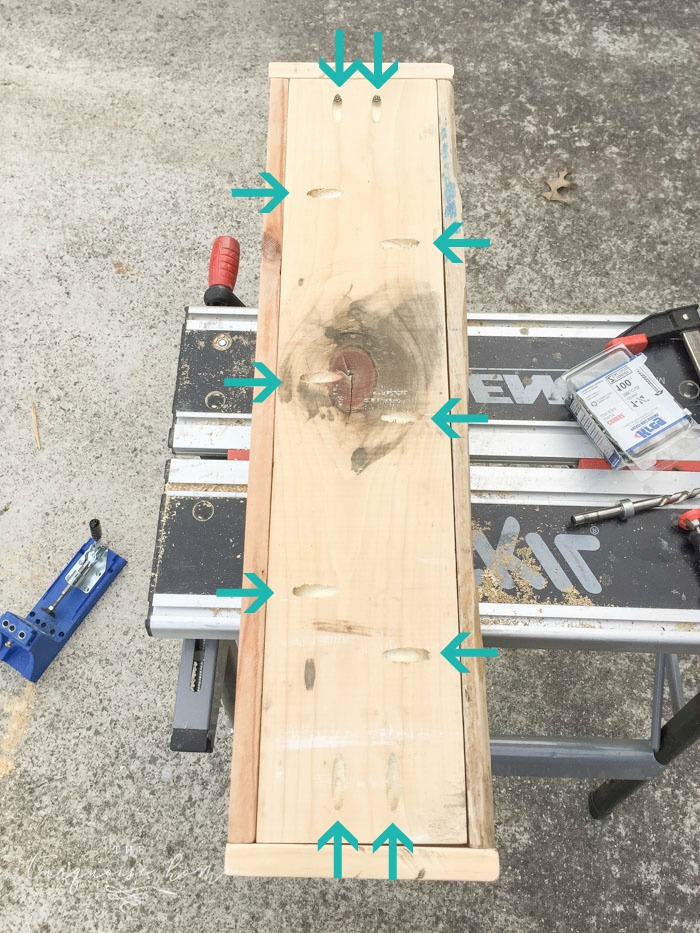
4. Then you’ll use your Kreg Jig to drill 2 holes on the short, inside ends of the side pieces.
And in this picture you’ll see that I didn’t do this step until I attached the side boards to the bottom, but I don’t recommend this. My drill almost couldn’t fit in there, so do this before you put any pieces together! 😉
RELATED: 10 Amazing Kreg Jig Projects

5. Attach the Bottom Piece to the Side Pieces.
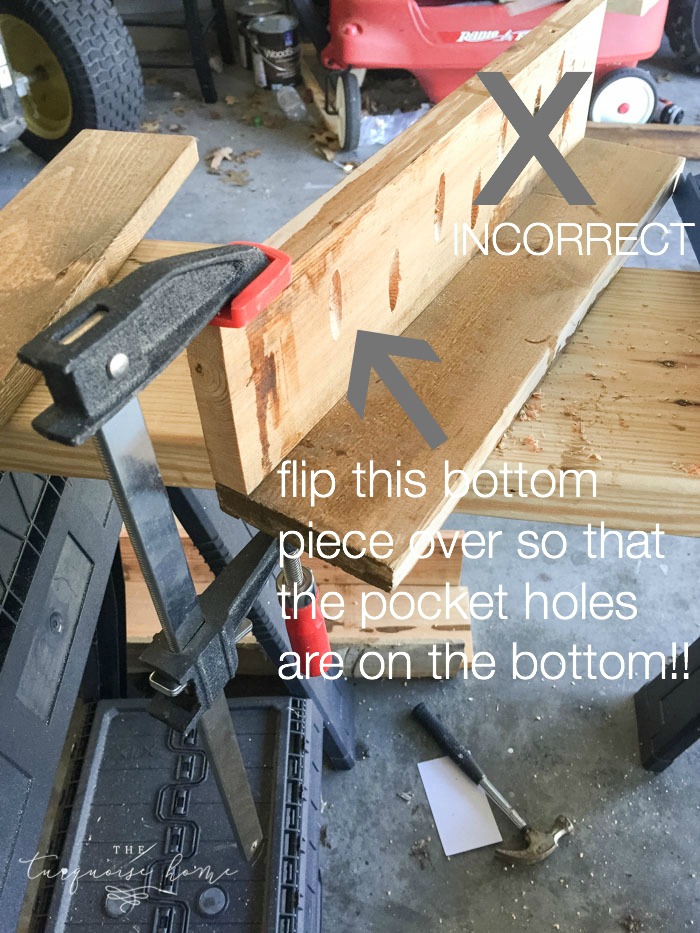
Using a clamp, place one side piece next to the bottom piece and screw them together with the pocket holes and screws on the underneath side of the bottom piece. Make sure everything stays inline and straight while you’re joining them together.
Sorry I don’t have a proper picture of this step! But I have an INCORRECT picture below that might help you out. I had the bottom piece with the pocket holes in it flipped on the wrong side. So you’ll clamp it like this, but flip the bottom piece over so that the pocket holes will be underneath. I forgot to take a picture when I changed it. 😋
6. Screw the End Pieces on to the Sides and the Bottom.
This is the last step for actually making the box. I know this all sounds complicated, but really it’s so easy! If you still haven’t cut your end pieces, then you’ll want to measure the exact size you’ll need and cut them to the right size.
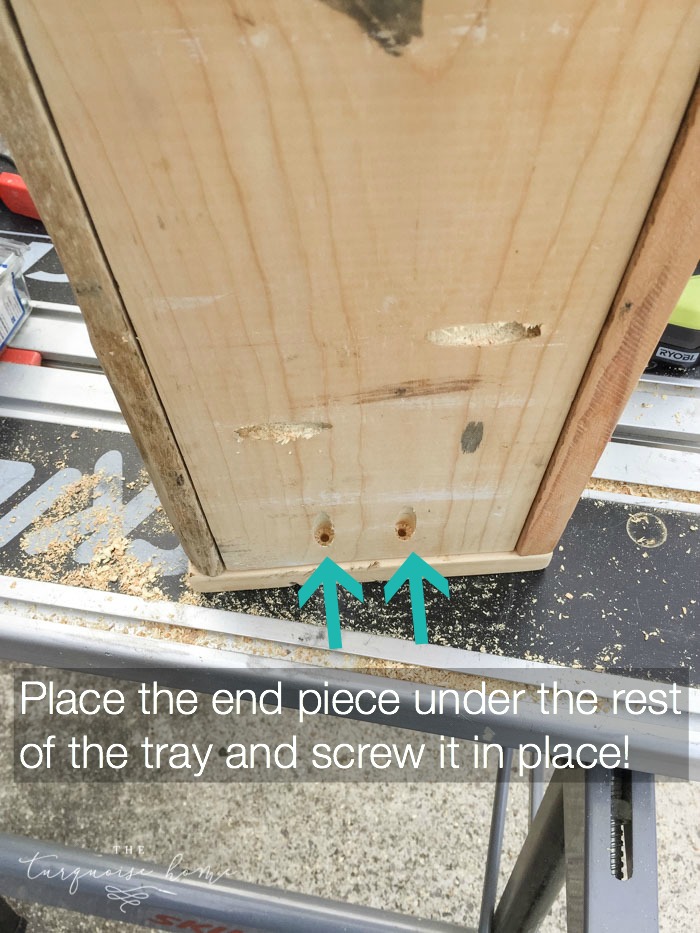
You should have two pocket holes on the bottom piece and two pocket holes on the inside of the side pieces. Just screw those final two end pieces in and you have yourself a box, ladies and gentlemen!
7. Finish the Box with Stain or Paint or Both!
I planned to paint my box in a white chalky-type paint from the beginning and I wanted to distress it, so I needed a dark stain underneath. I had some Minwax dark walnut stain on hand, so I used that! Make sure you wipe down your box before you stain it so that sawdust doesn’t get stuck in the stain.
I used it like this for a couple of weeks before I got around to staining it. I debated about painting it, because I thought the stain looked pretty. But I’m so glad I decided to go ahead with my original plan! I love it!

I used Amy Howard’s One Step Paint in Bauhaus Buff. It’s a thick, chalky paint that dries quickly, but it creates a wonderful finish, which I love!
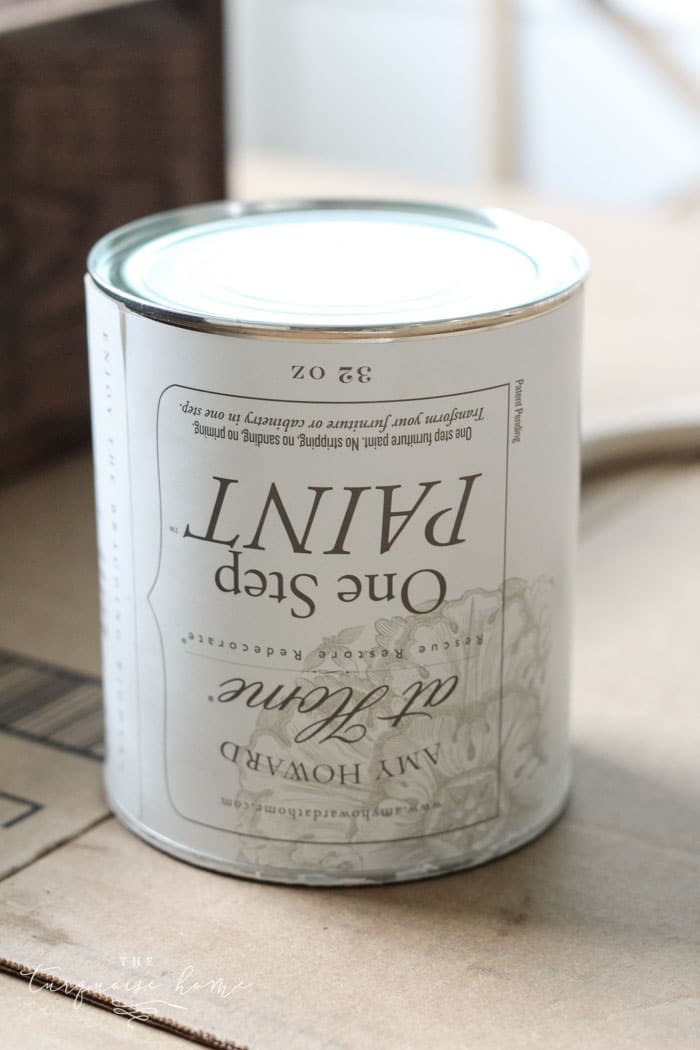
TIP: When using Amy Howard’s One Step Paint, turn it over on it’s top for about 15 minutes before opening it and stirring it up. This paint separates a lot and is hard to get it to combine sometimes. Turning it over makes stirring it up much, much easier.
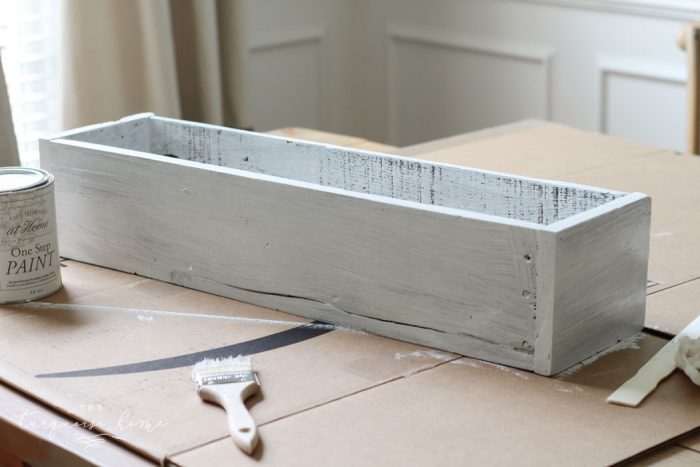
I painted everything except for the bottom of the box with a mostly full coat of paint. The goals was to get it down in the cracks and crevices and just have the raised parts of the wood show through when I sanded it.
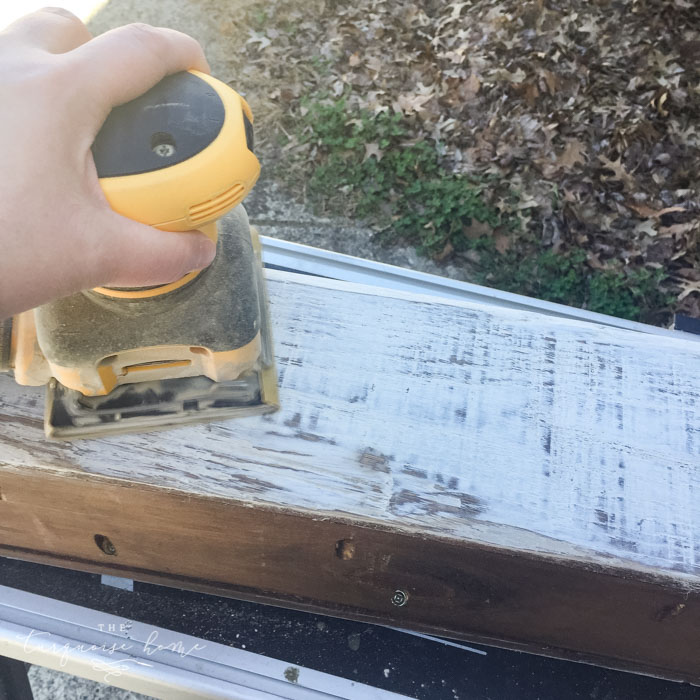
Using my favorite sander, my Dewalt Sheet Sander, and some fin 180 grit sand paper, I knocked the paint off of the raised parts of the wood. I tried not to sand too hard because I didn’t want to take off the stain! The rustic wood gives so much character.
When I finished sanding, I wiped everything off with a damp cloth to get the sawdust off of it.
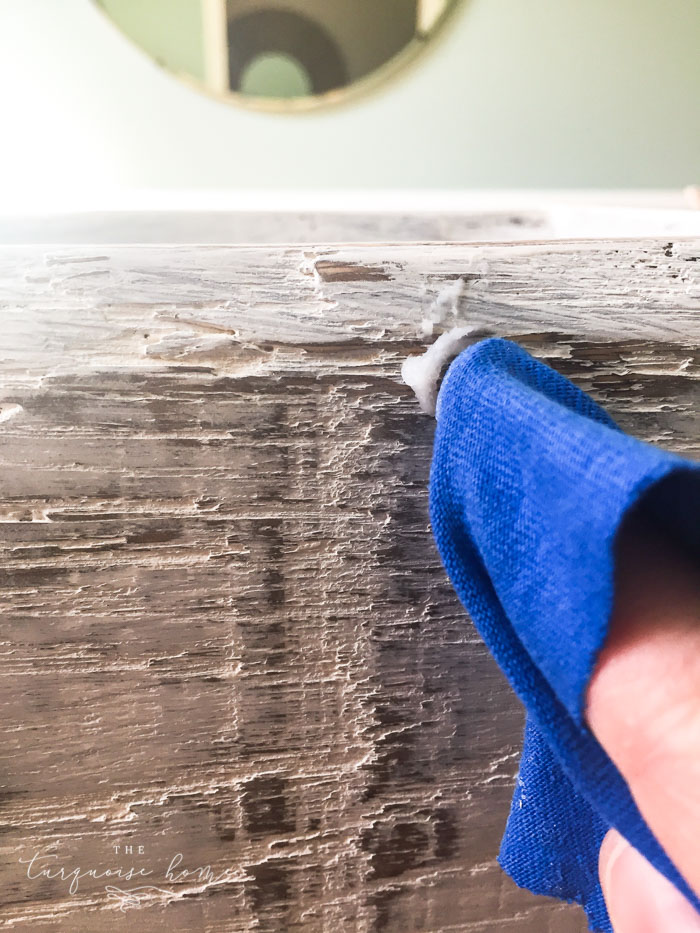
I finished off the box by rubbing some clear finishing wax on it. This seals the paint and the wood leaving a nice, smooth surface.
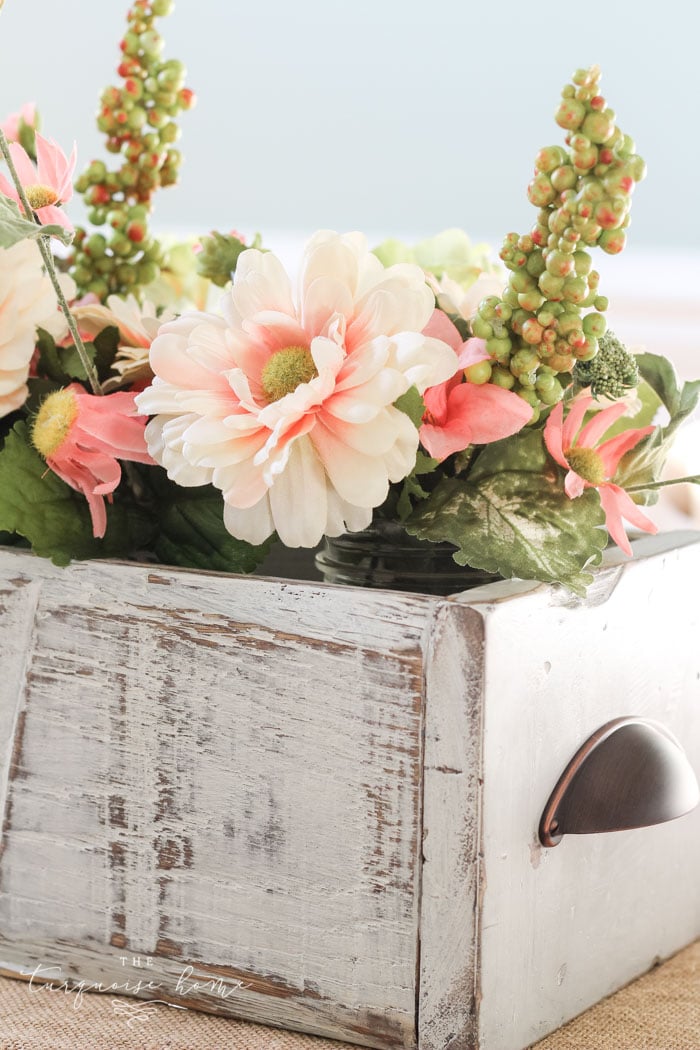
8. Add Handles or Pulls.
This is optional, but it’s not only a functional addition, but cute, too! I grabbed these oil rubbed bronze cup pulls at Lowe’s one day. They were easy to put on. Just find the middle of the box’s end piece and attach them where you want them.
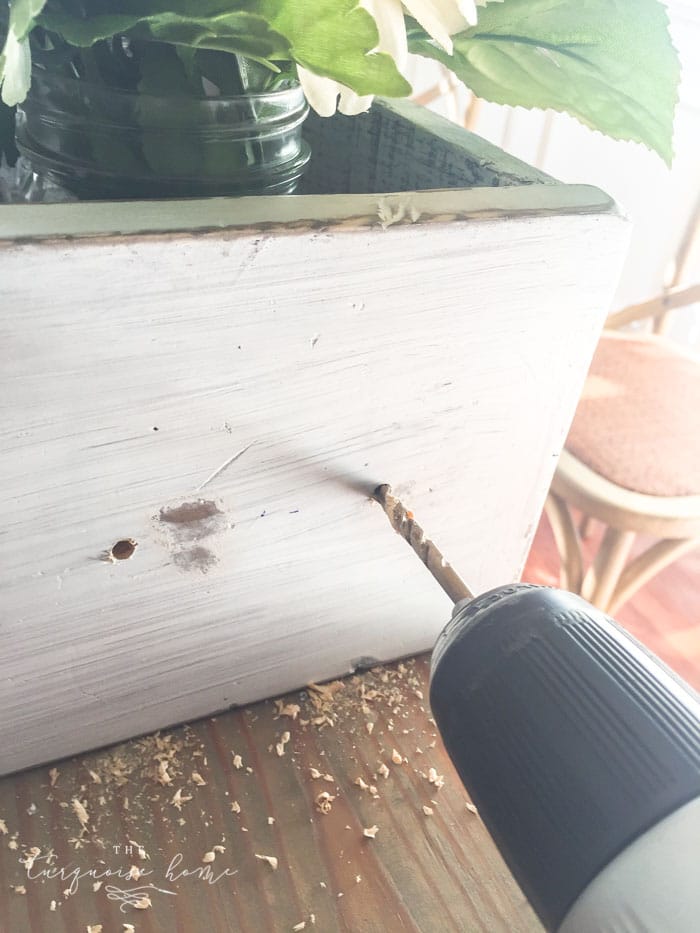
I used a drill bit larger than the handle screws and drilled them in place. Then I attached the pulls using the screws that came with them.
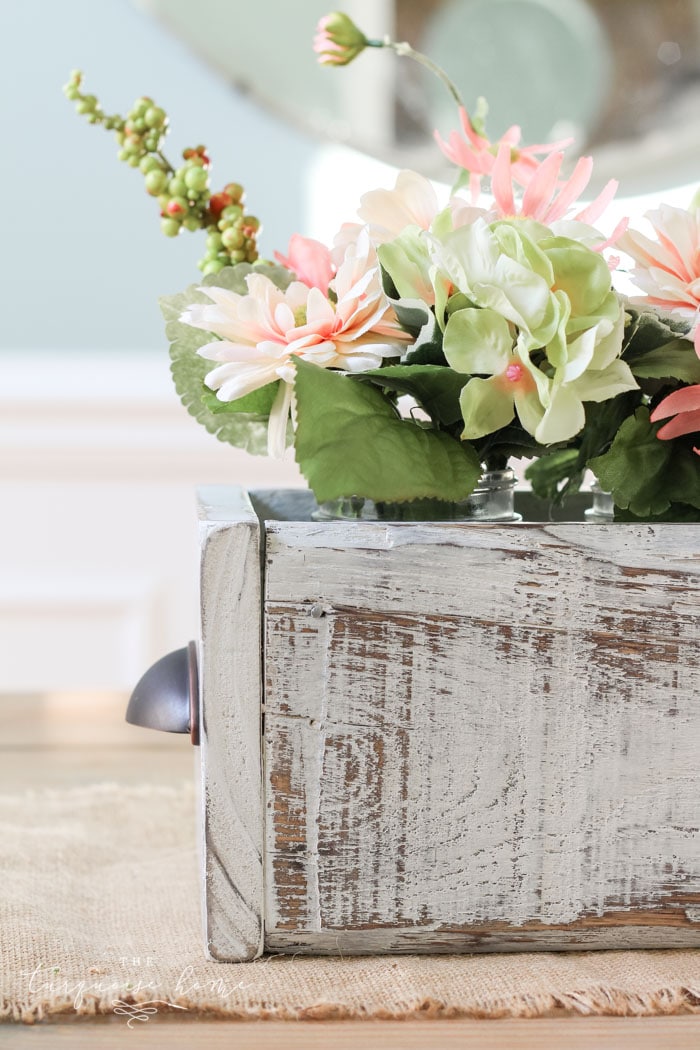
And that’s all! You now have a cute decor piece that you made from a board! Or scraps for your wood pile, like me! Even better. 🙂
It turned out absolutely adorable!
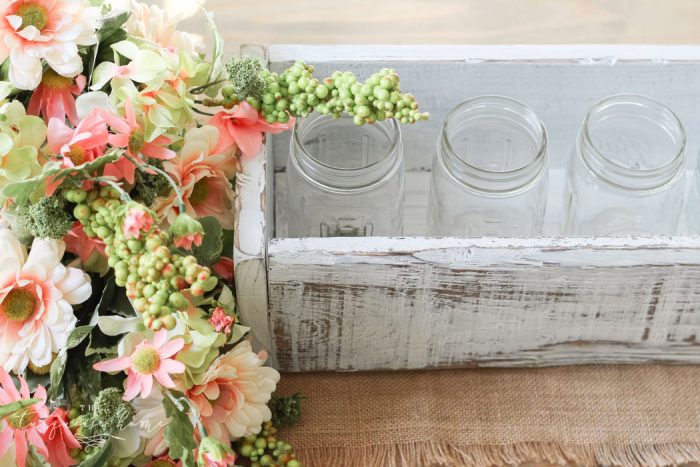
I filled it with mason jars and picked up some faux floral arrangements from Hobby Lobby. Then, I cut them up and arranged them in the mason jars and put it on my DIY farmhouse dining room table. (Get details about the table right HERE!)
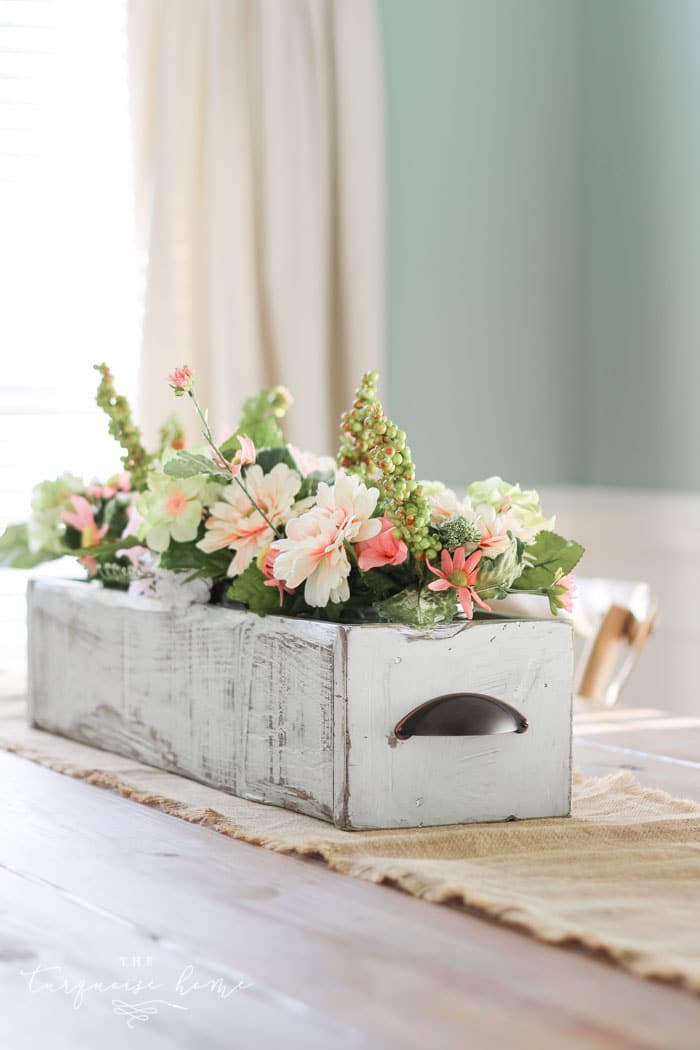
I smile every time I walk by the dining room now… And not just because I cleaned up all of the clutter. 😜
The simple elegance of a rustic box with flowers warms my heart and it perfect for spring. I can’t wait to play with it on the mantel this fall or Christmas!
What do you think? Could you make something like this? Of course you CAN! 😊
It’s seriously one of the easiest projects I’ve ever done and it only used a Kreg Jig, drill and a sander (if you want to do the same finish as me).
More Posts You Will Love

I love the easy step-by-step instructions. One question, when you attached the handles, you said you used a drill bit a little larger than the screws – is that correct? I usually use a drill bit a little smaller than the screws.
Looks neat and simple. Thanks for sharing
ciao!
I love your step by step tutorial, as well as how everything turned out. I would love to have this beautiful center piece sitting on my dinningroom table.
I love this! It’s amazing how you created something so lovely out of just some scraps of wood! I’ve been wanting to have more plants inside and this will be perfect for a few herbs or flowers. I just found your blog and am having a ball going through it!
Awww, thank you for the kind words! It made my day!!
This is so pretty! I love your tutorial! Thanks for linking up with Thursday Favorite Things – look for your feature this week. Bisous, Angelina & Peonies & Orange Blossoms
Lovely tutorial.
Thanks for sharing at the Inspiration Spotlight party. Pinned & sharing.
So lovely ! Mason jars are so versatile, what a great way to use it . A simple project that make a big impact !
Ah! This project is gorgeous. And such a nice detailed tutorial! Pinned and sharing. Thank you for joining us at Family Joy Blog Link-Up Party. I hope you will join our next party starting Sunday at noon EST.
Fresh and pretty. Great tutorials for making this. Love the flowers in the jars. zi can see changing them out. Thanks for sharing at DI&DI.
This was a beautiful project the colors of flowers are wonderful as well!! Being featured on Friday Features this week!
Hope to have you drop by again! Have a great week!
This is gorgeous!!!
but do i have to do the finishing wax???
No, you definitely don’t have to do the wax unless it’s going to be near food or water!
Thanks for sharing at What’d You Do This Weekend? This is so fresh and pretty.
Linda
So beautiful! The colors are so pretty, too! Love that you used mason jars to hold the flowers! 🙂
This is so pretty! And I’m amazed you made it yourself!
So simple and so pretty! Love it!
This is so pretty! I’ve wanted a box like this forever, pinned!
Oh it looks lovely and I adore the flowers. Thanks for linking up and sharing with us at #OvertheMoon link Party. I’ve pinned and shared.
Very nice project! I love how you can change out the flowers for each season or for the holidays! Well done! Blessings, Janet
great job and love the light color. thanks for sharing on craft schooling Sunday!
I love it! I love beautiful spring florals on the table. It just brightens up a room!
This turned out awesome. I’ve been wanting to make one of these forever. I just need to get on the ball and get it done. I may even host a craft day so others can join in the fun too. Love it!
You should so do it! I say that about nearly every project on my list – I wish I’d done it sooner! 🙂
It’s the perfect size! I can see how that will be so much fun to play with. Thanks for the tips. I’m showing this to the Mister today! Hope you have a wonderful Wednesday.
I know!! I can’t wait to play with it more for each and every season! 🙂
It’s beautiful. I love the suggestion of using the Mason jars to fill it, making it easy to change out the filler. The handles on the side are terrific, too! Very creative and lovely.
Beautiful! It makes me smile, too! I love coral! Great detailed instructions.
Thank you, Sherry!