How to Build a Custom Frame for Your Frame TV (High-End Look on a Budget)
Learn how to build a custom Frame TV frame that makes your TV look like real art. This step-by-step DIY adds a high-end, designer touch on a budget.
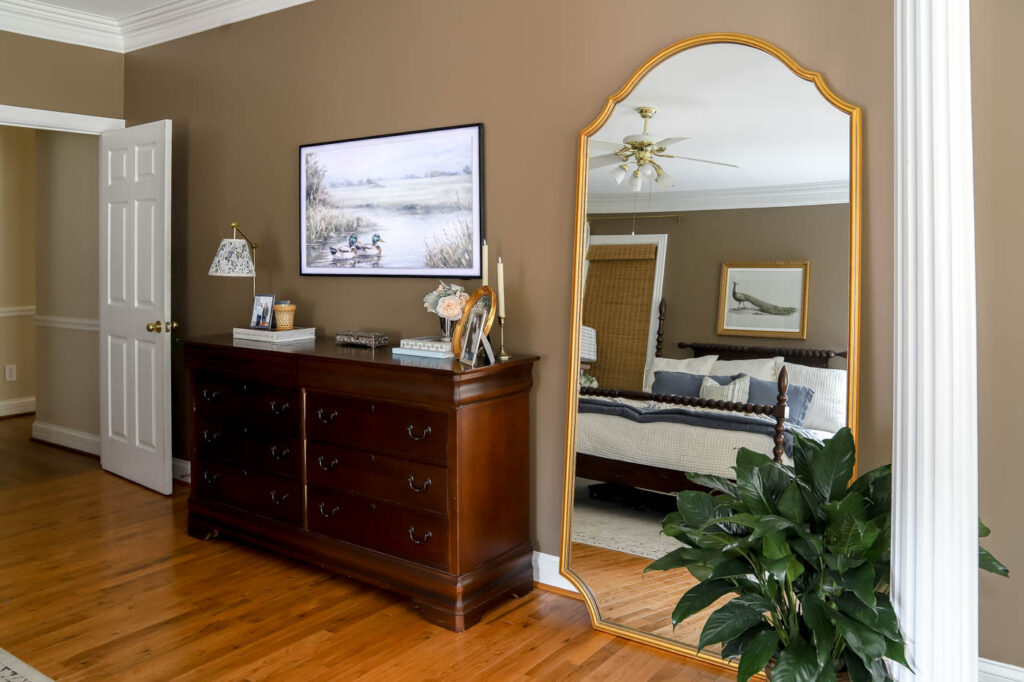
We have this huge wall opposite our bed in the primary bedroom. I’ve been slowly finishing the space, and still have a ways to go. We’ve loved having this Frame TV in here since it looks like art, but we can watch TV from the bed. But even with the TV mounted, something about the wall still felt unfinished.
I knew I wanted to add a frame around the TV since I had already created a much simpler DIY version in our living room. But for this room, I wanted this one to look like a high-end Frame TV frame. I wanted something a little more elevated and decorative. I wanted this custom Frame TV frame to feel high-end, cozy, collected, and just a little glam-meets-traditional to match the rest of our bedroom.
If you’ve spent any time looking at Frame TVs online, then you’ve probably seen the gorgeous ornate frames that make the TV look like it belongs in an art gallery. And honestly? I absolutely love the look of oversized gold-framed artwork (just look at Mr. Peacock above our bed ☺️), but I didn’t love the $500+ price tags that came with those designer frames.
I just couldn’t justify spending that much on a TV frame.
So instead, I figured out how to build a custom DIY Frame TV frame myself for much less… closer to $120! If you already have a few basic tools on hand, this project is honestly a no-brainer and makes such a huge impact in the room.
Let me show you exactly how I built this high-end Frame TV frame on a budget!
Want to Save This?
Enter your email below and I’ll send it directly to your inbox!
This post contains affiliate links for your convenience. See my full disclosure policy.
What to Expect
This custom Frame TV frame is a beginner-to-intermediate DIY project that can absolutely be tackled over a weekend with a few basic tools and a little patience. Depending on what supplies you already have on hand, the total cost will likely fall somewhere around $100–150, which is a whole lot better than spending $500+ on a pre-made decorative frame!
And don’t let the ornate look fool you. While this frame looks high-end and custom, the process itself is actually pretty simple once you break it down step-by-step. I’ll walk you through the entire project so it feels approachable and doable, even if you’re newer to DIY projects.
If you’re looking for a simpler, more beginner-friendly version, be sure to check out my original DIY Frame TV tutorial here.
But truly, this one small upgrade completely transformed the feel of our bedroom. The TV finally feels like an intentional part of the space instead of just a big black box hanging on the wall. It really does look like a framed piece of art now, and that cozy, collected feel was exactly what I was hoping for.
Supplies Needed for a Custom Frame TV Frame:
Here’s everything I used to build this custom Frame TV frame. The supplies are actually pretty simple, and most of the magic comes from layering the decorative trim onto a basic wood frame structure.
Lumber and Trim:
- 4 – 1 x 2 x 8 boards
- These create the outer frame and internal structure that attaches around the TV.
- 2 – 1-1/16-in x 3-1/2-in x 8-ft casing boards
- This is the decorative front trim that gives the frame that high-end, ornate look.
Building Supplies:
- Wood adhesive
- Wood filler
- 1½-inch brad nails
- 2-inch brad nails
Finishing Supplies:
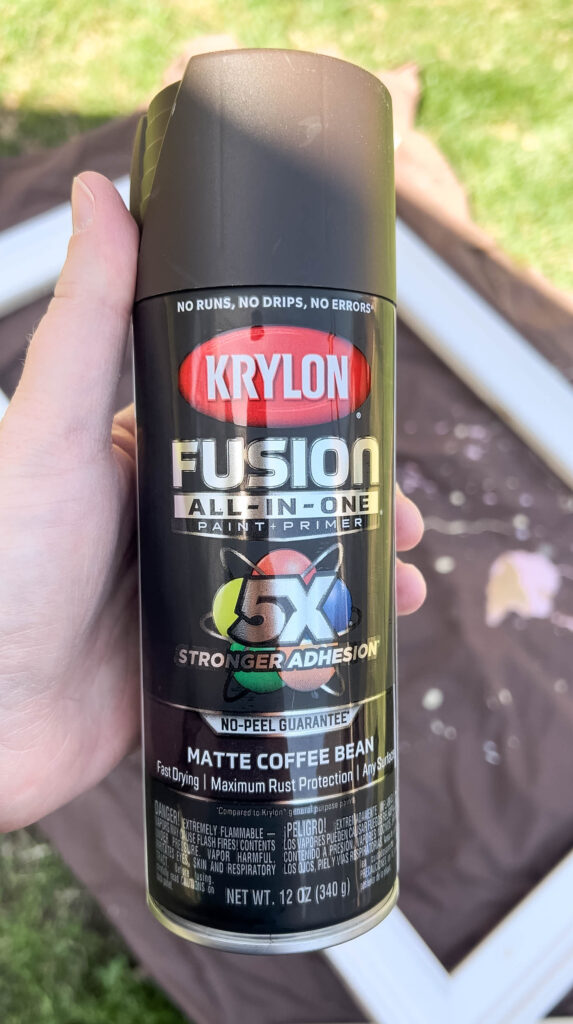
- Matte spray paint in a dark color
- I used a deep matte finish as the base coat to give the frame more depth and richness underneath the metallic finish. I chose this one.
- Rub n Buff Metallic Paint in your preferred color
- I used Grecian Gold, which gave the frame that warm, vintage gold look without feeling too shiny or overly glam.
Tools Needed:
You’ll need a few basic power tools for this custom Frame TV frame project. The cuts are simple, but having the right tools will make the whole process much smoother.
- Miter saw
- Circular saw
- Brad nailer
- Clamps
- Corner clamps (recommended, but not required)
This version is a bit more detailed than my original simple Frame TV frame, but don’t worry! I’ll walk you through every step so you know exactly what to do.
I highly recommend reading through the full tutorial before purchasing supplies or beginning the project. That way, you’ll understand how the frame comes together and can make sure this method will work for your specific TV, wall setup and skill level.
Step-by-Step Tutorial for a Decorative Frame TV Frame
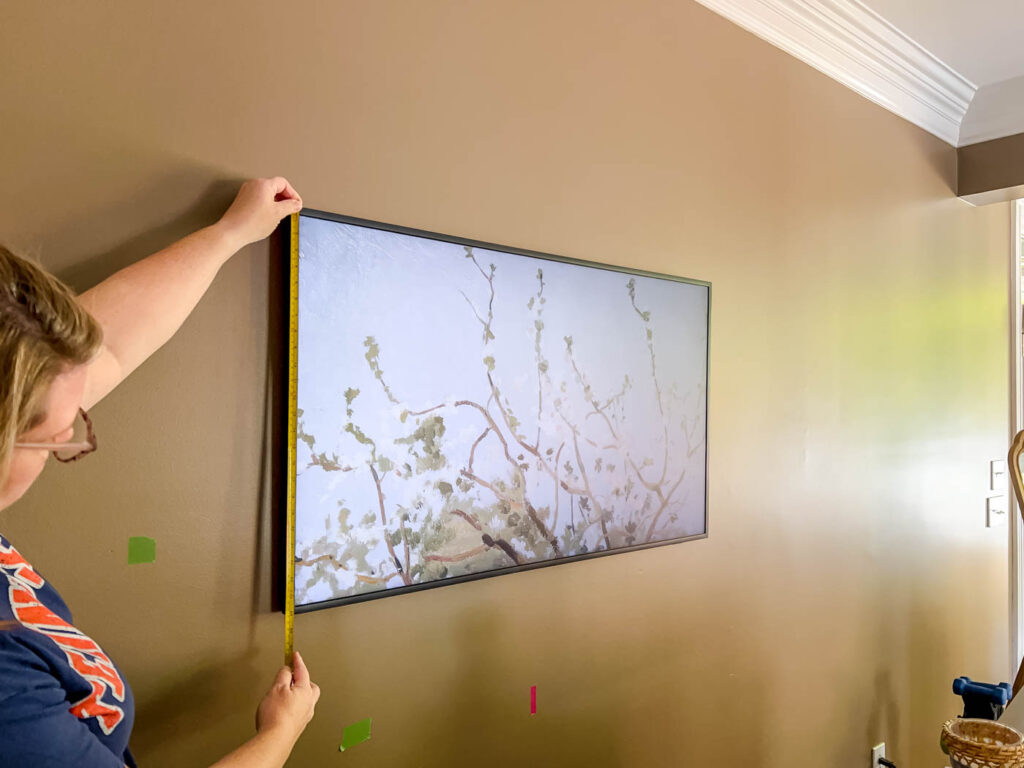
Step 1. Measure Your TV
Since every Samsung Frame TV model is slightly different, you’ll want to carefully measure your exact TV before cutting anything. And trust me on this one, measure twice! A snug fit looks the most custom and high-end, but if it’s too tight, the frame can be difficult to slide on and off.
For my frame, I added about 1/8-inch to my measurements so the frame would fit comfortably without scraping the TV. Those measurements will determine the inside dimensions of your base frame.
I personally like the frame to sit close to the TV so it really looks built-in and intentional, but you still want just enough wiggle room for easy placement.

Also, make sure to pay attention to the sensor located at the bottom of the Frame TV. Depending on your model, it may extend slightly beyond the edge of the TV frame. Mine did, so I ended up carving out a small space in the wood to accommodate it. I’ll show you exactly how I handled that later in the tutorial.
And don’t worry if you’re having trouble visualizing how the decorative trim overlaps the base frame right now. I promise it will all make sense as we go!
Step 2. Build the Inside Base Frame
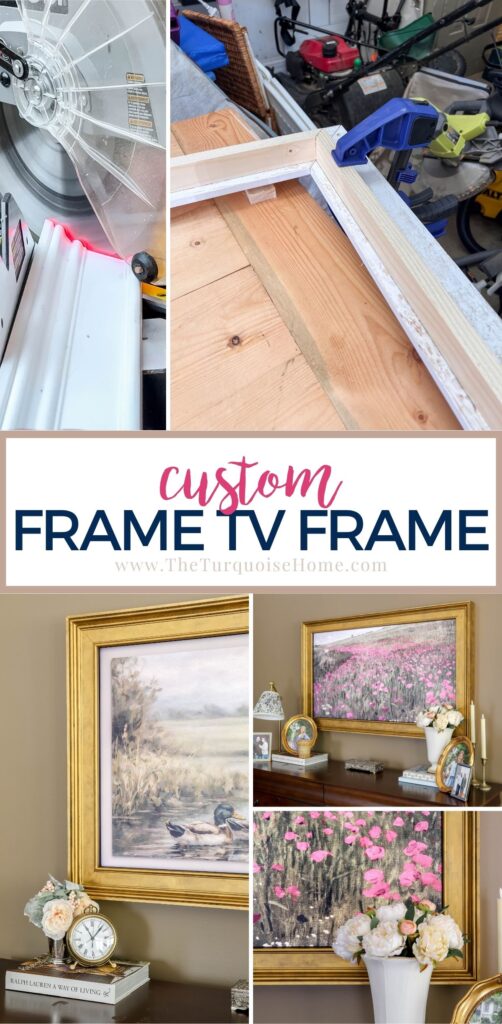
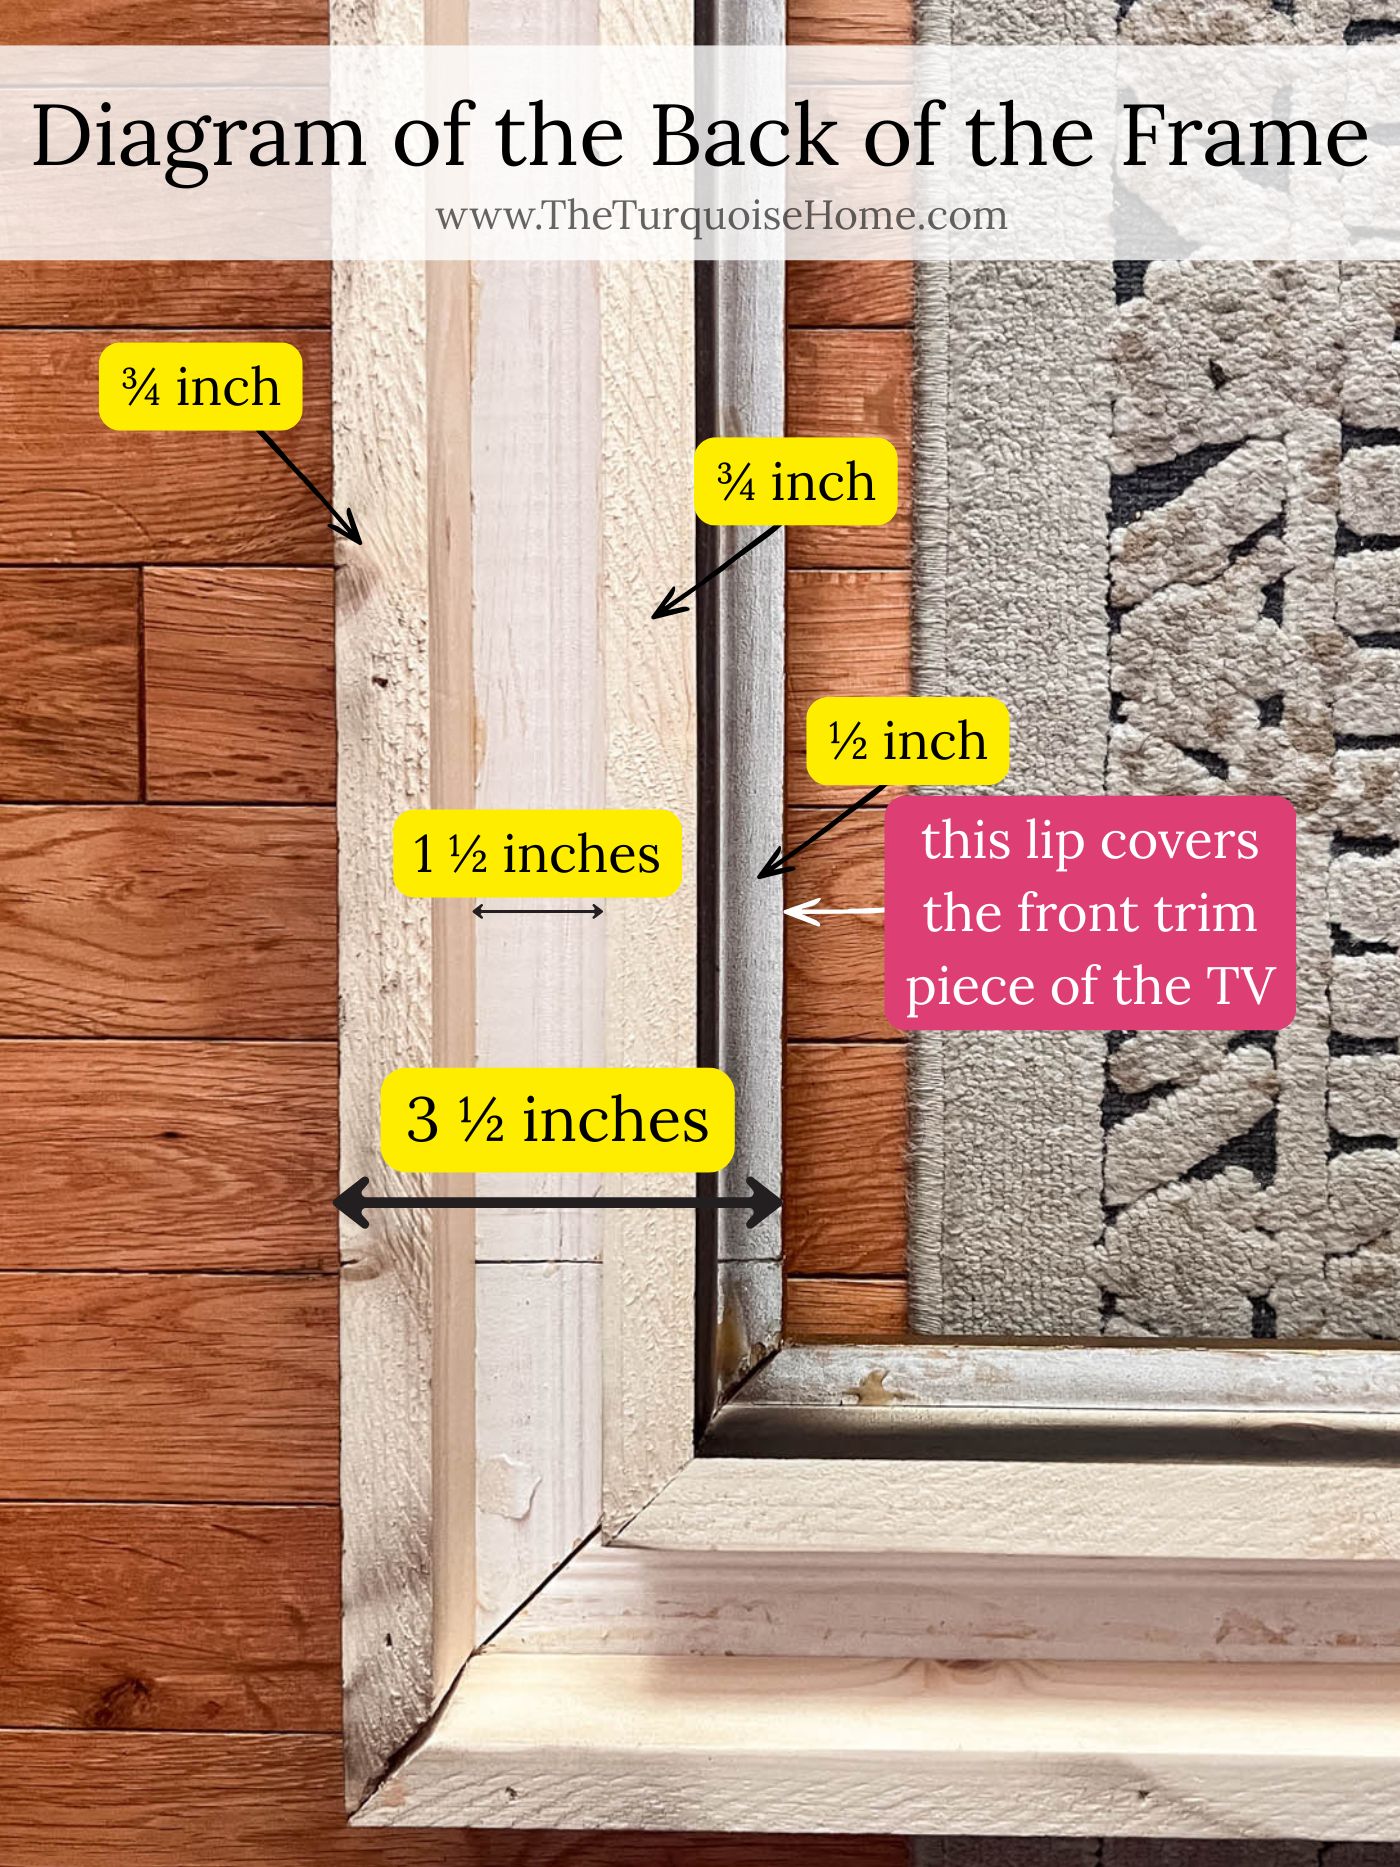
Using the measurements from Step 1, cut your 1 x 2 boards to size with 45-degree mitered corners on the short sides. This will create the first of the two base frames that make up the structure of the project.
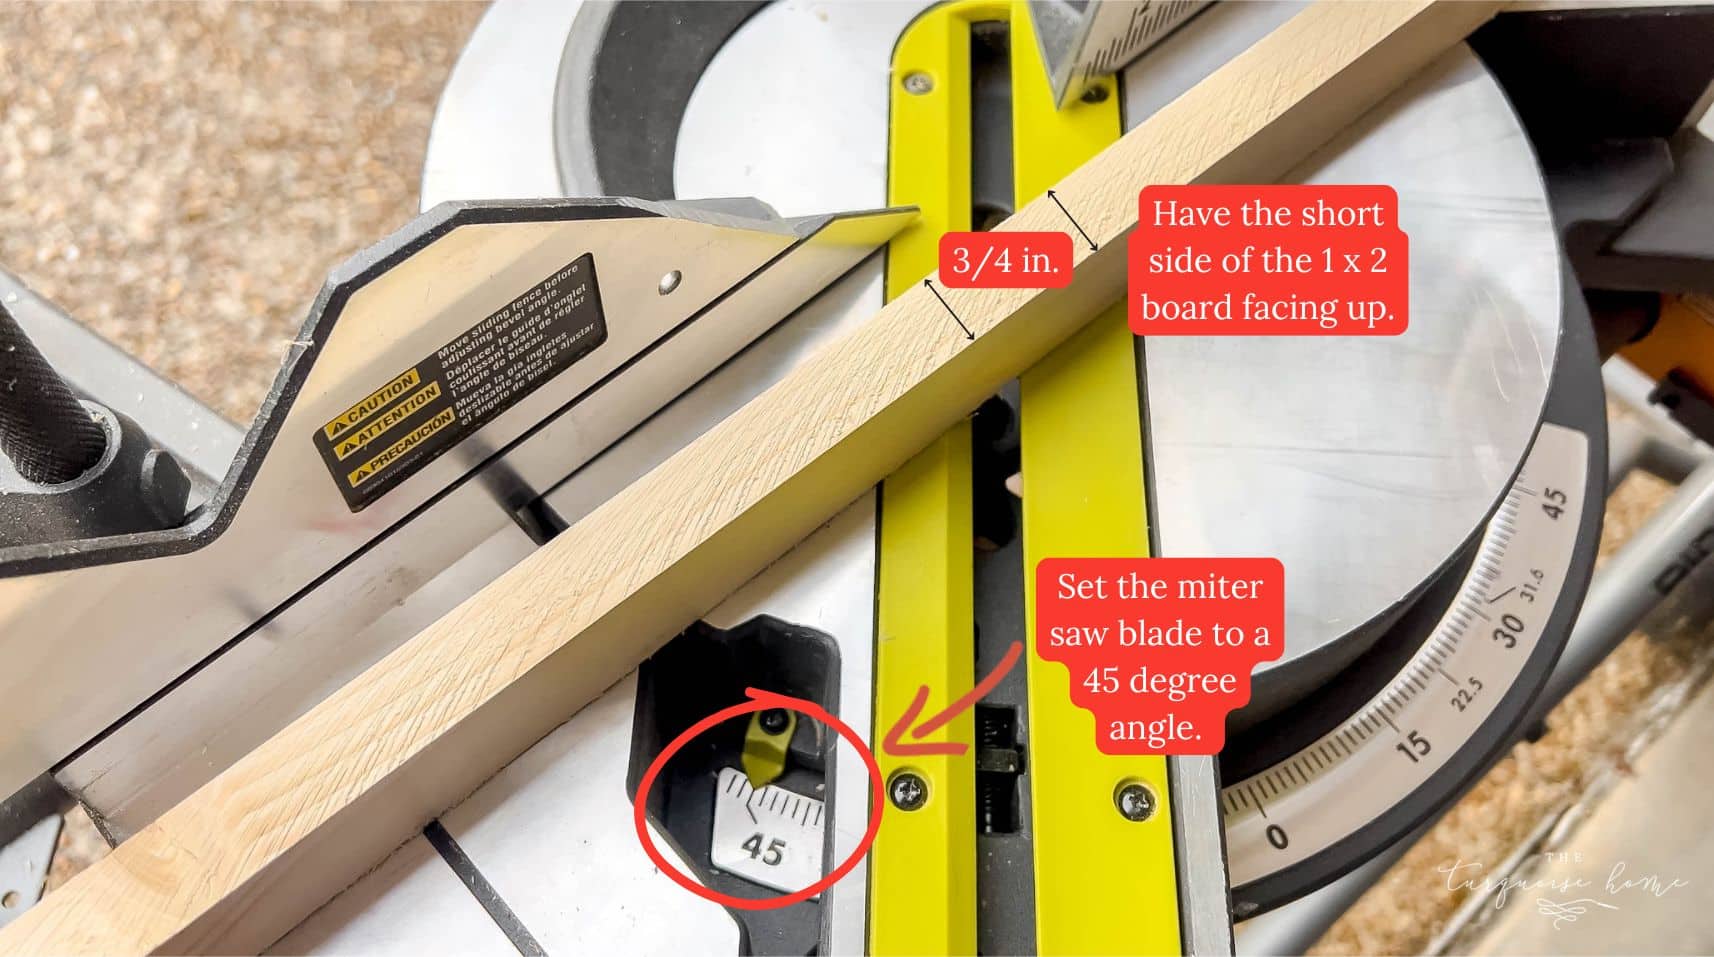
When positioned correctly, the longer side of the board (about 1.75 inches) will sit against the TV, while the shorter side (about .75 inches) will face outward. This helps create a slimmer, more finished profile around the screen.
I used a miter saw for these cuts because it gives the cleanest and most accurate angles, but you could also use a circular saw if that’s what you have on hand.
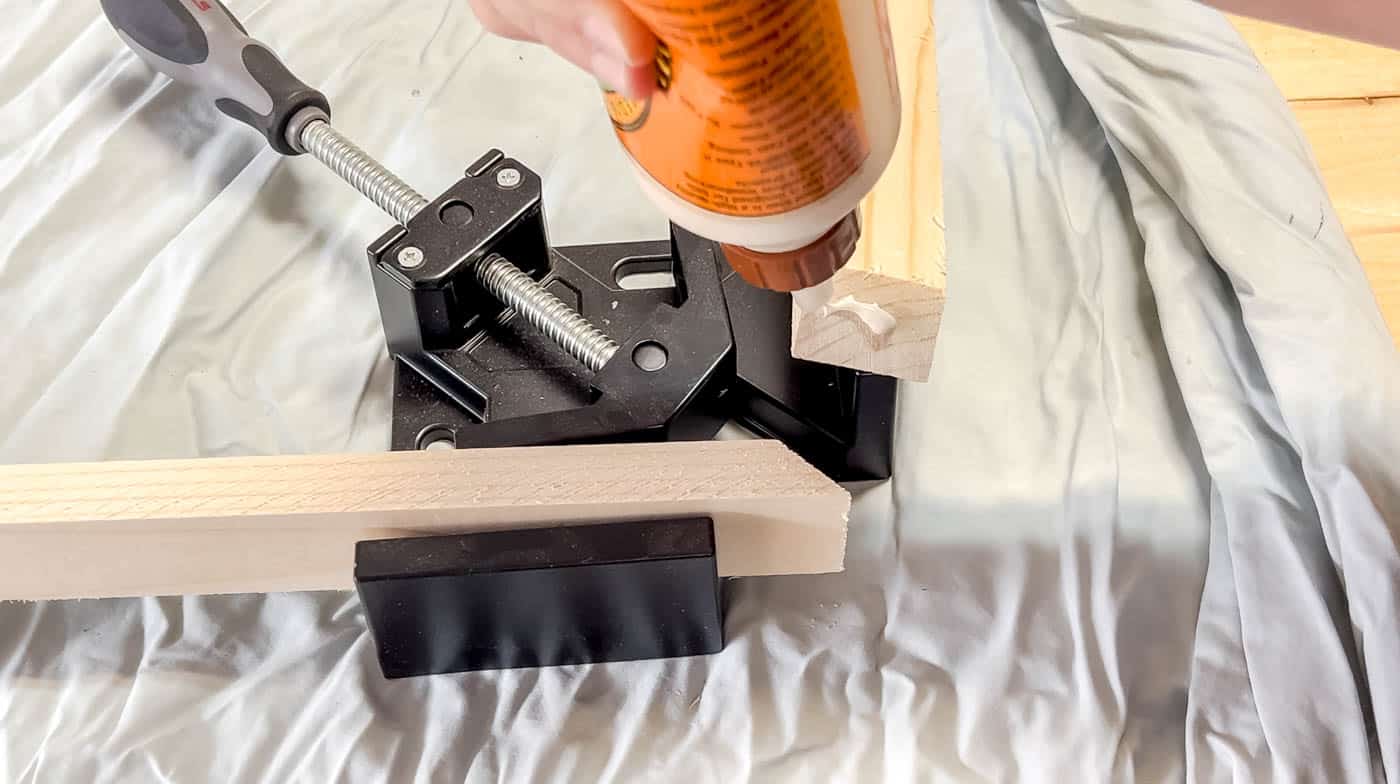
Once your pieces are cut, apply wood glue to each corner and clamp the frame together to form a large rectangle. I highly recommend using corner clamps here. They make frame building so much easier and help keep everything square while the glue dries.
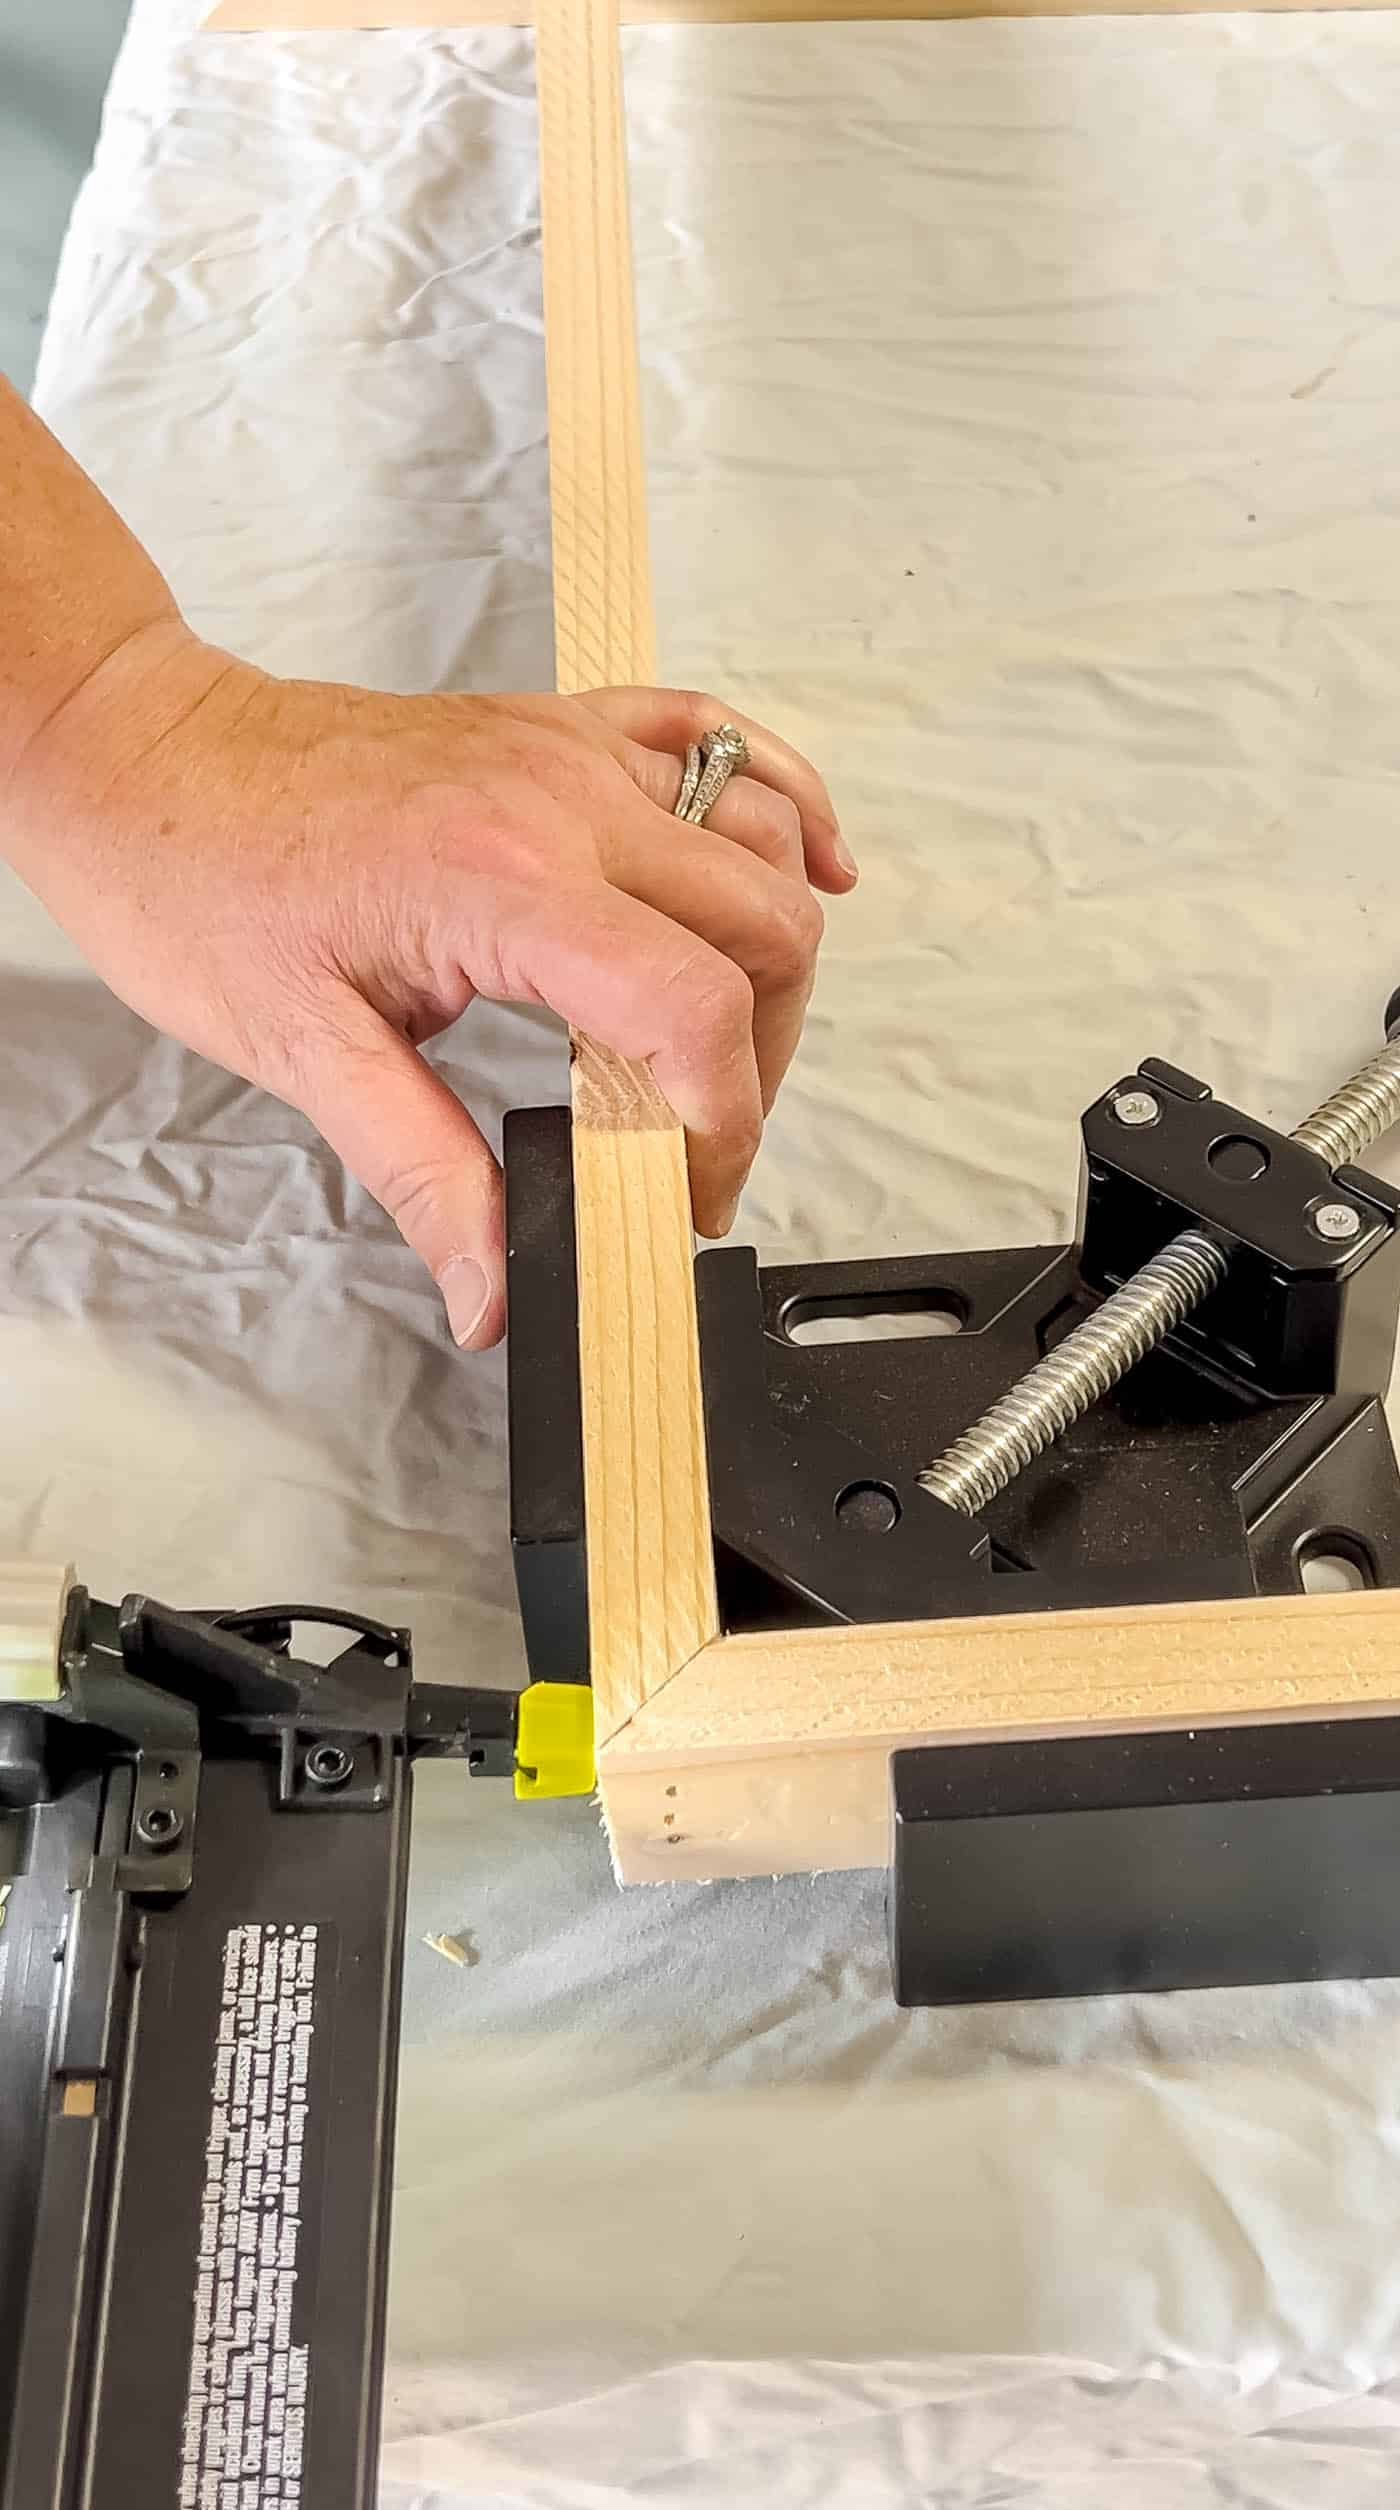
After the glue has fully dried, reinforce each corner with a finishing nail or brad nail in the corners to make the frame extra sturdy and secure.
Before moving on, test the frame on your TV to make sure the fit feels right. This is the perfect time to make any small adjustments before adding the second frame layer or decorative trim later on.
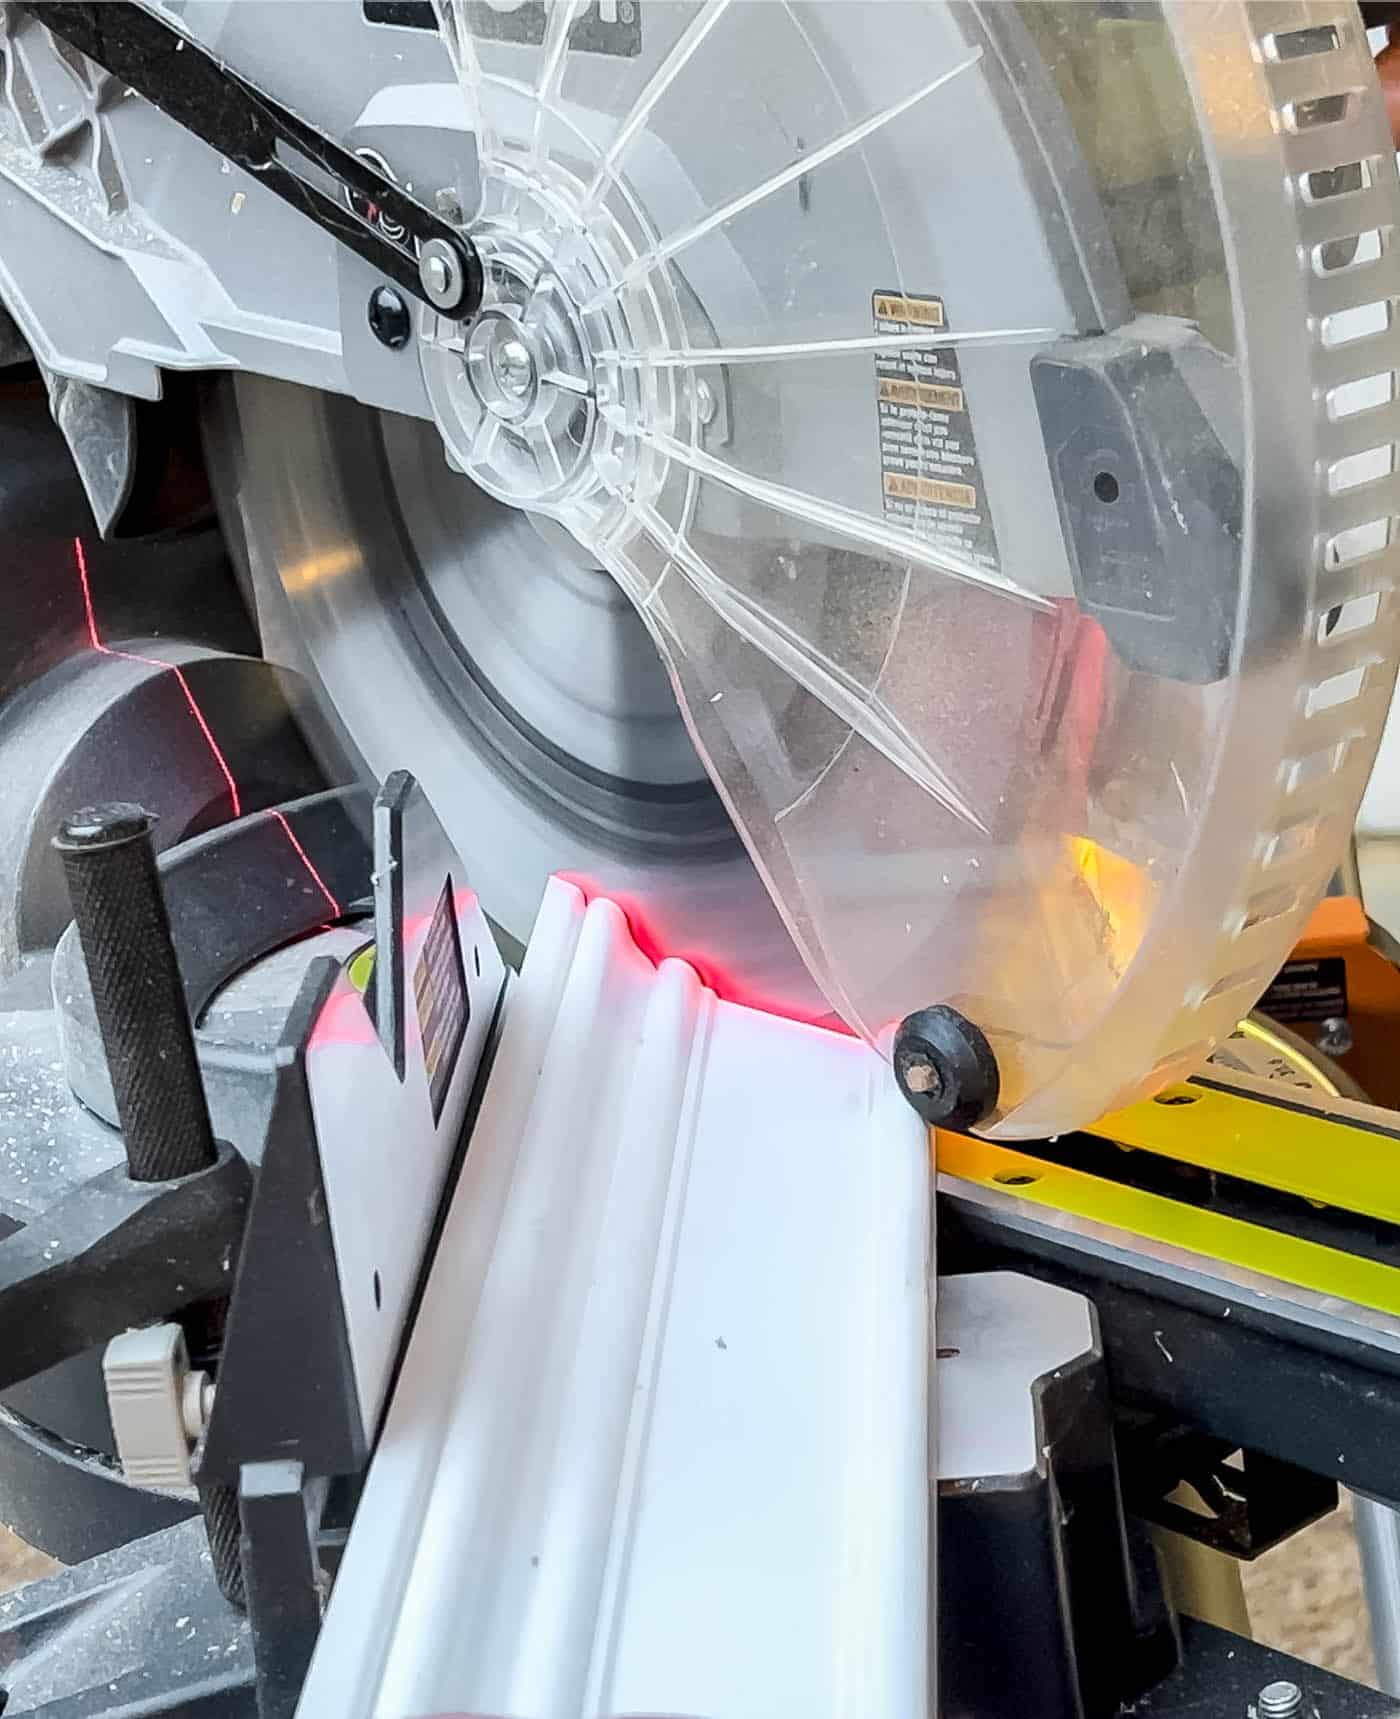
Step 3. Add Decorative Trim Molding
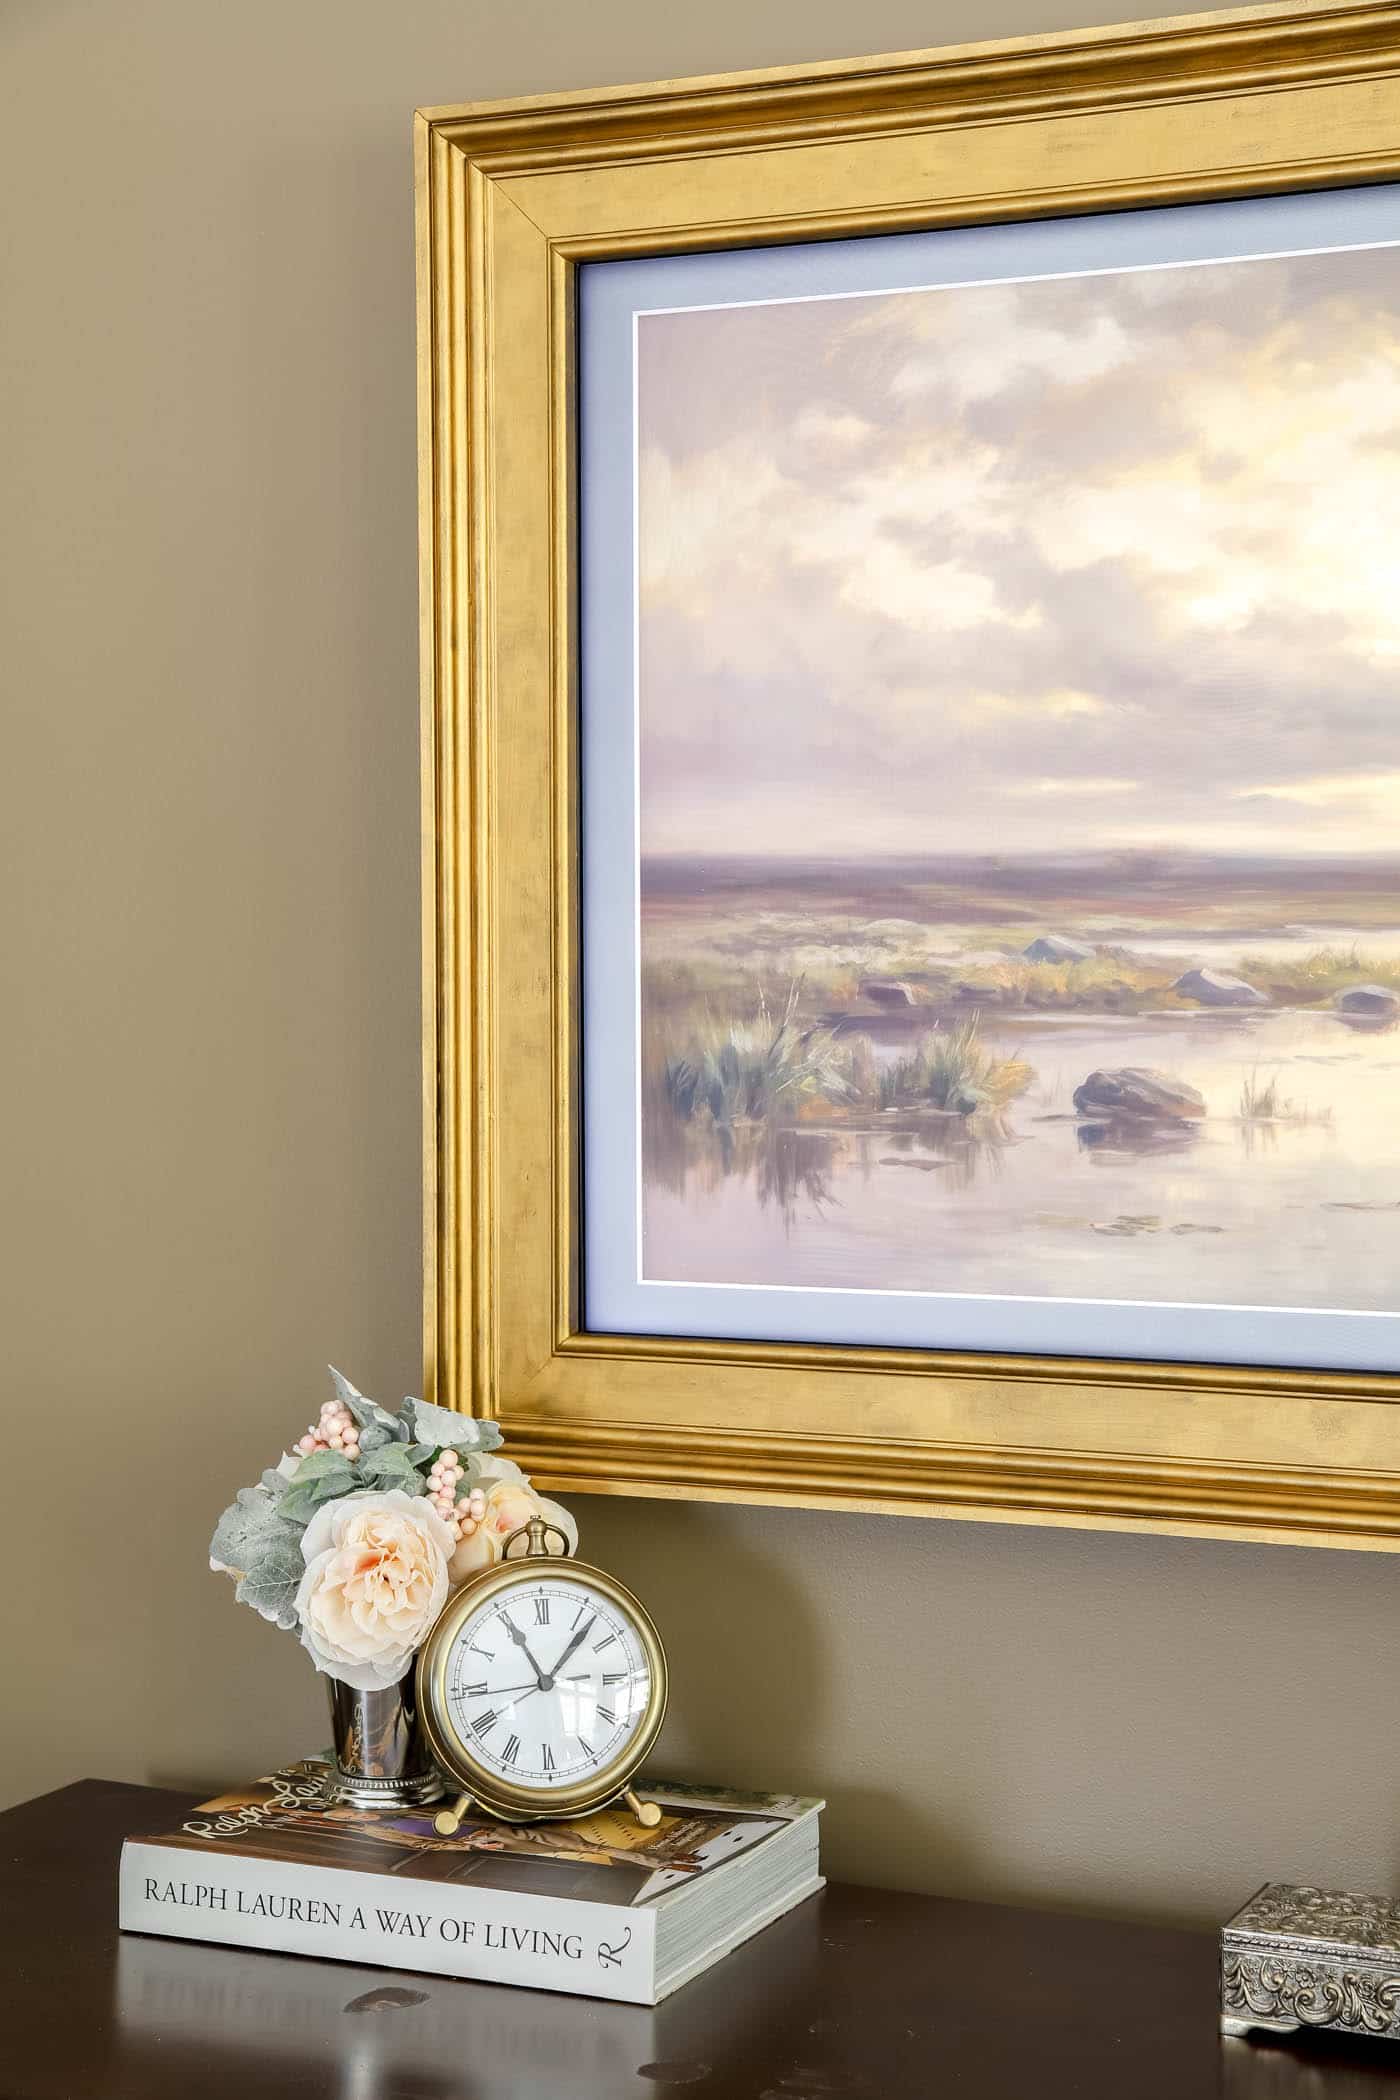
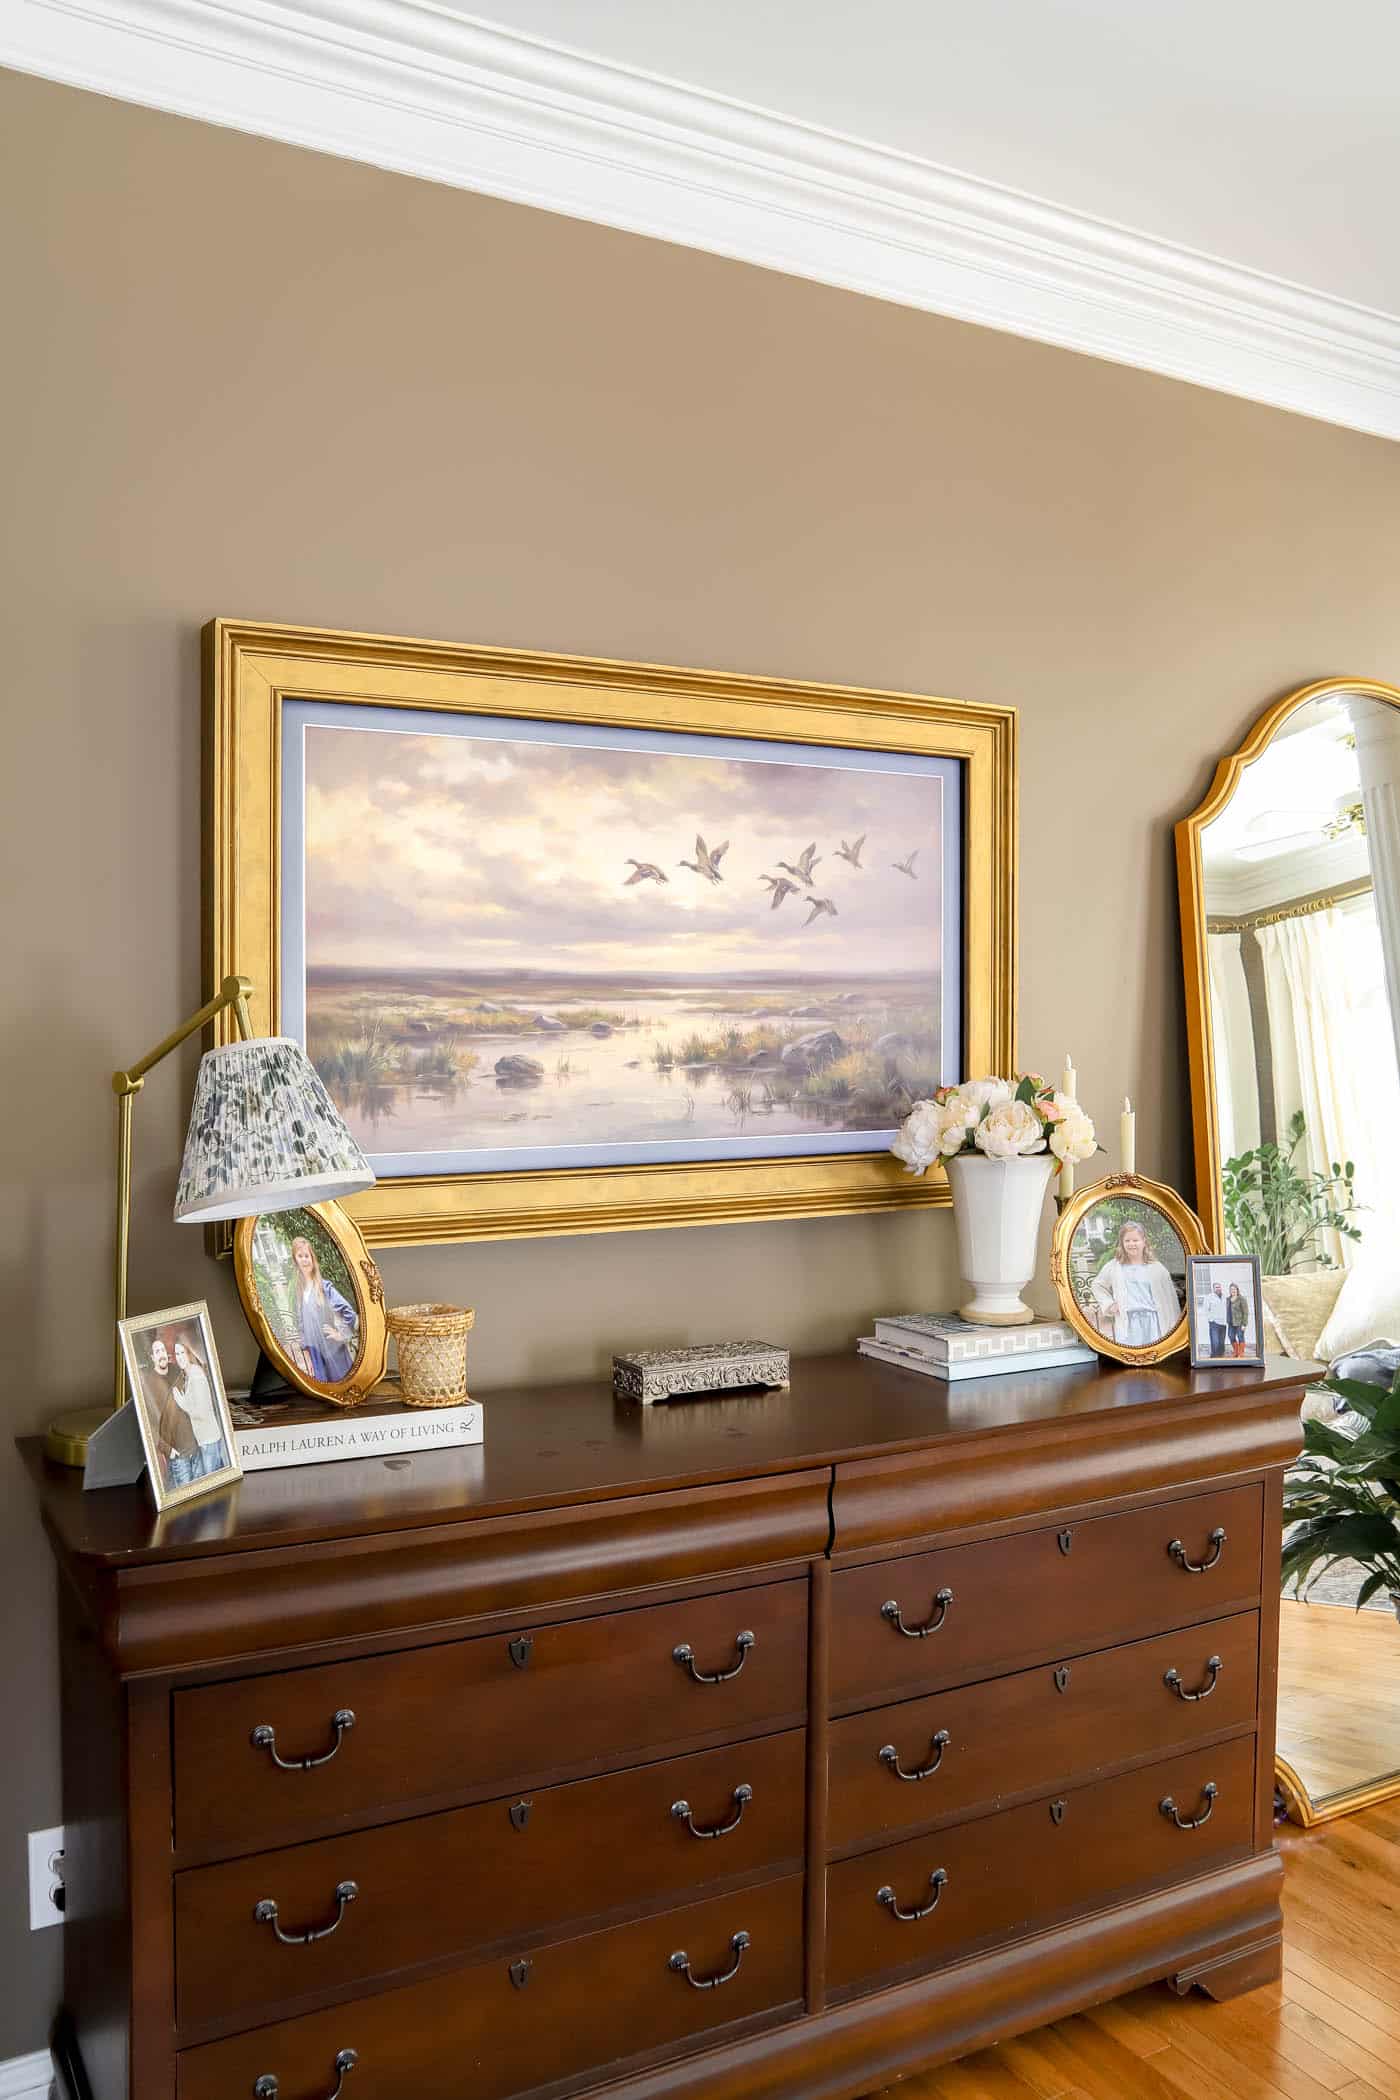
Now for the fun part… the decorative trim! This is the piece that really transforms the project and gives your Frame TV that high-end, art-gallery look, so take your time choosing a molding style you truly love.
shopped for my trim pieces at Lowe’s and looked for something chunky, traditional and substantial enough to make the TV feel like a real framed piece of art.
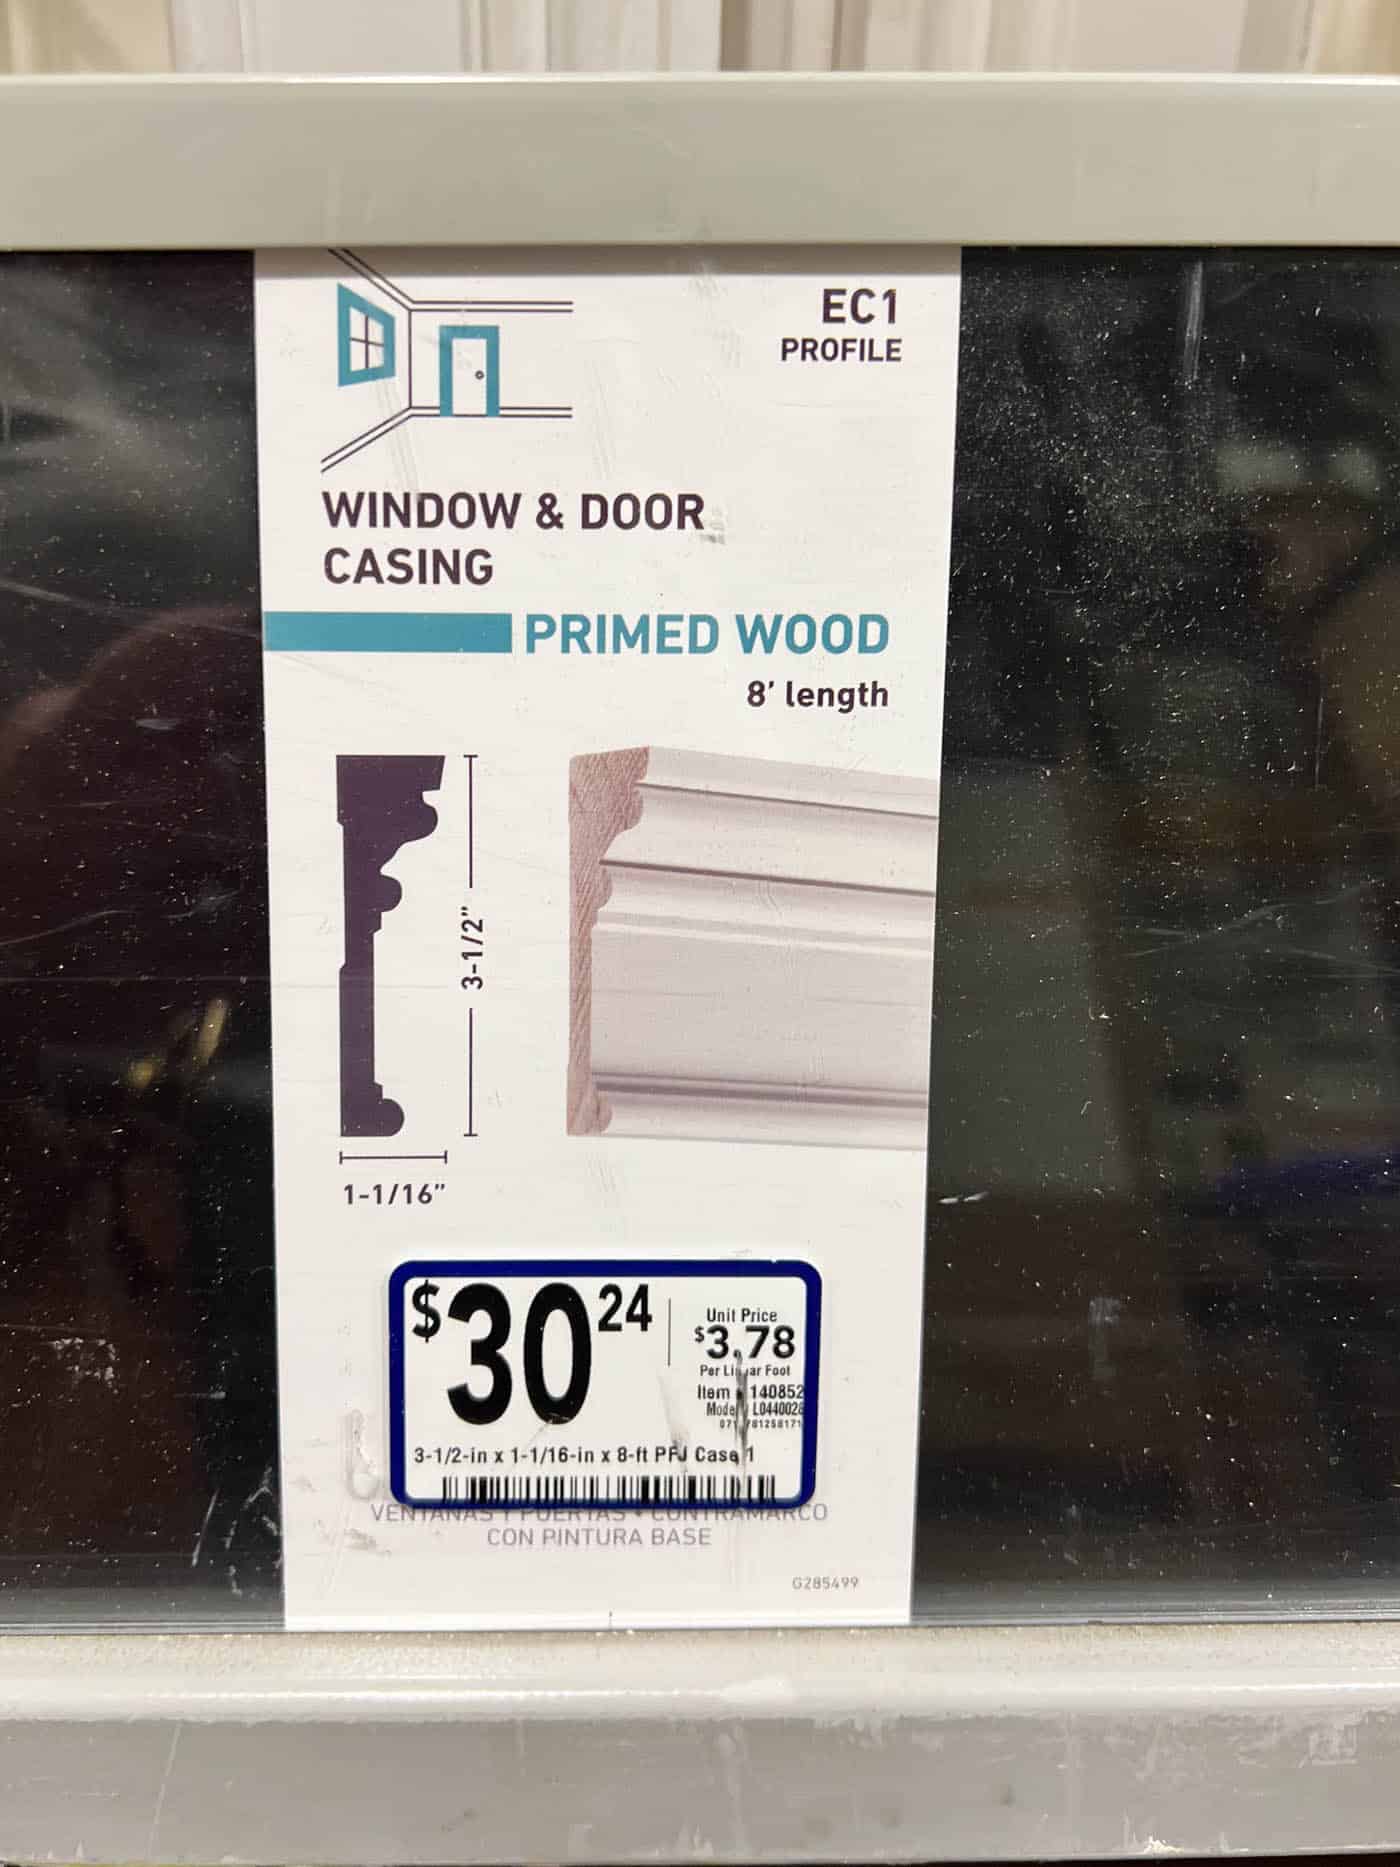
I ended up choosing this casing style because it’s flat on both edges and has a more classic, traditional profile, which fits the overall style of our home perfectly. The trim piece I used was about 3.5 inches wide, and honestly, I think that width works beautifully for a custom Frame TV frame. It feels large enough to make an impact without overwhelming the TV itself.
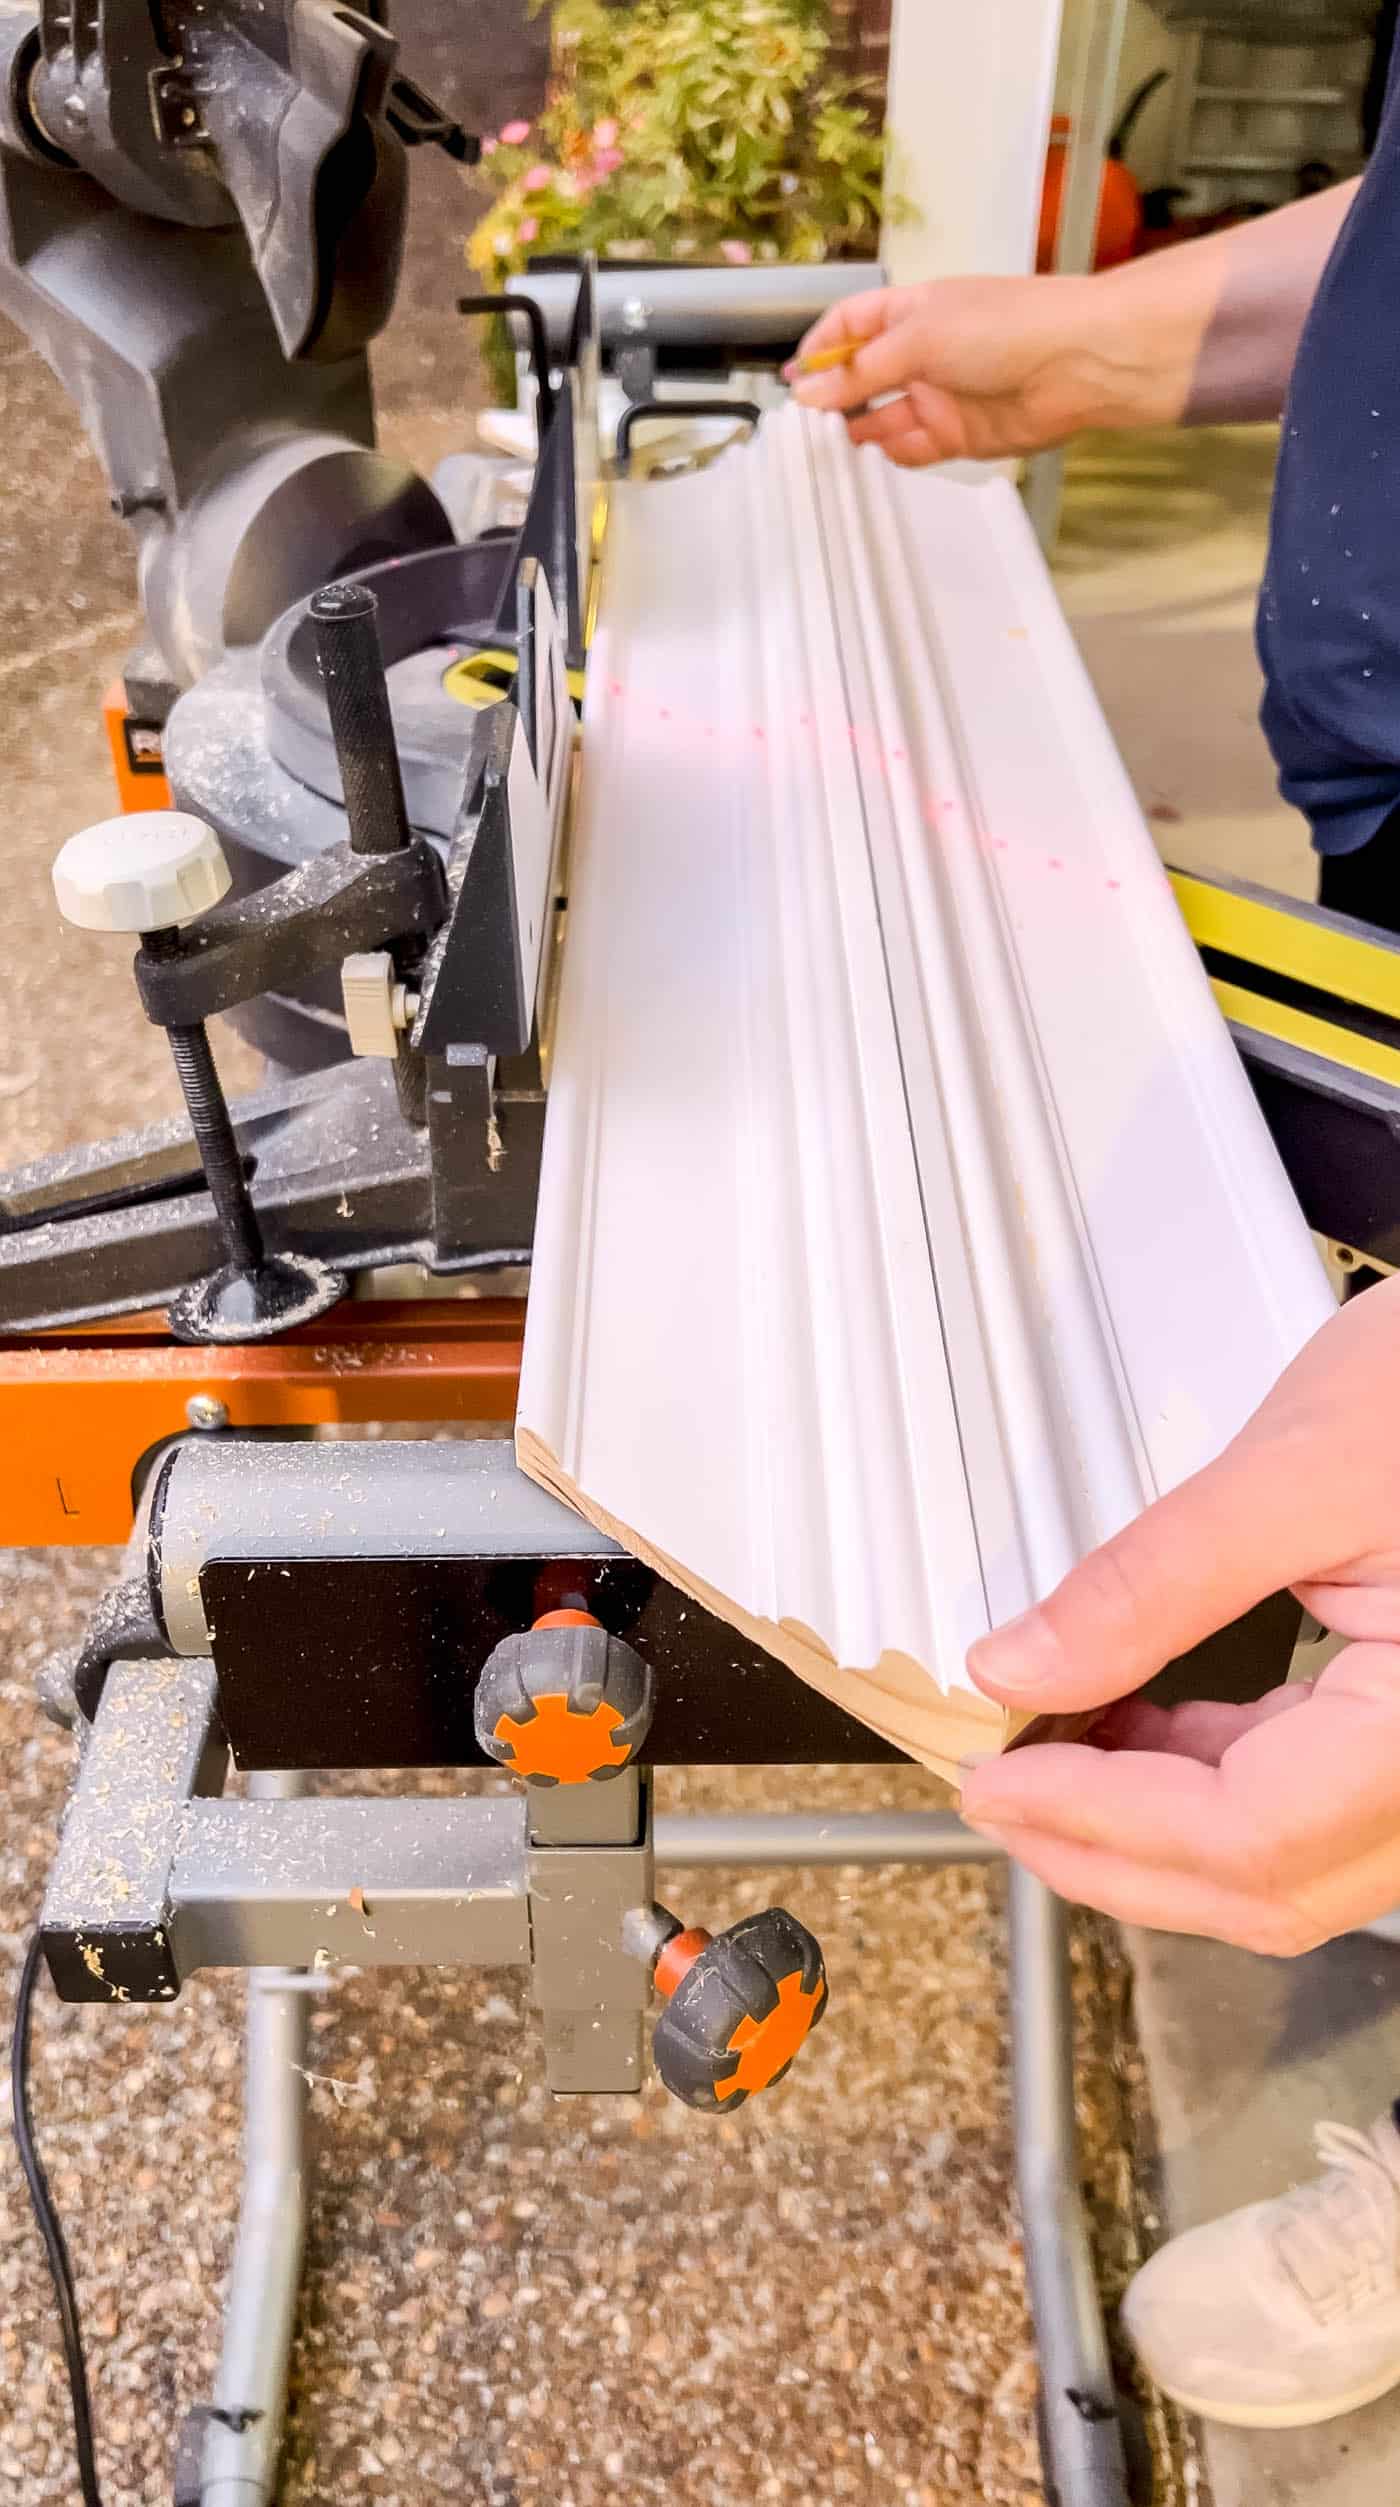
Measure the Inside TV Frame for your Decorative Trim
For this decorative front frame, you’ll actually want your measurements to be slightly smaller than the 1 x 2 base frame you built in Step 2. This allows the decorative trim to overlap the front edge of the TV frame for a more seamless and finished look.
My Frame TV has about a ½-inch trim edge around the screen, so I used the inside measurements of that visible trim area to determine the sizing for my decorative molding frame.

Once you have your measurements, cut each trim piece with 45-degree mitered corners so they fit together into a rectangle.
Helpful Tip: Before assembling, line up your parallel trim pieces side-by-side and double-check that they’re exactly the same length. This little step helps keep the frame perfectly square and prevents it from looking crooked or “wonky” later on.
Once your cuts are finished, glue the corners together and carefully secure them with brad nails to create the rectangular frame.

I assembled mine directly on my bedroom floor because I knew the surface was perfectly level. The only problem? One of my nails bent downward and shot into the hardwood floor instead of the frame. 😅 Thankfully, it landed perfectly between two floorboards, so you can’t even tell it happened. Major DIY grace right there!
If I were doing it again, I’d probably let the glue dry completely first while the frame sits on a flat surface. Then I’d move it back out to the garage or workshop area to reinforce the corners with nails afterward.
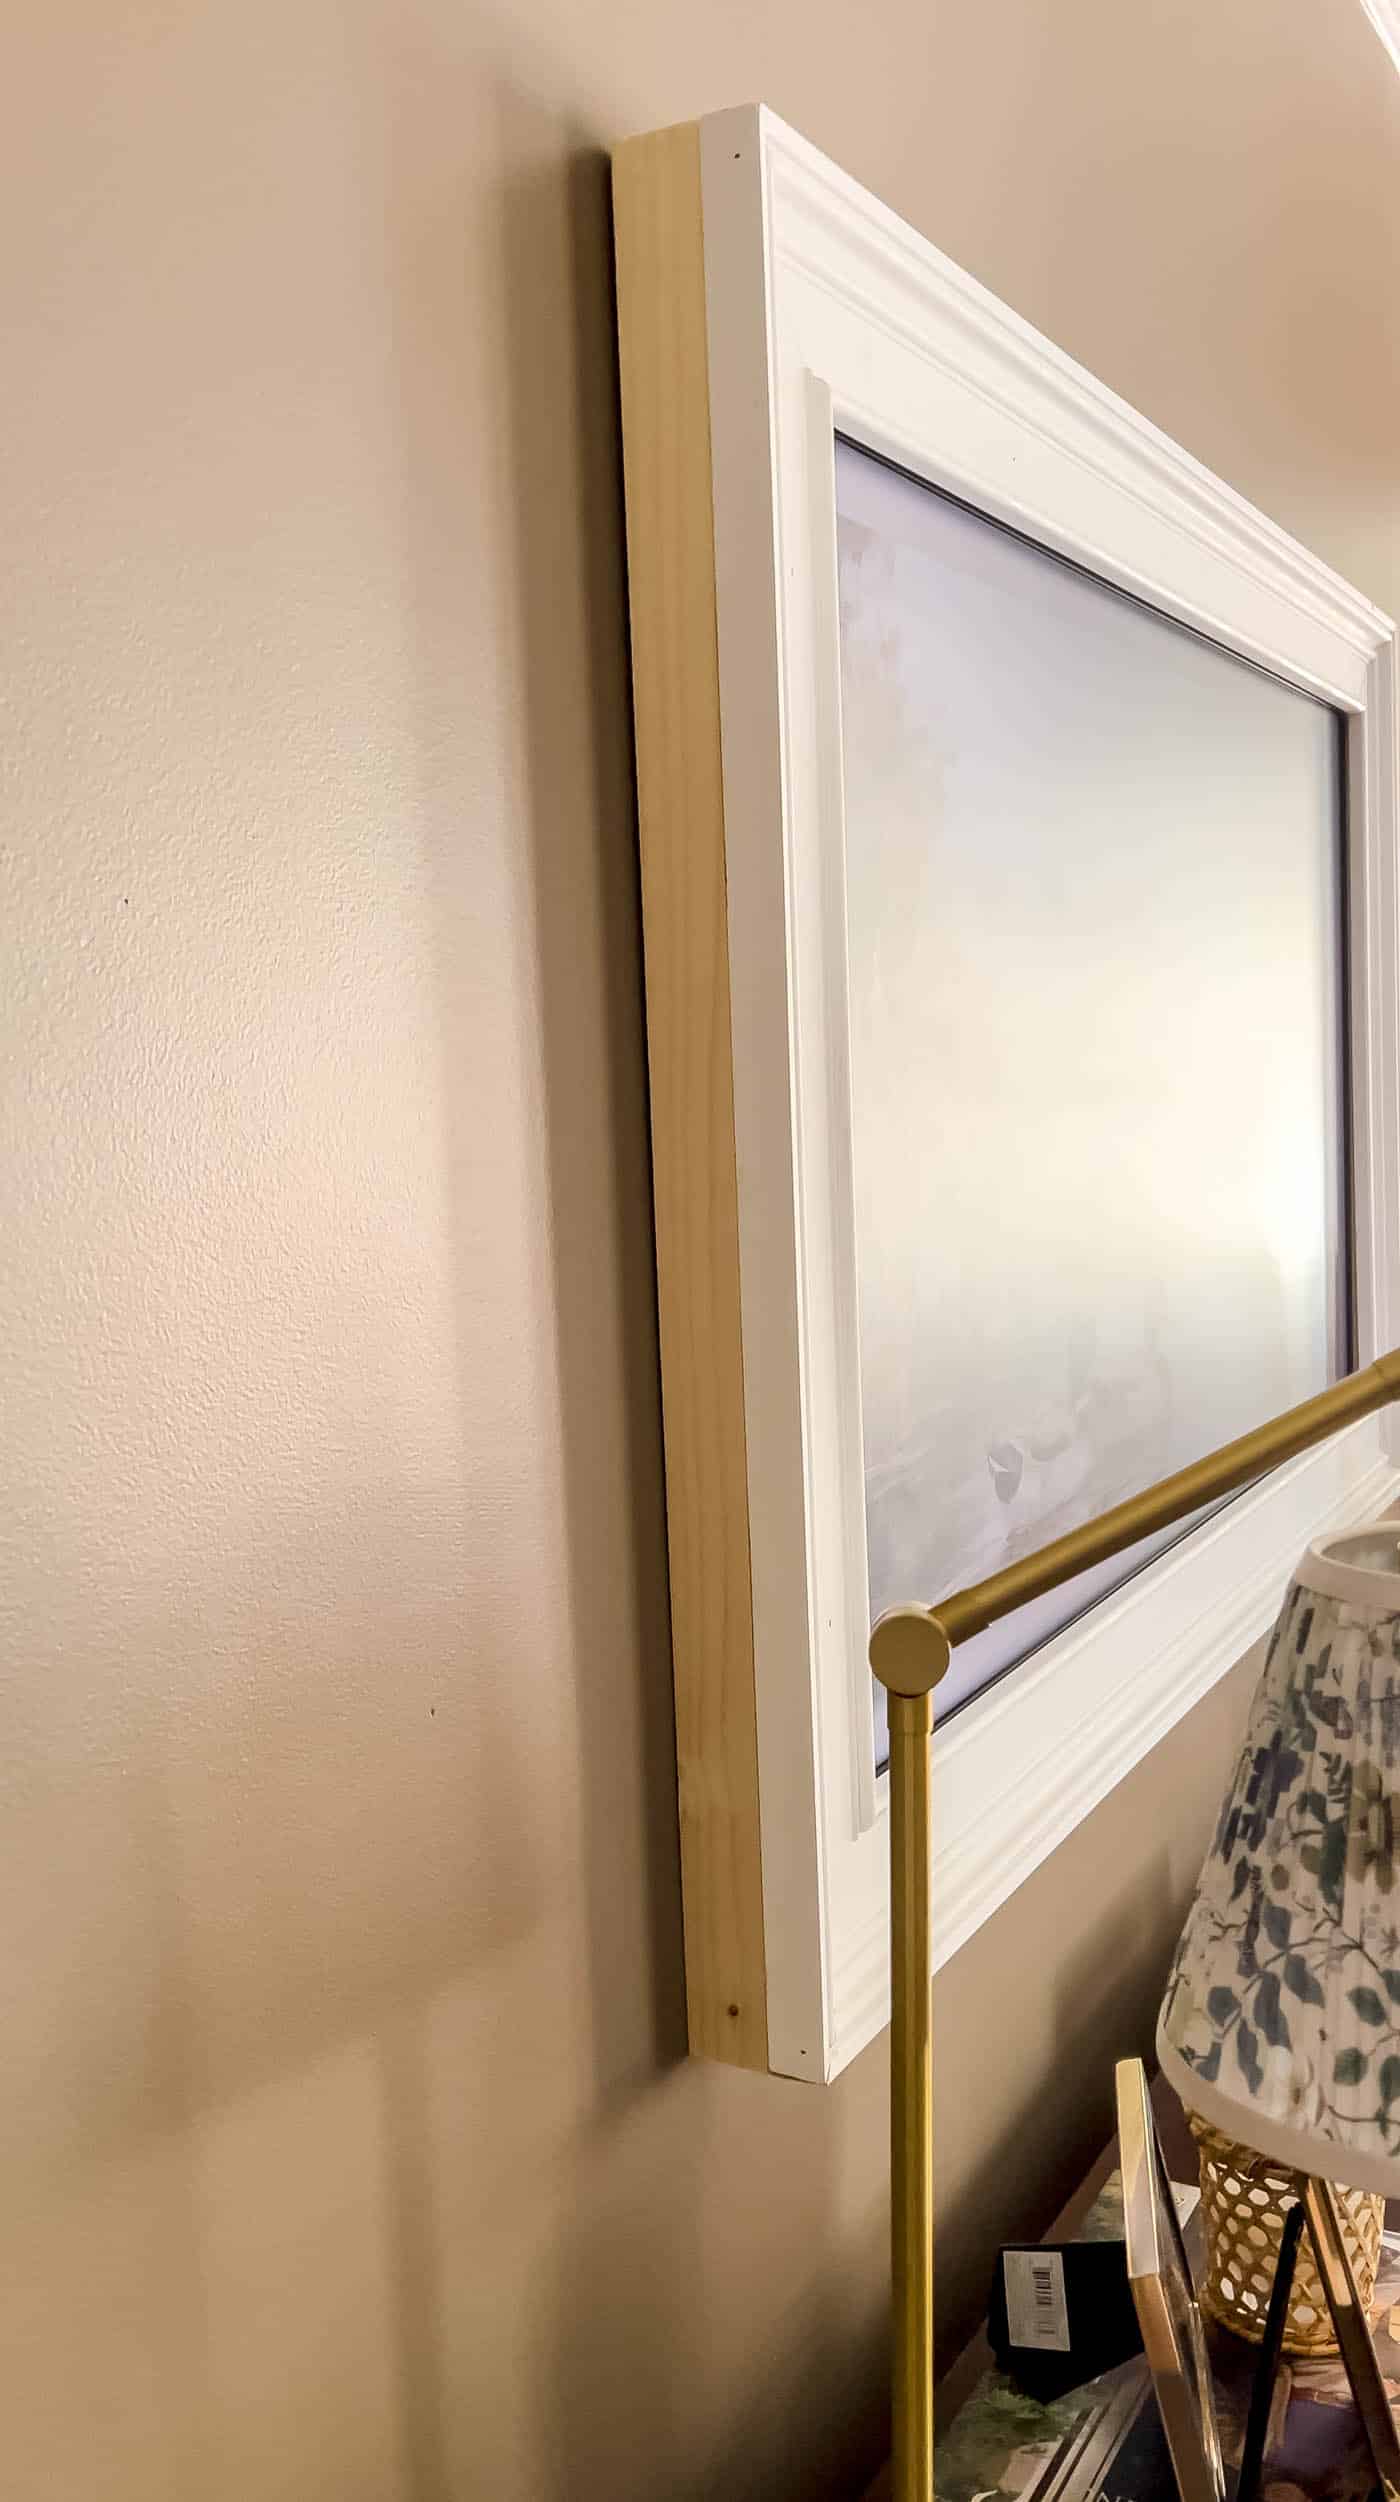
Step 4: Attach the Base Frame to the Decorative Frame
I personally like to assemble projects in stages as I go because it gives me a chance to test everything along the way before fully committing. It may not be the fastest method, but I’d much rather catch a problem early than realize something is off after the entire frame is finished.
So at this point, you’ll attach the 1 x 2 base frame to the decorative front trim frame you just built.
To do this, I applied wood glue between the two pieces and clamped them together securely. As I lined everything up, I left about a ½-inch lip along the back inside edge of the decorative trim. This overlap is what allows the frame to sit nicely around the TV and helps create that custom, built-in look.
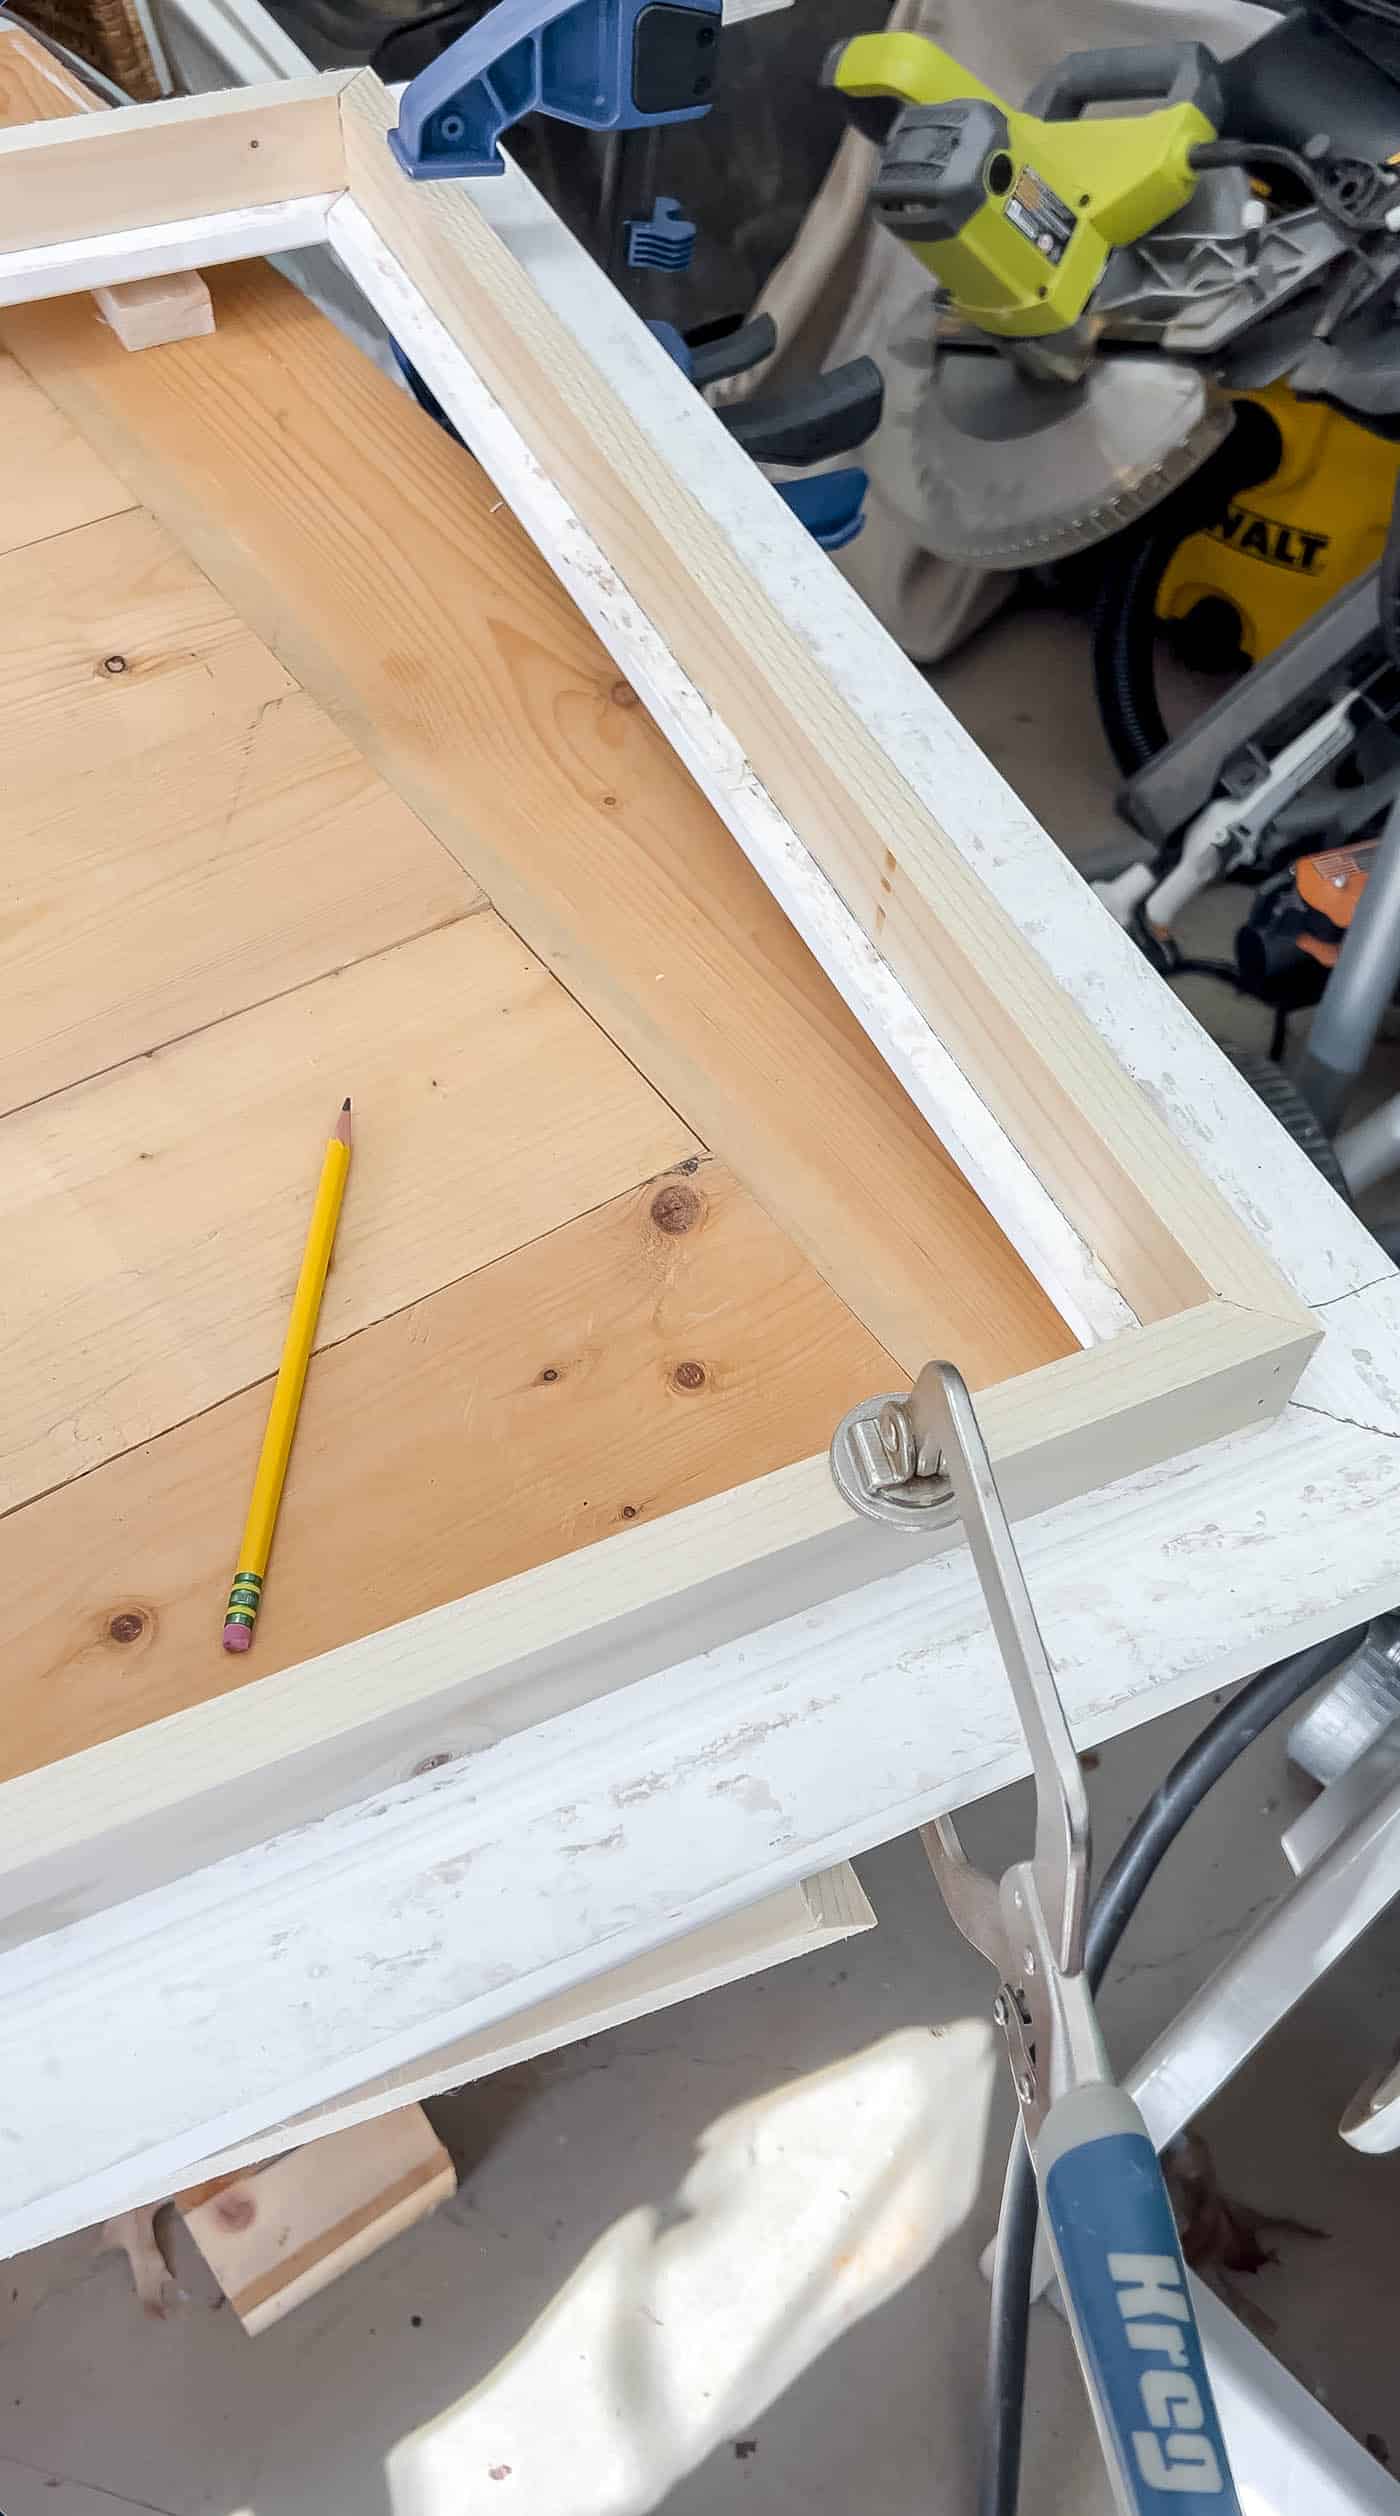
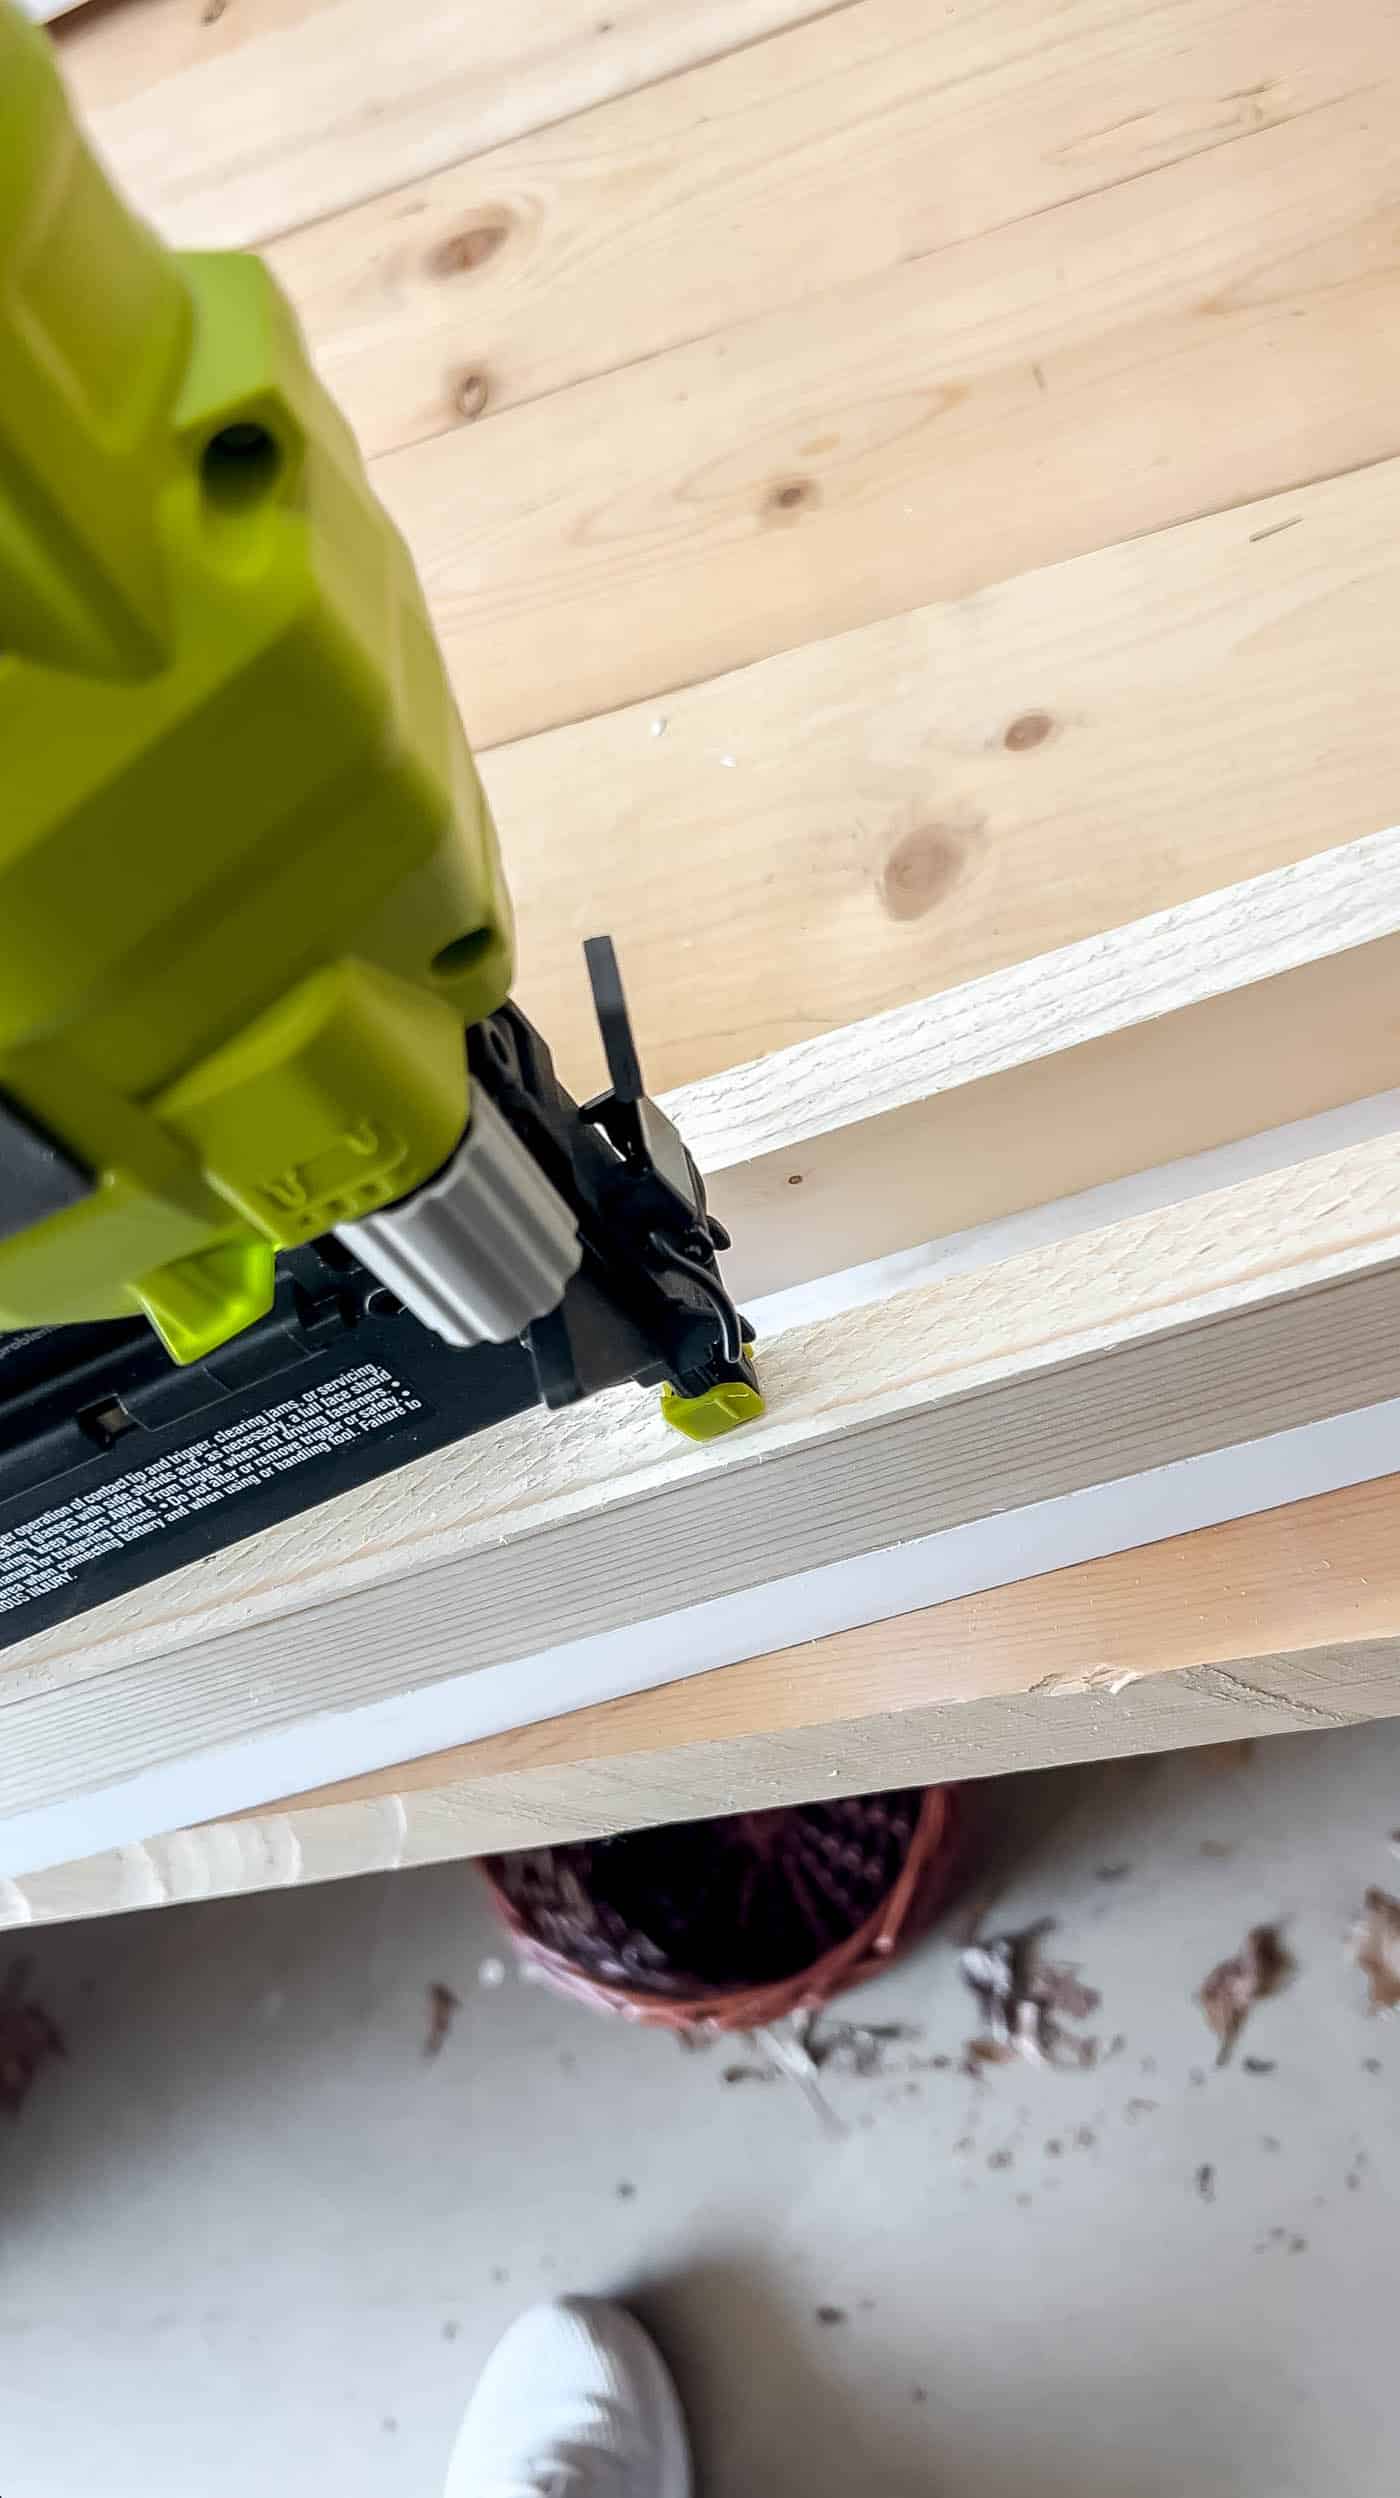
Once the glue had fully dried, I carefully flipped the frame over and added a few 1½-inch brad nails through the front of the decorative trim and into the base frame underneath. This secures everything together really well and makes the frame feel solid and sturdy.
Don’t worry about the nail holes at this stage. We’ll fill, sand and smooth everything out later in Step 7 so the finished frame looks seamless and professional.
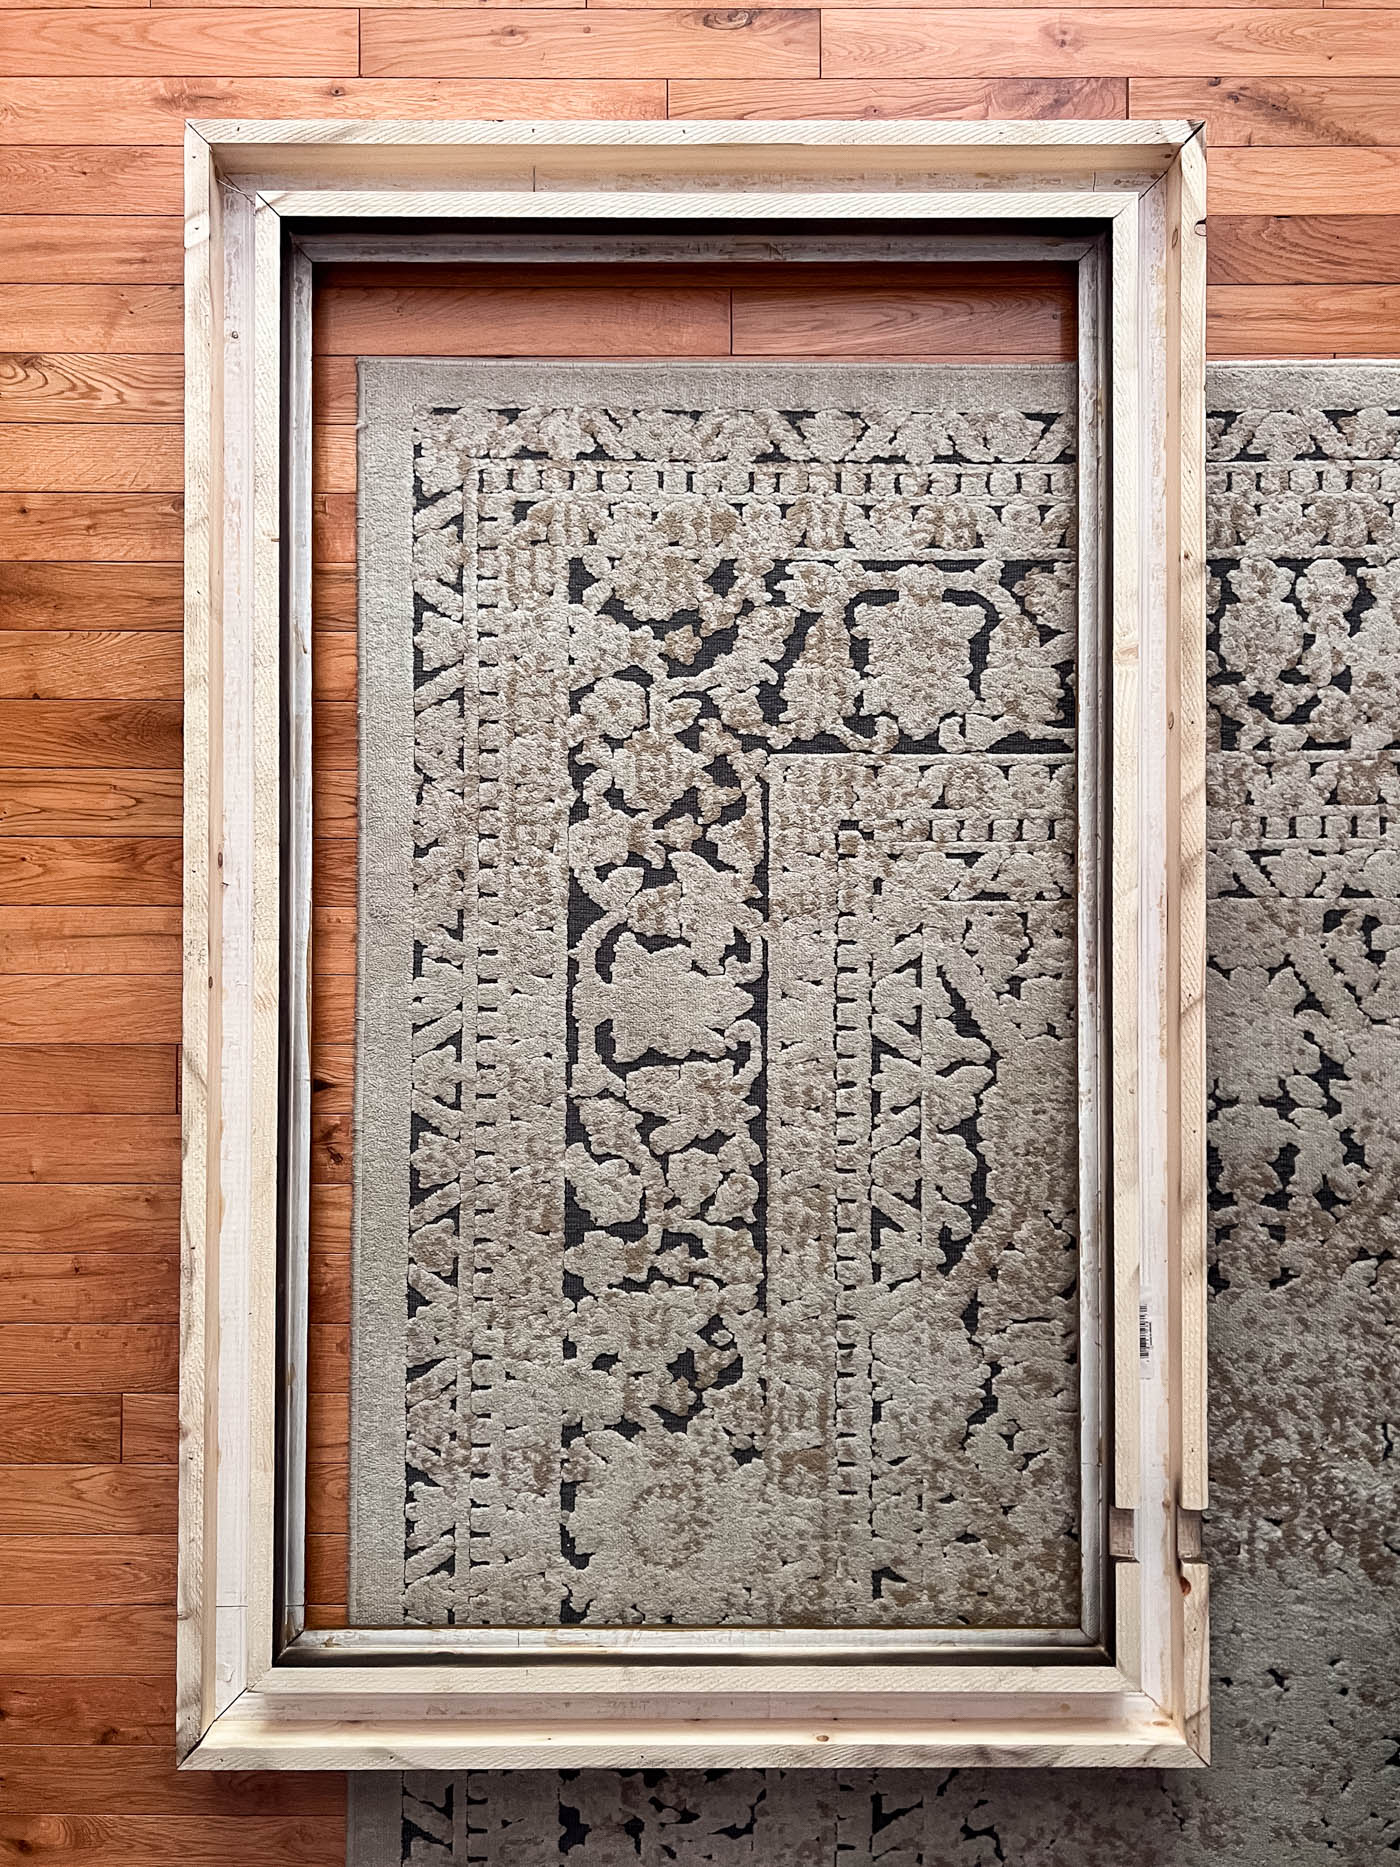
Step 5: Build the Outside Frame Base
Next, you’ll build the second 1 x 2 frame that creates the outer support structure for the decorative frame. This piece sits behind the outer edge of the trim and helps give the entire frame more stability and depth.
To get your measurements, measure the outside dimensions of your decorative trim frame.
Then, using your remaining 1 x 2 boards, cut each piece with 45-degree mitered corners, just like you did in Step 2. Make sure the short side of the board is facing outward the same way as the first base frame so everything lines up properly.
Once your cuts are complete, glue the corners together and clamp the frame until dry. After the glue sets, reinforce the corners with brad nails just like before.
At this stage, I also added a few 2-inch brad nails through the back of the outer base frame and into the decorative trim frame to make the entire structure feel extra solid and secure.
Before moving on, test the frame on your TV again to make sure everything still fits properly and sits mostly flush against the wall. This is a good time to double-check that nothing shifted during assembly and that the frame still slides on and off comfortably.
Below you can see the back side of the completed frame structure so you can better visualize how all the layers fit together.
Step 6. Cut a Notch for the Sensor
Samsung Frame TVs have a built-in sensor that detects light in the room and helps control the Art Mode display. On my TV, the sensor is located on the bottom right side of the frame, so I needed to create a small notch in the wood frame so the sensor would still function properly.
To figure out exactly where the notch needed to go, I placed the completed frame onto the TV and marked the spot where the sensor hit the wood.
Once it was marked, I used my circular saw to make several small cuts close together in that section of the frame. Then I carefully knocked out the small wood pieces using a chisel.
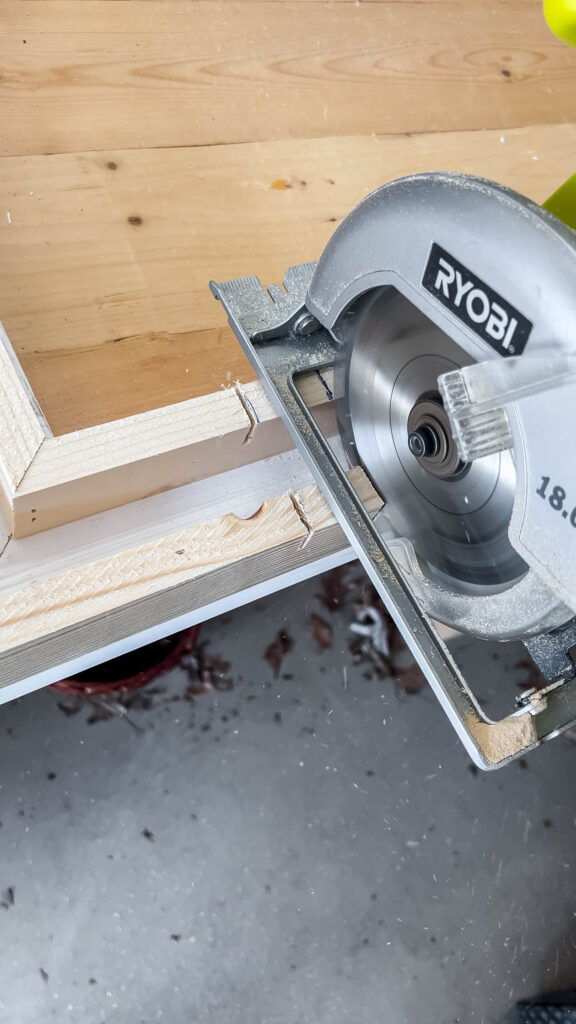
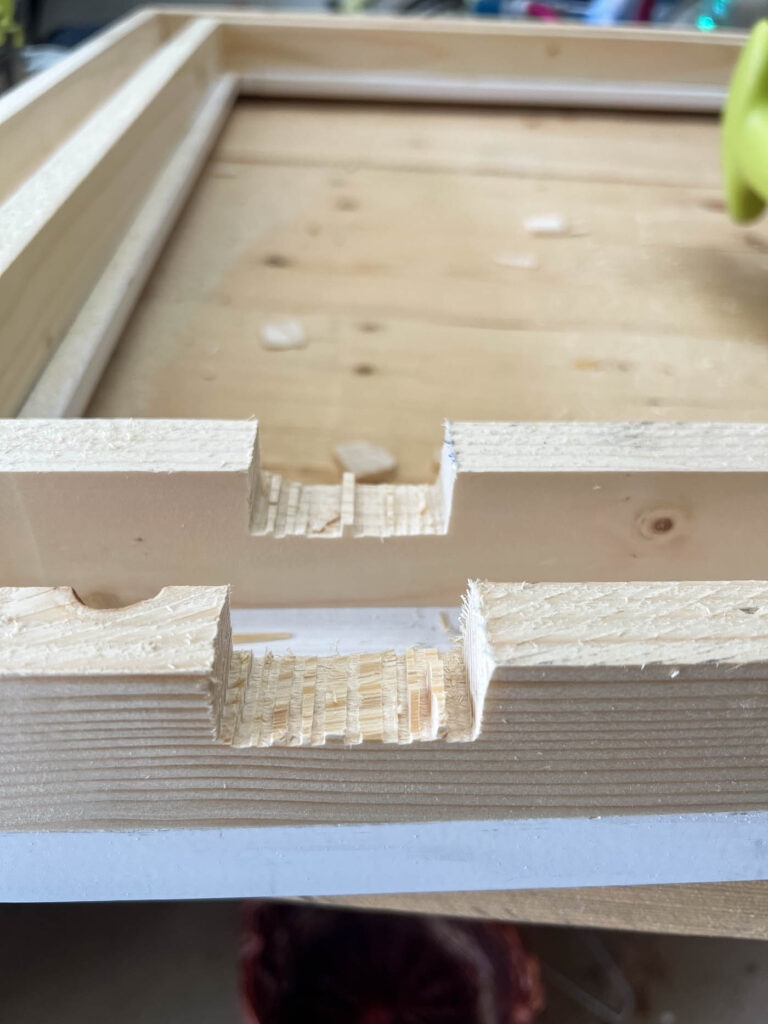
After that, I sanded everything down until the notch was smooth and clean-looking.
It doesn’t have to be perfect since it sits underneath the frame and isn’t very noticeable, but you do want enough space for the sensor to “see” the room properly so your Frame TV art mode still works like it should.
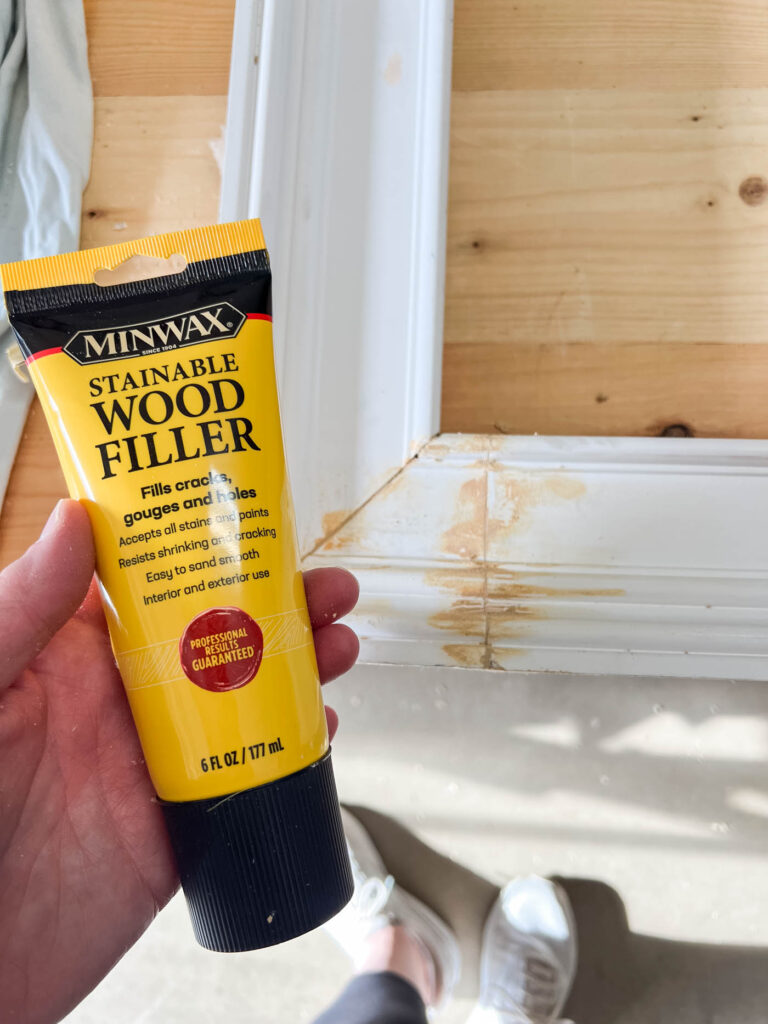
Step 7. Fill, Sand, and Prep
Now it’s finally time for the frame to start looking polished and professional!
Use wood filler to fill any nail holes, seams or small gaps in the frame. This step makes a huge difference in the final look, especially once paint is added.
And in the spirit of keeping things real around here… I accidentally cut one of my decorative trim pieces too short and had to patch in another small piece. 😅 So I spent a little extra time filling and smoothing those seams to make everything blend together nicely.
Thankfully, once everything was sanded and painted, you could barely tell it ever happened!
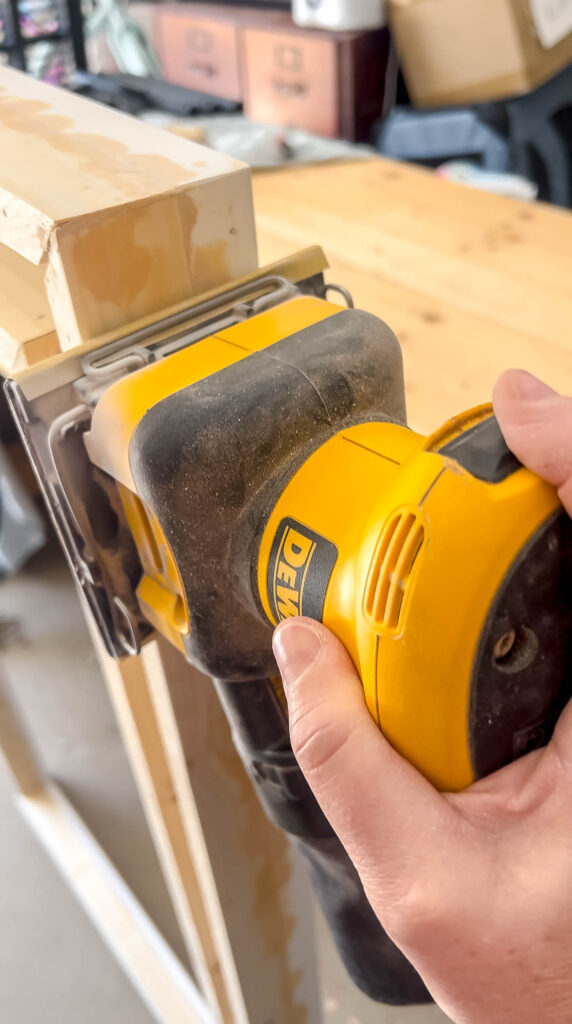
For the flat areas and outer edges, I used an electric hand sander to smooth everything out quickly. Then, for all the decorative grooves and detailed trim work, I just used a piece of sandpaper by hand so I could get into all the little crevices.
After sanding, wipe the entire frame down with a damp cloth or tack cloth to remove all the dust before painting. This helps the paint adhere better and gives you a much smoother final finish.
Step 8: Paint or Stain
When it comes to finishing your custom Frame TV frame, there are so many directions you could go depending on the look you want for your space.
If you used all raw wood, you could absolutely stain the frame for a rustic or more natural look. Since I used a primed casing trim board for my decorative molding, painting made the most sense for this project. But truly, you could stop after a simple paint color if that fits your style!
I wanted mine to have more of an antique, high-end metallic finish, so I started by spray painting the entire frame a deep dark brown. This acts as the base layer underneath the metallic finish and helps give the final frame more depth and dimension.
If you plan to use Rub ’n Buff like I did, I definitely recommend starting with a darker base coat first.
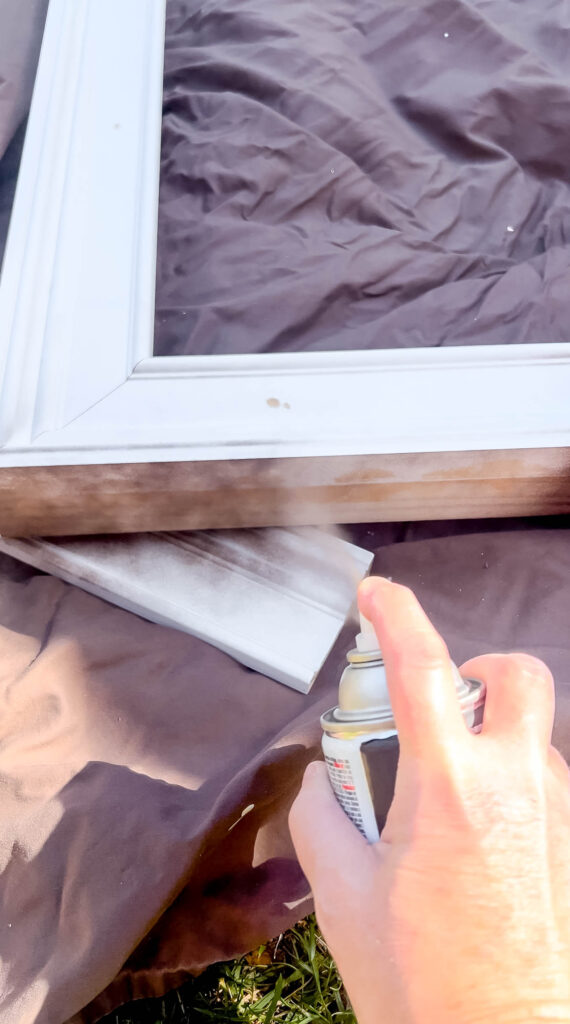
Since I was spray painting, I took the frame outside and worked on top of a drop cloth in a well-ventilated area. Be sure to follow the directions on the spray paint can, but in my experience, spray paint almost always turns out best outdoors where there’s plenty of airflow and room to work.
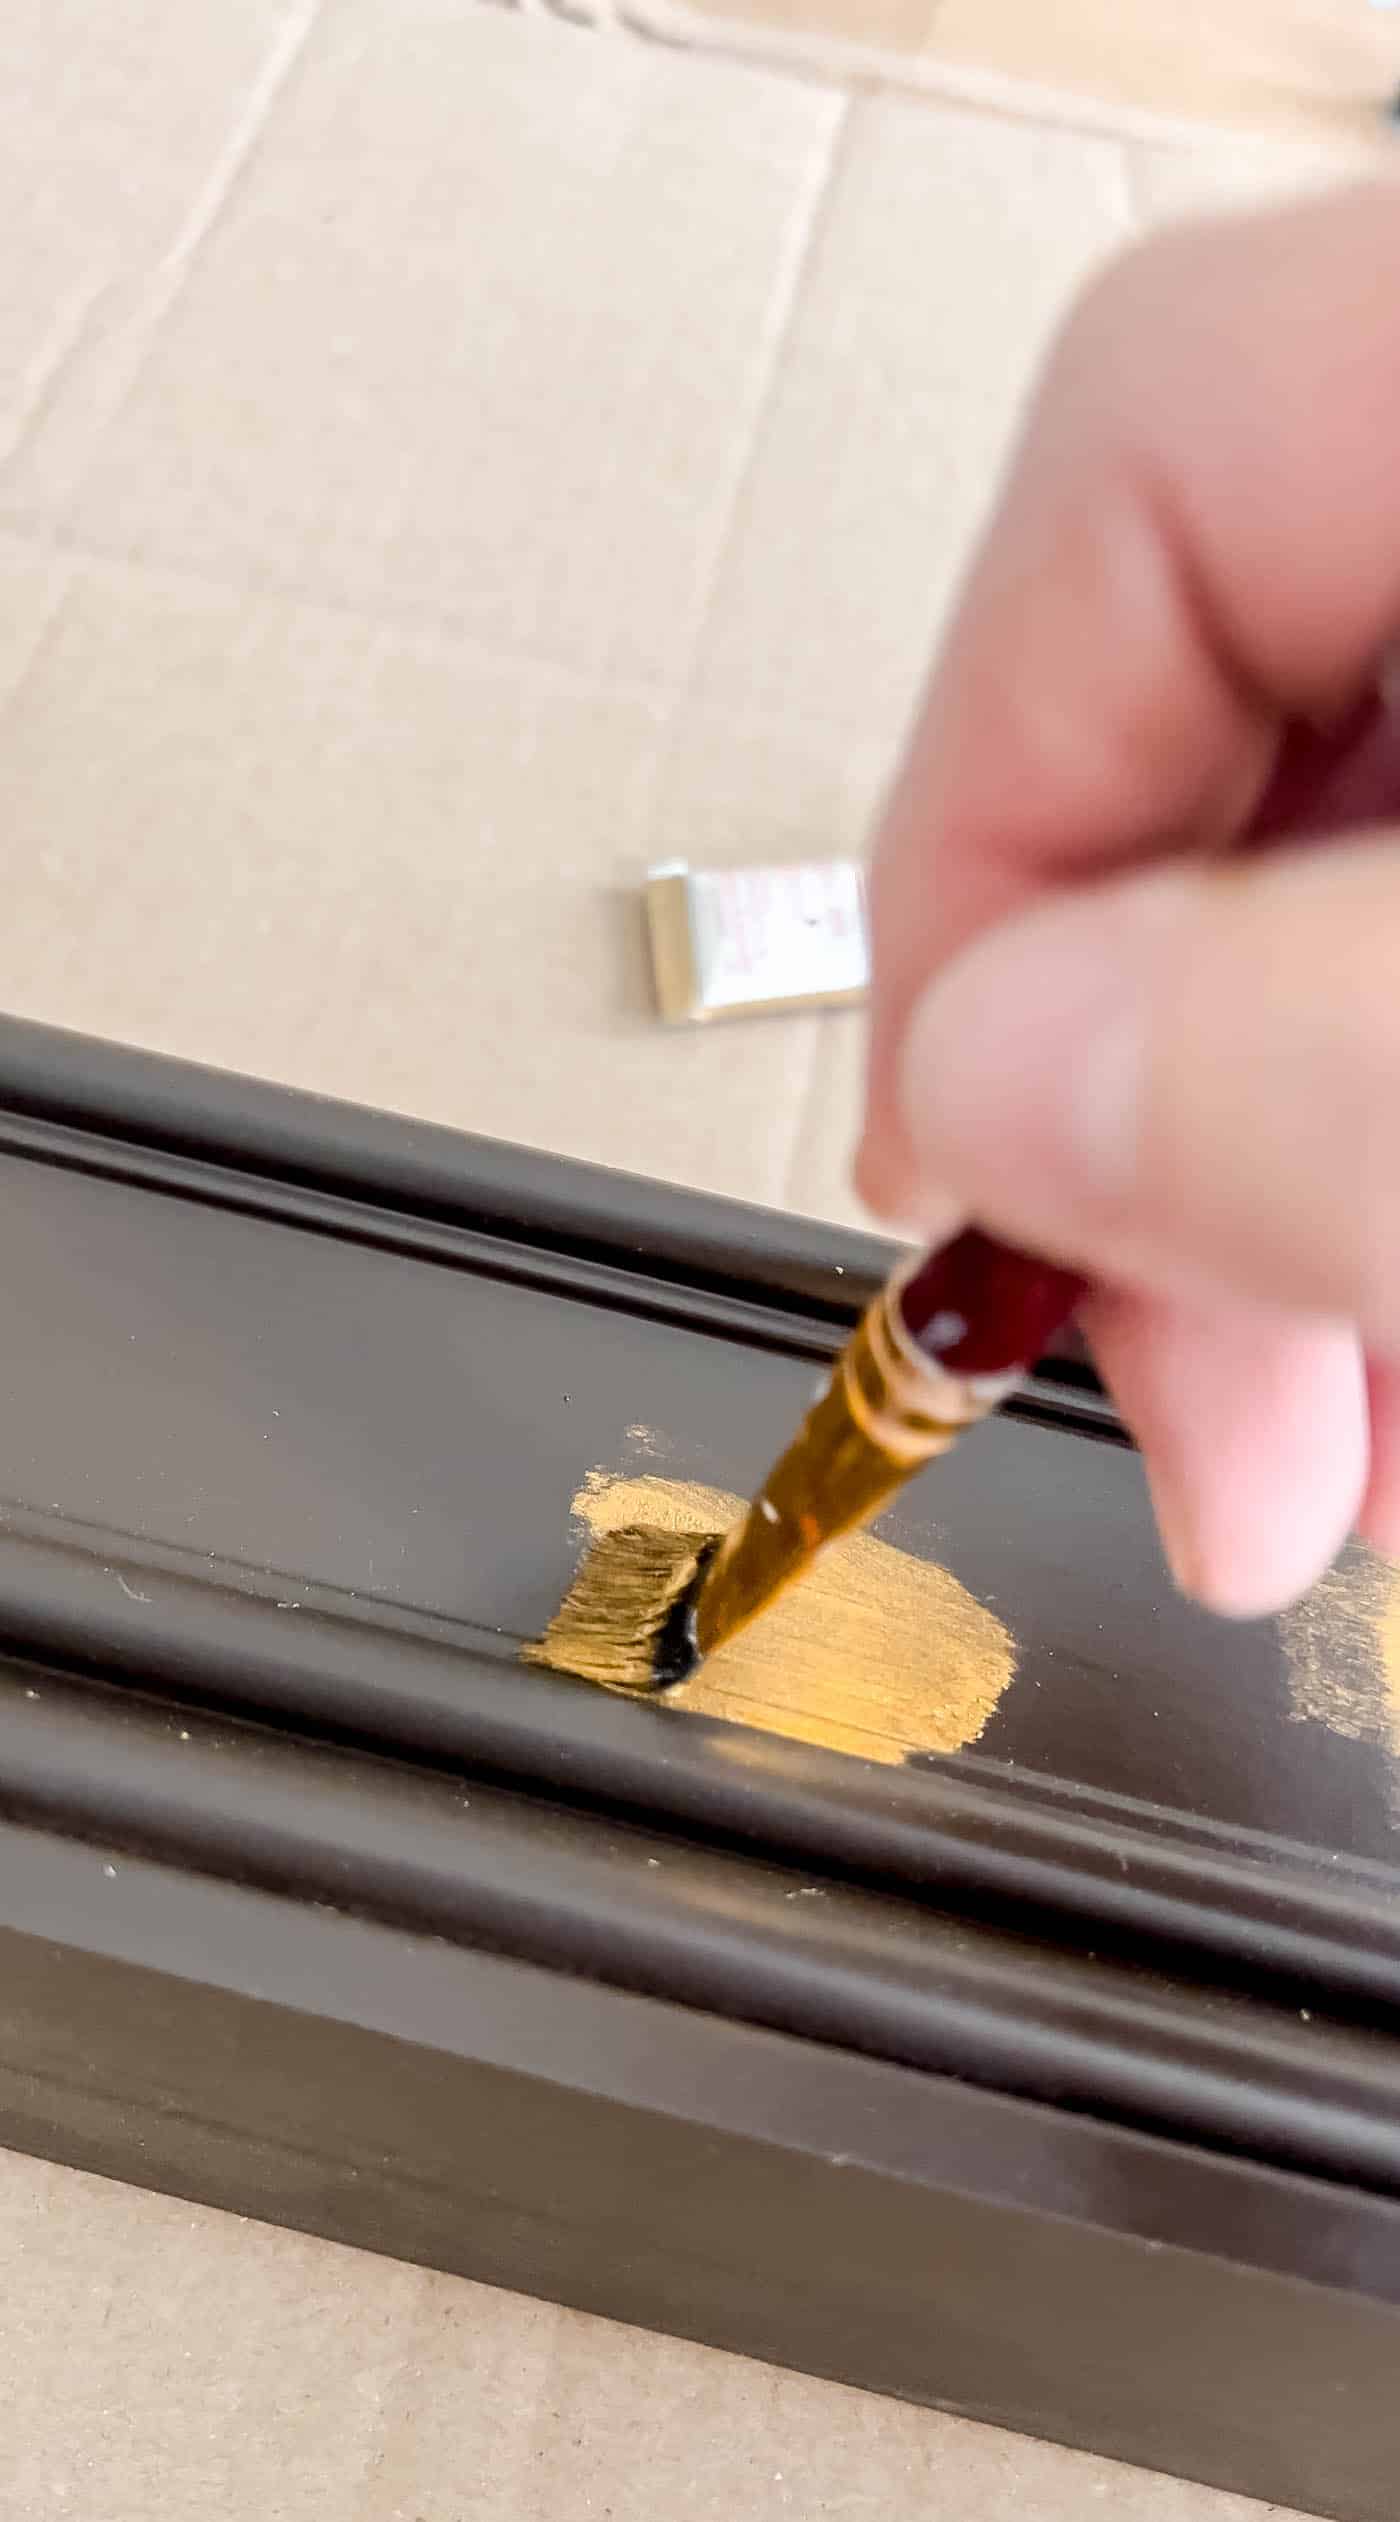
Once the paint dried completely, I brought the frame back inside and started applying the Rub ’n Buff finish.
I tested a few different metallic shades I already had in my craft stash and ended up choosing Grecian Gold because it matched the other warm gold tones in our bedroom so well.
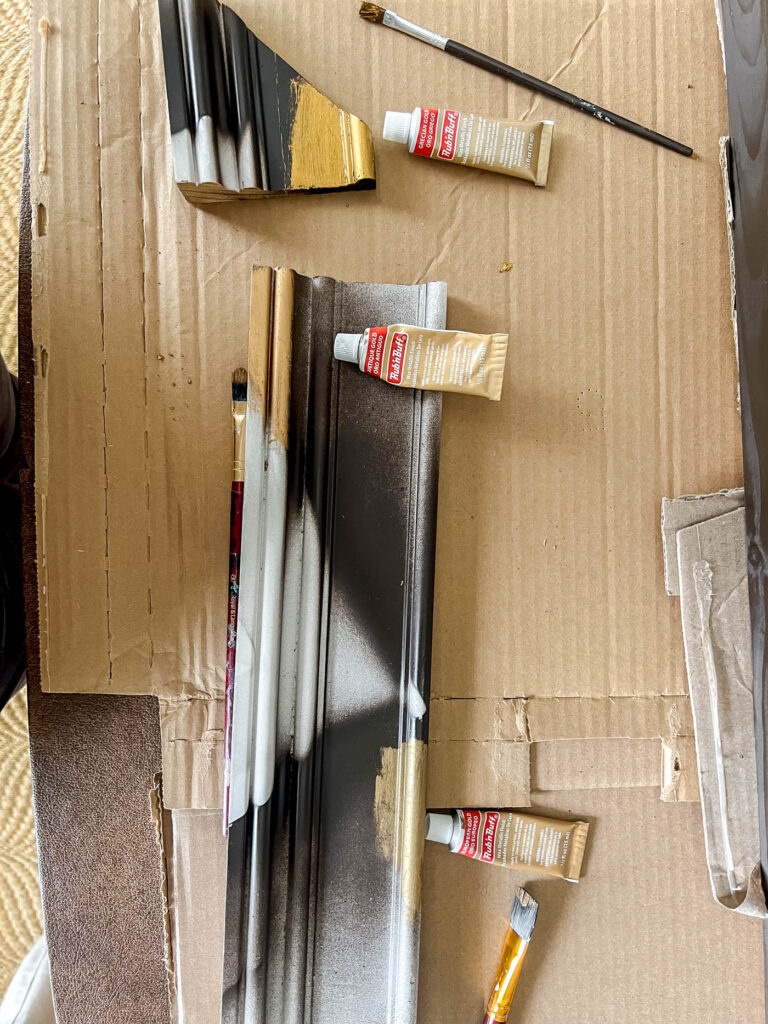
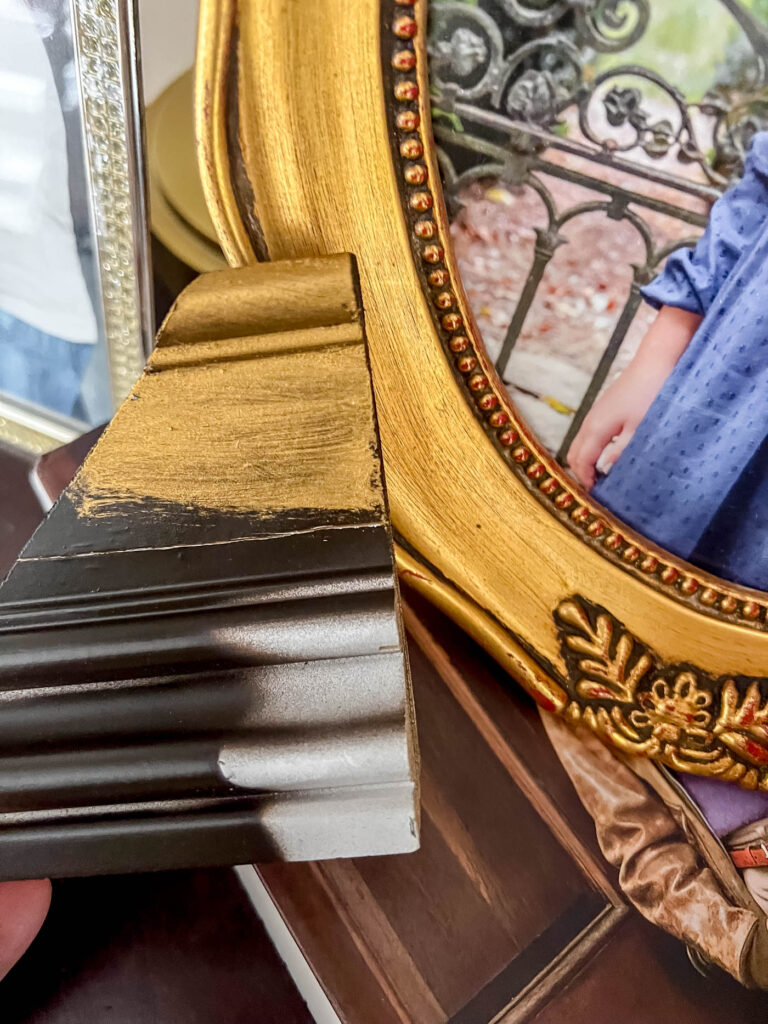
To apply it, I used a small brush with just a tiny amount of product and worked in light, small brush strokes until I achieved the soft antique finish I wanted. A little bit truly goes a long way with Rub ’n Buff, so start light and slowly build up the color as needed.
Step 9: Attach Frame to TV
Since I built my custom Frame TV frame to fit fairly snugly around the TV, I simply placed the frame onto the television and let it rest in place. That’s actually the same method I used for the DIY frame on our living room Frame TV over the mantel, and it’s worked great for us.
Because the frame is lightweight but sturdy, it naturally stays put once it’s sitting correctly around the TV.
If I ever felt like it needed additional support, I would probably use a few Command Strips behind the frame to help secure it lightly to the wall. There are definitely other attachment methods out there, but honestly, if your frame is measured and built well, it should sit securely on the TV without needing much else.
And that’s it! One simple DIY project completely transformed the look of our bedroom and made the TV feel so much more intentional, cozy and collected instead of just a big black screen on the wall.
How to Style Your Frame TV
The whole point of building a custom Frame TV frame is to help your TV truly feel like a piece of art instead of just another screen in the room. And honestly, styling the art might be my favorite part!
I love changing out the artwork on our Frame TV throughout the year to match the seasons and keep the room feeling fresh and cozy.
Seasonal Frame TV Art Ideas:
Changing the artwork seasonally completely transforms the feel of the room with almost no effort. It’s such a simple way to make your home feel warm, collected and intentional year-round.
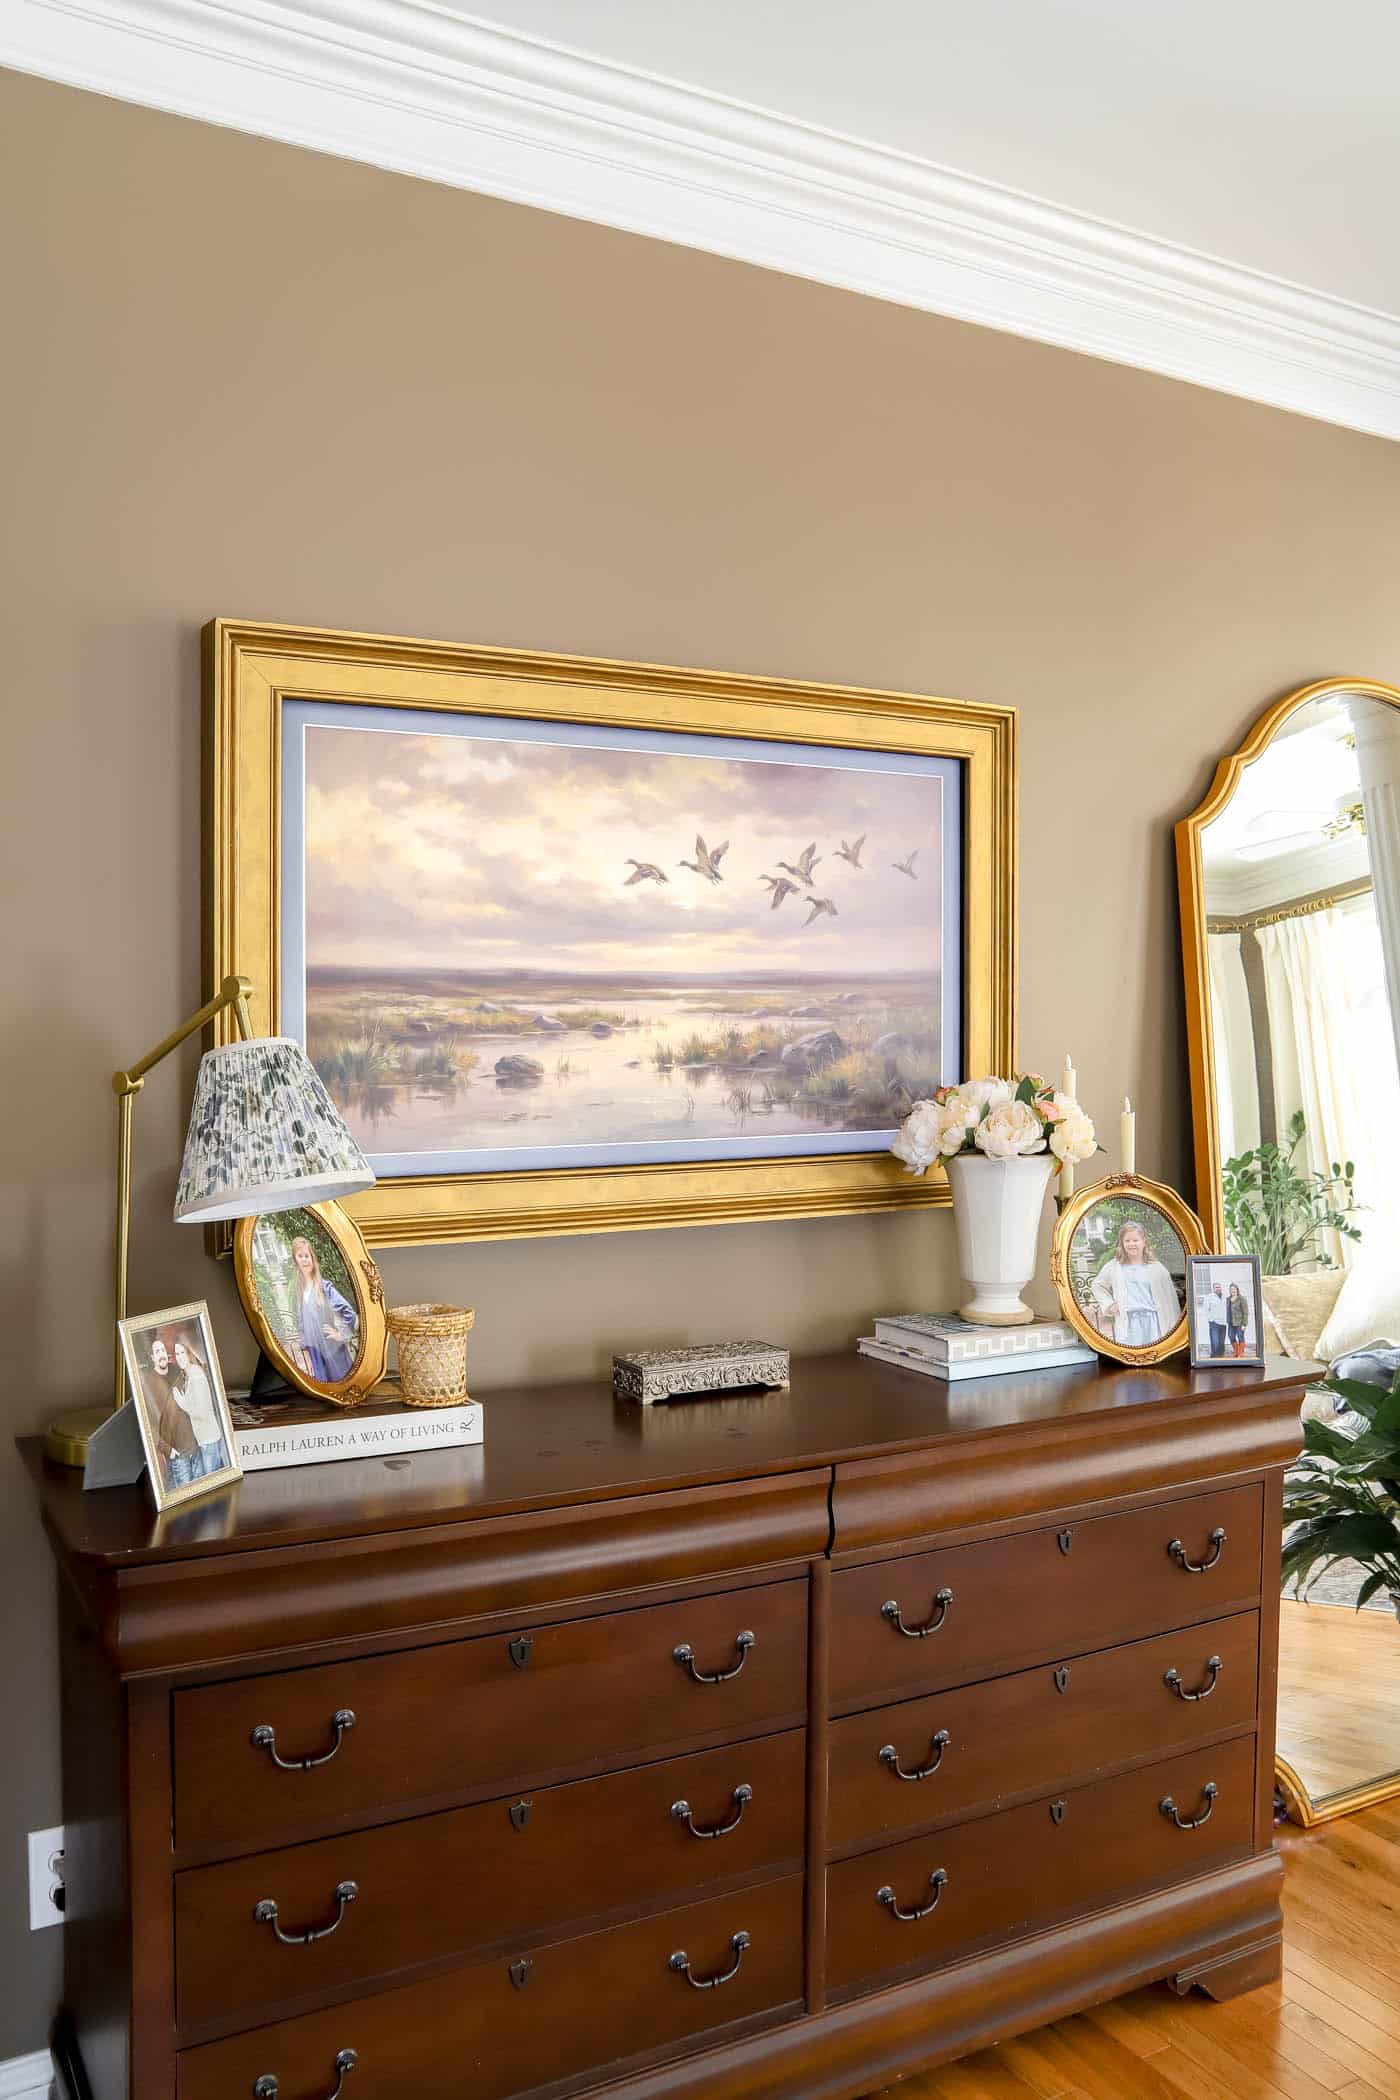
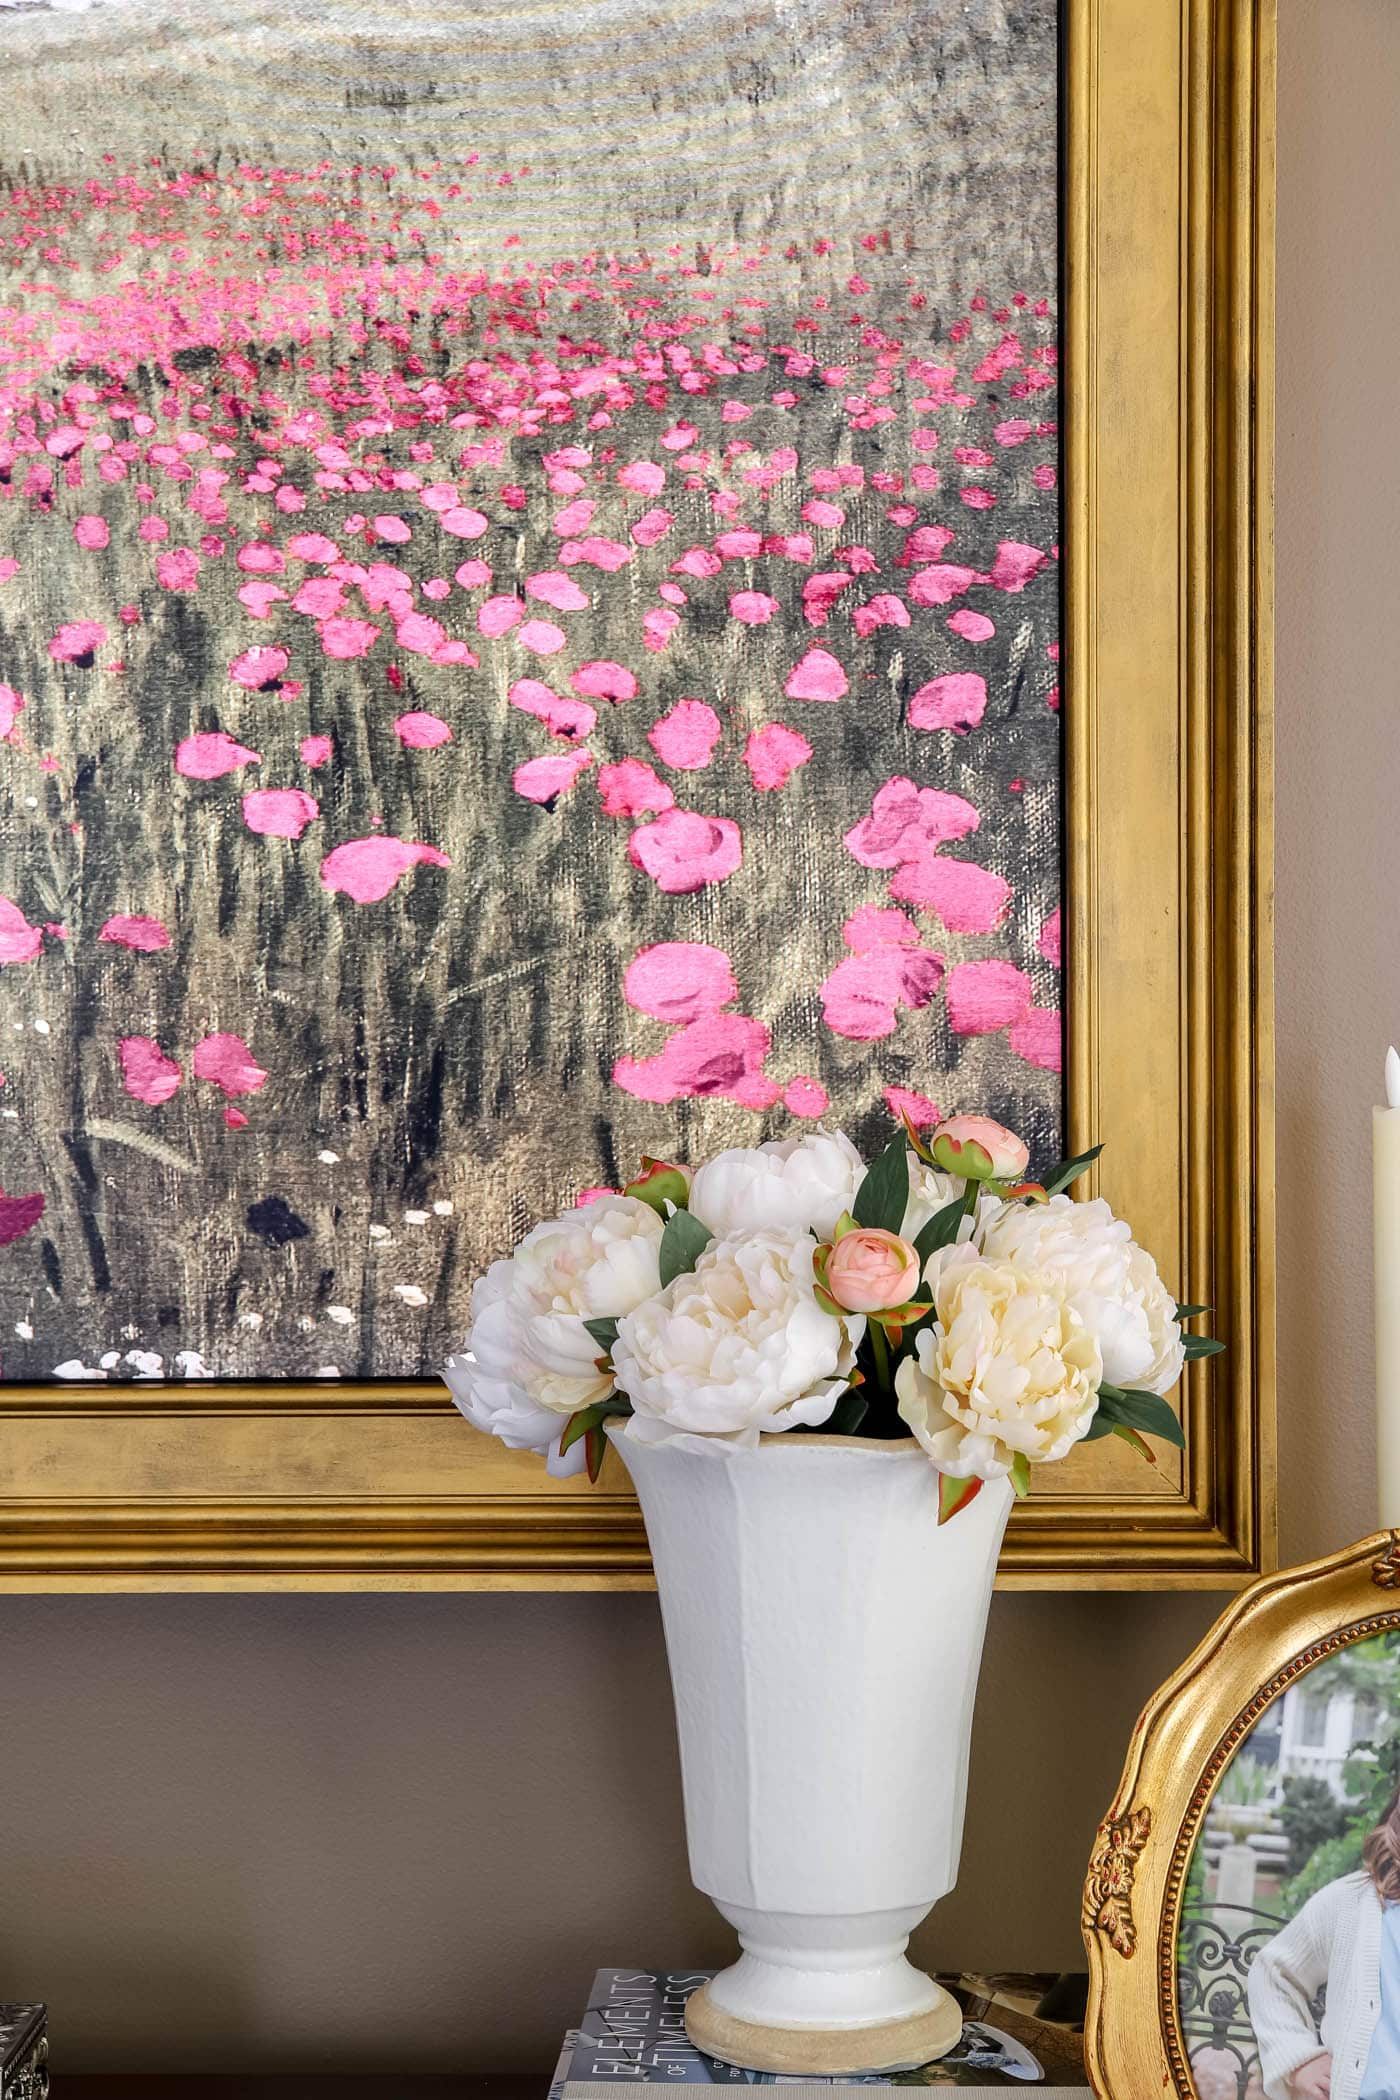
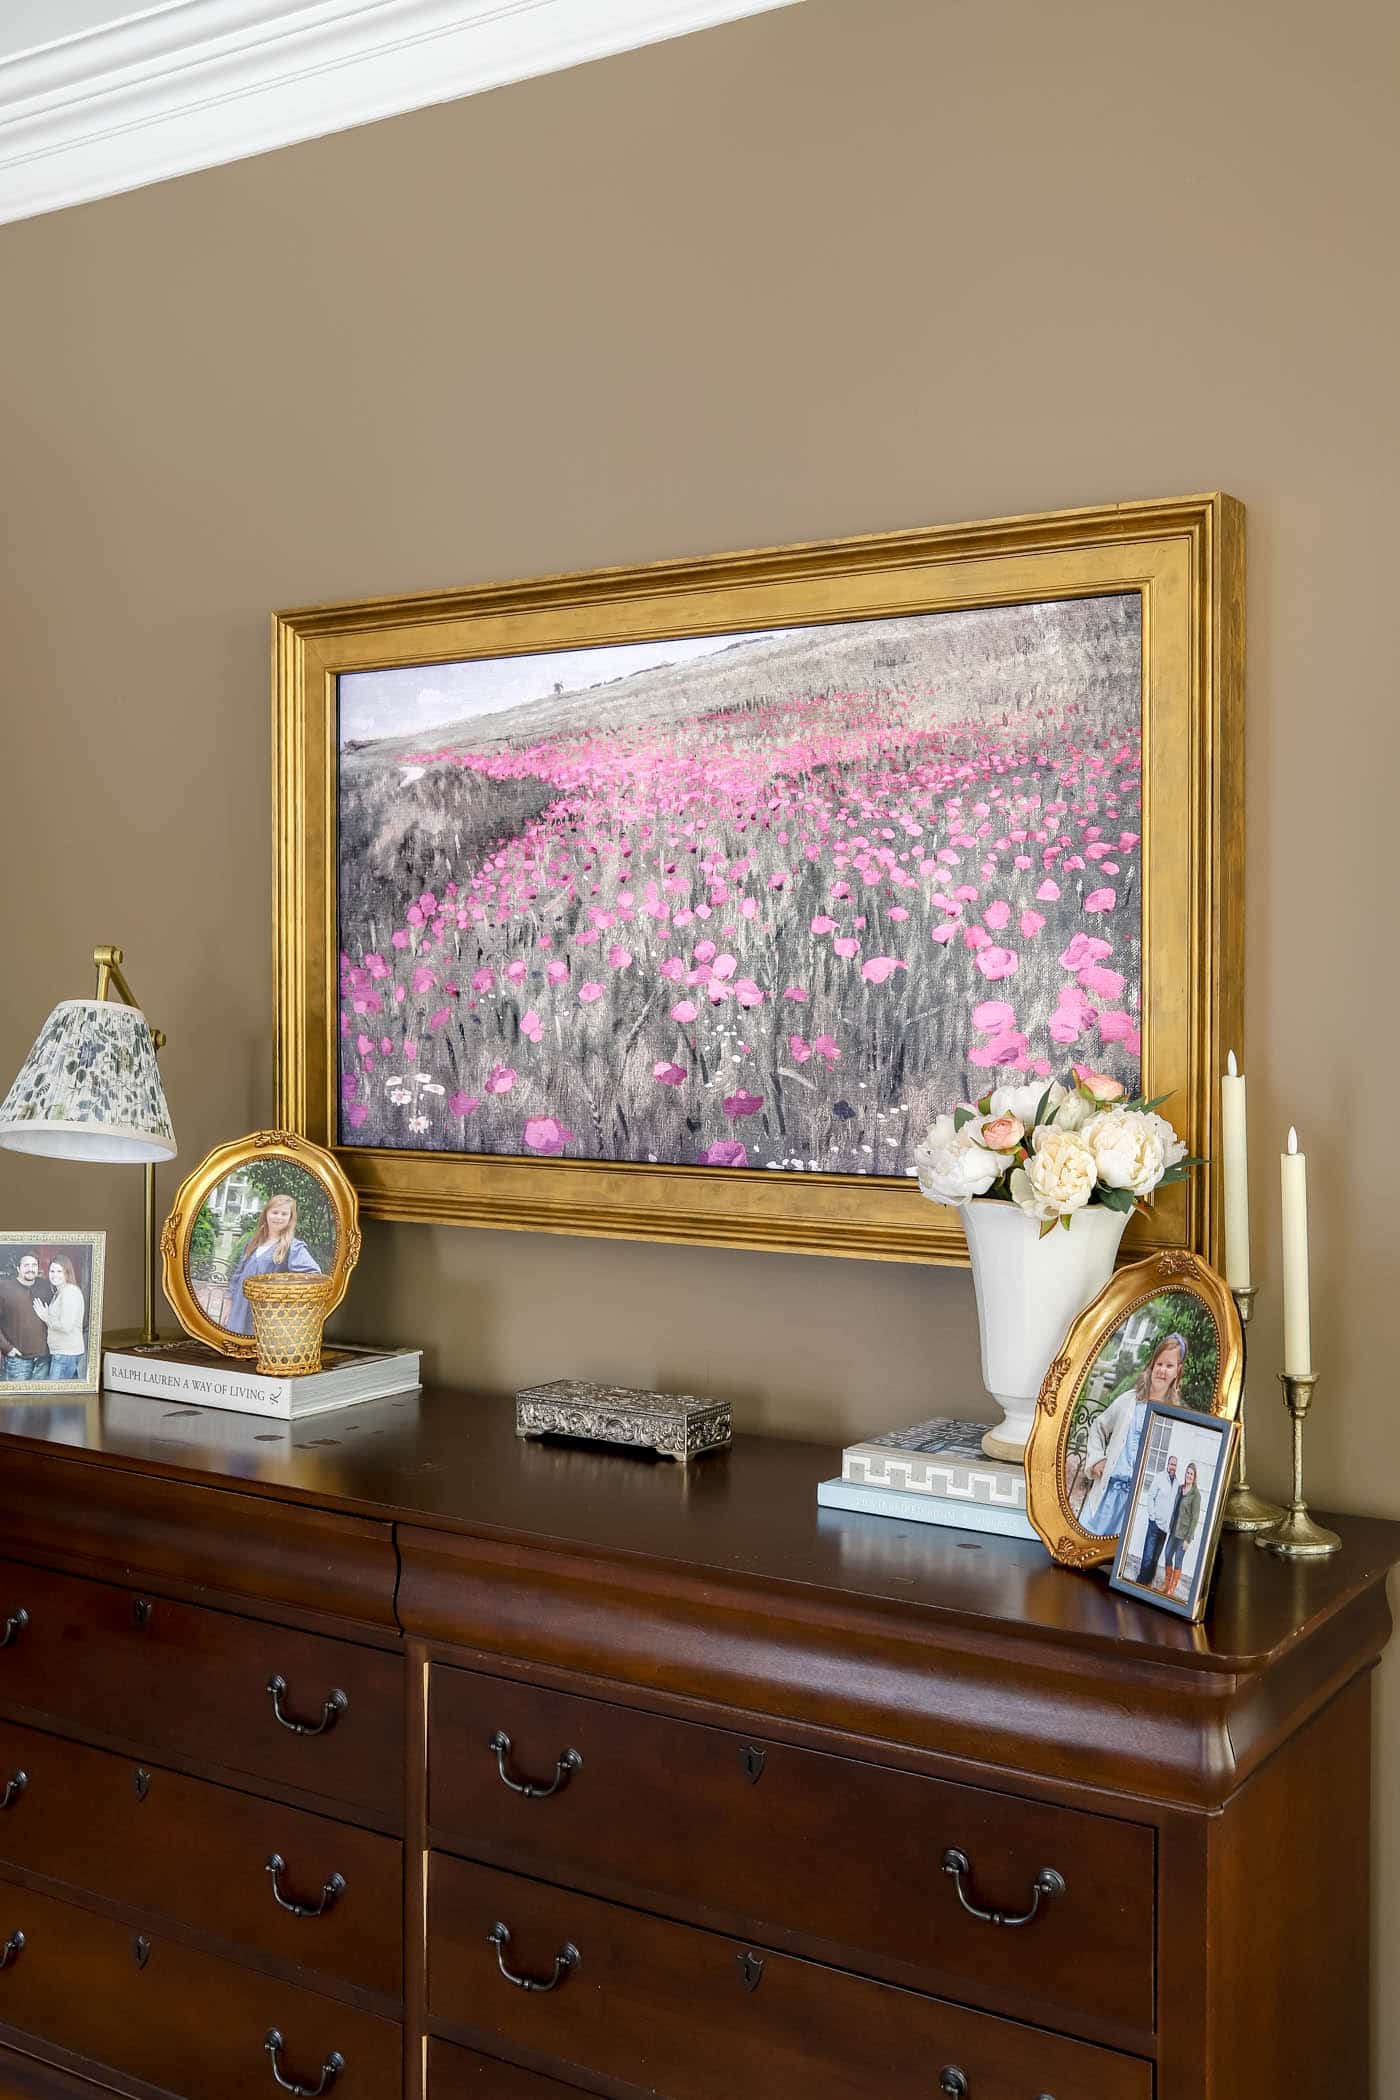
And dressing up the TV as artwork totally changed the look of this once sad and boring wall. I love that mounting the TV gave me plenty of space on the dresser below for books, framed photos, flowers, lamps and candles instead of having a bulky television sitting there.
I even pulled my childhood jewelry box out of the attic and styled it in the center of the dresser, which feels extra sentimental and special in the space now.
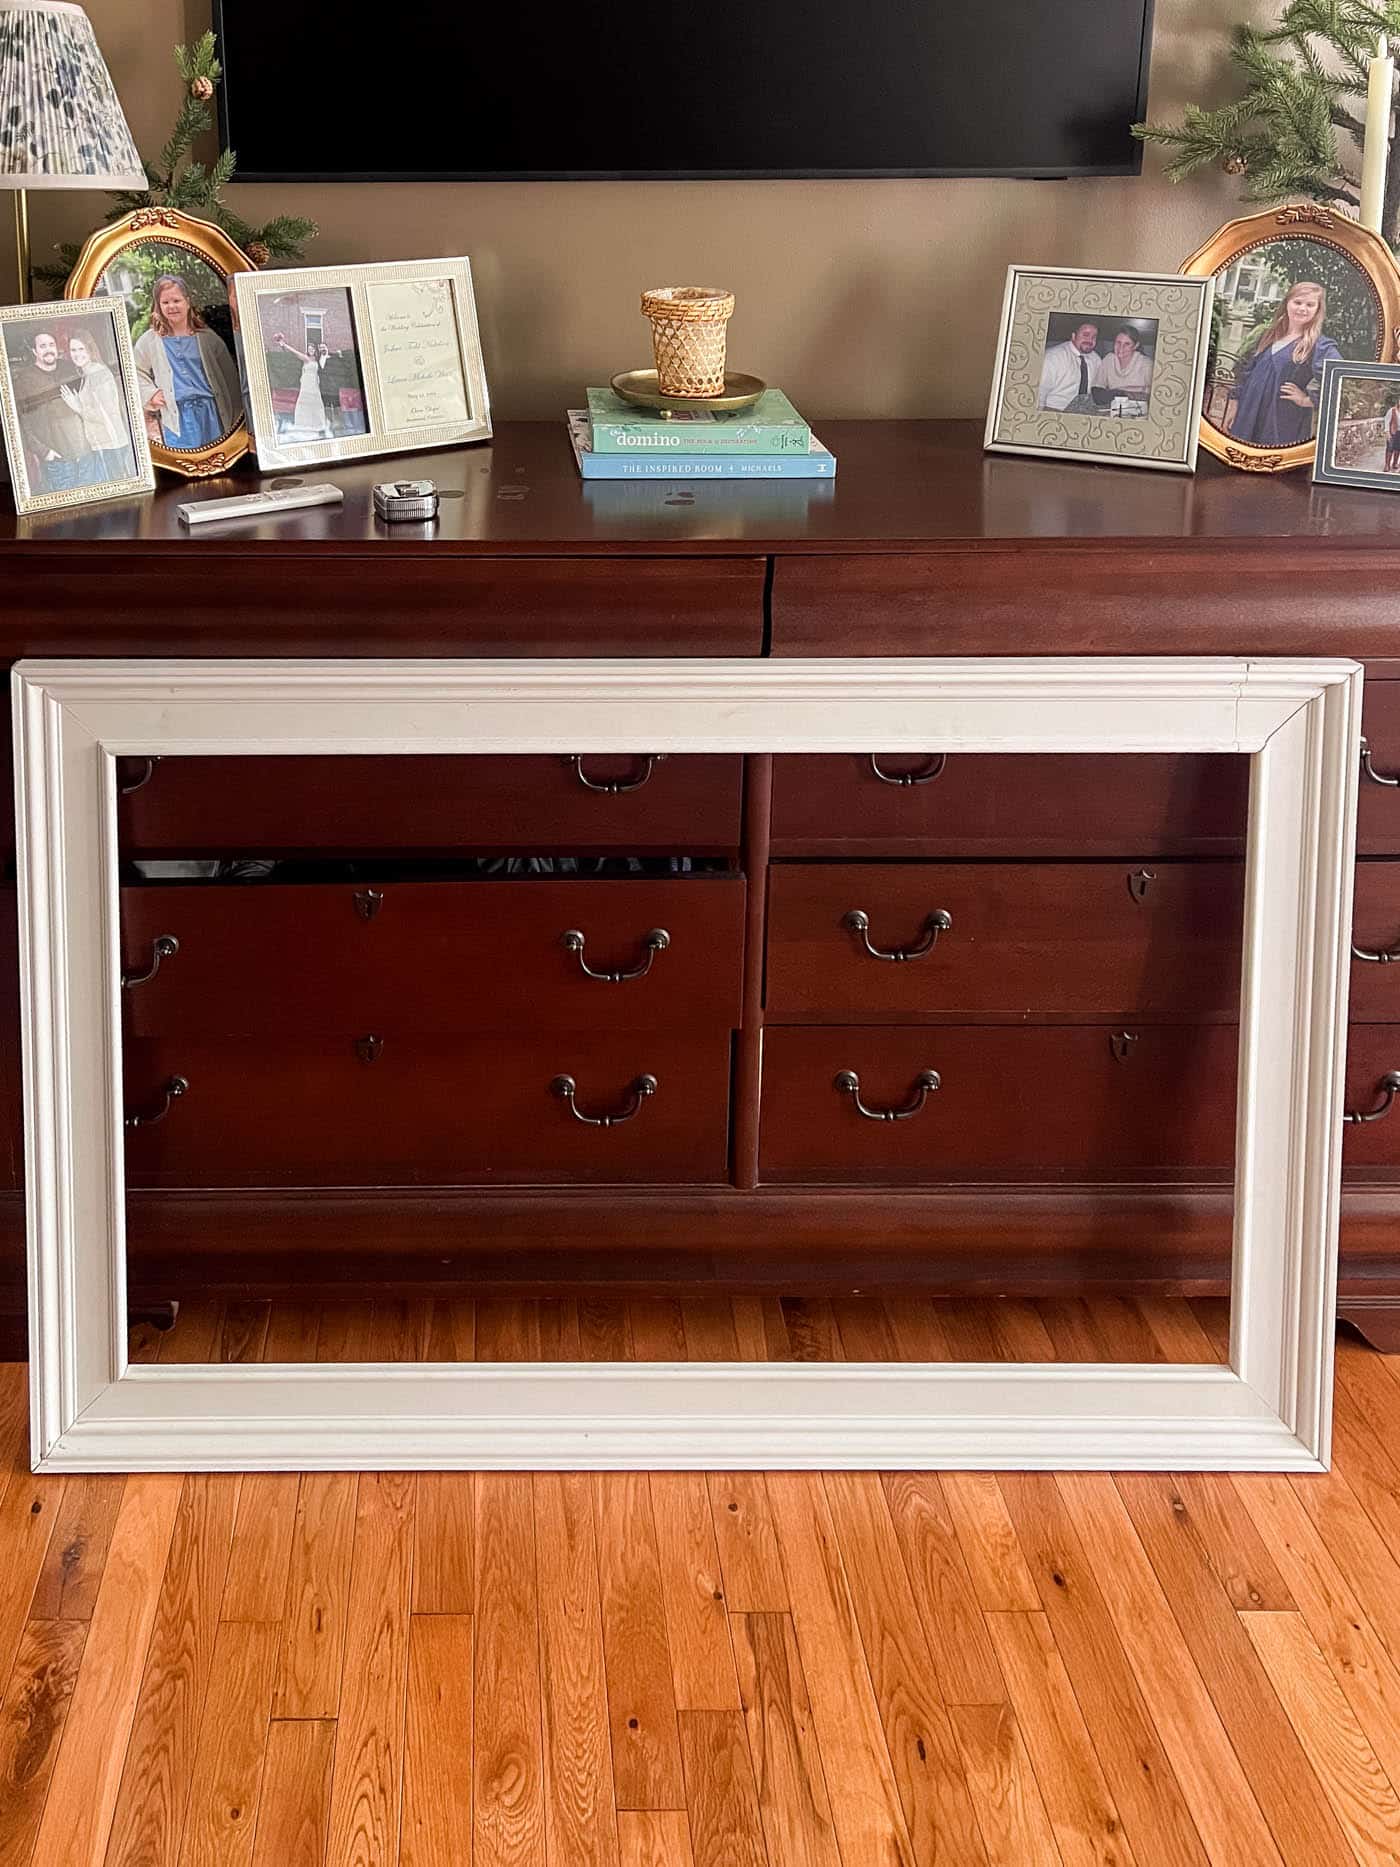
Before:
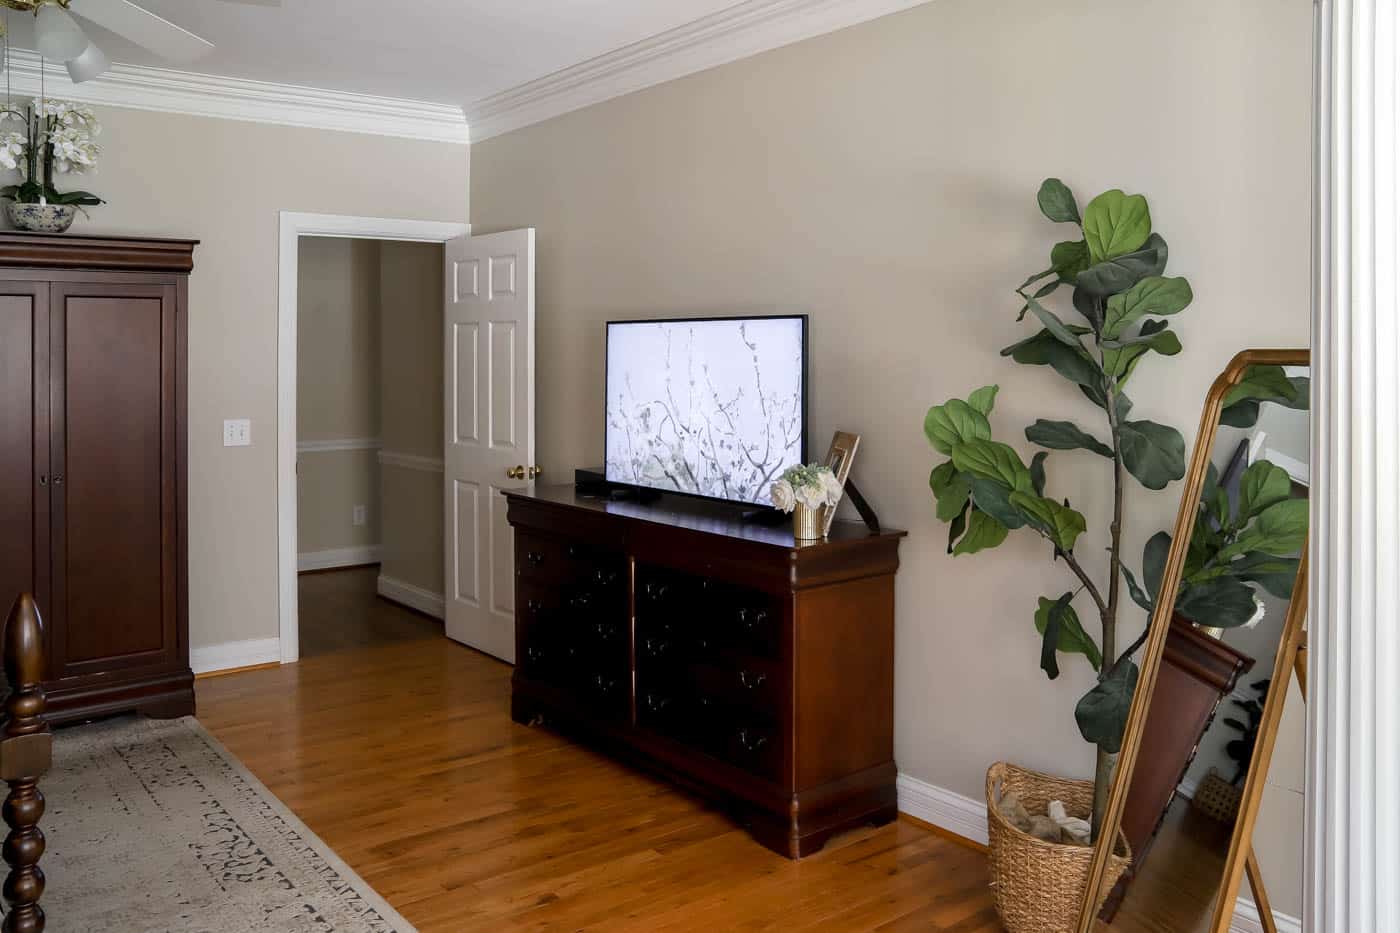
After:
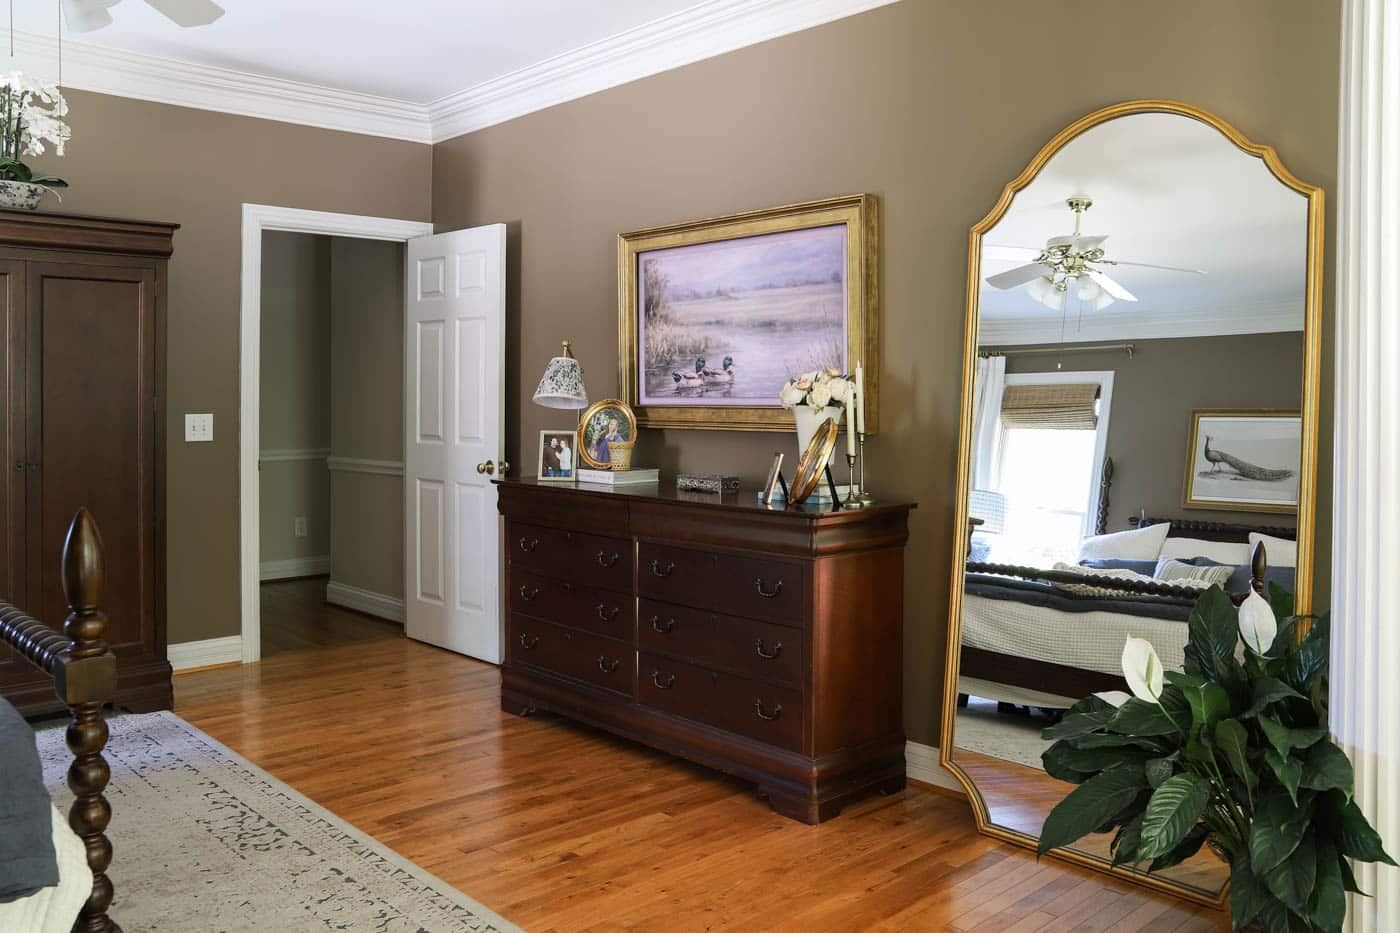
The oversized mirror and the large framed TV suit the scale of this wall so much better now. It’s honestly such a good reminder of how important scale is when decorating a room.
This wall is over 16 feet long with 9-foot ceilings, so the larger pieces finally help the space feel balanced and intentional instead of empty and awkward.
And of course… I’m still not completely finished with this room yet. 😉 I have a few more ideas planned for this bedroom makeover, so stay tuned for the next phase!
Frequently Asked Questions
Yes! You can absolutely add a DIY frame to a Samsung Frame TV. In fact, that’s one of the reasons these TVs are so popular for home decor lovers since they’re designed to look like artwork on the wall.
You can build your own custom frame like I did, or purchase one of the many pre-made decorative frames available online.
This frame partially covers the sensor, but I showed how to cut a small notch in the frame so light can still reach it properly.
Your Frame TV remote should still work even if the sensor is somewhat blocked, but covering it too much can affect the TV’s motion and light sensitivity features. If needed, you can always adjust those settings directly on the TV.
That really depends on how you choose to attach your frame.
Since my frame simply rests snugly around the TV, it’s very easy to remove whenever I want to switch something out, make adjustments or move the TV.
If you use adhesive strips or another securing method, removal may take a little more effort.
I’ve found that decorative molding around 3½ inches wide works best for this style of custom Frame TV frame.
That width gives the TV a substantial, high-end look without overwhelming the screen itself. I also recommend choosing a molding profile that matches the style of your home, whether that’s traditional, modern, farmhouse or something more ornate and vintage-inspired.
Shop the Look
If you love the cozy, collected look of this bedroom makeover, here are a few of the pieces that helped bring the whole space together:
One of my favorite things about this room is how layered and intentional it feels now without being overly fussy. The framed TV really helped anchor the entire wall and made the surrounding decor feel more balanced and high-end.
Which Frame TV DIY Is Right for You?
Now that I’ve built two different DIY Frame TV frames in our home, you might be wondering which version makes the most sense for your space and skill level.
Honestly, they’re both great options; it just depends on the look you’re going for!
Choose the Simple Frame If:
- You want something quick and budget-friendly
- You’re newer to DIY projects
- You prefer a cleaner, more minimal look
- You want an easy weekend project with fewer tools and steps
Choose the Custom Decorative Frame If:
- You love a more designer, layered look
- You don’t mind a few extra building steps
- You want your TV to truly resemble framed artwork
- You enjoy traditional details and a little extra character
This decorative version definitely takes a little more time, but the final result feels so custom and high-end. It completely transformed the feel of our bedroom and made the TV blend into the room so much more naturally.
And the best part? Both versions are still far more budget-friendly than buying a pre-made luxury Frame TV frame. 🙌
Final Thoughts
Building this DIY Frame TV frame wasn’t just about saving money or avoiding the high price tag of a store-bought version, although that certainly didn’t hurt! It was really about creating something that felt personal, intentional and beautifully connected to the rest of our home.
I love being able to take a few basic tools, some affordable materials and a creative idea and turn them into something that completely changes the feel of a space. Projects like this remind me that you don’t always have to spend a fortune to create a home that feels warm, collected and uniquely yours.
And honestly, there’s something really satisfying about looking around your home and seeing pieces that you built with your own hands. They tell a story, add character and make a space feel even more meaningful.
This frame completely transformed our bedroom wall, and I’m so glad I decided to take the DIY route instead of purchasing an expensive custom frame. It feels cozy, high-end and perfectly suited to our home, which is exactly the look I was hoping for.

Your frame is lovely! What have you done about a sound bar with your Samsung frame tv?
Hi Kim! Do you mean the connected box that goes with the TV? We don’t have a sound bar, but we used the same method for hiding the cord as we did in our living room. We cut a hole in the drywall behind the TV, and ran the cord down to behind the dresser and cut a hole there, too. The box for the TV sits in the floor behind the dresser! Another reason I love the Frame TV is because it only has the one really thin cord attached, and the box can be hidden anywhere since the remote uses bluetooth to connect!
See my original tutorial for how we did this in the living room here: https://theturquoisehome.com/how-to-hide-tv-cords/