DIY Frame for a Frame TV
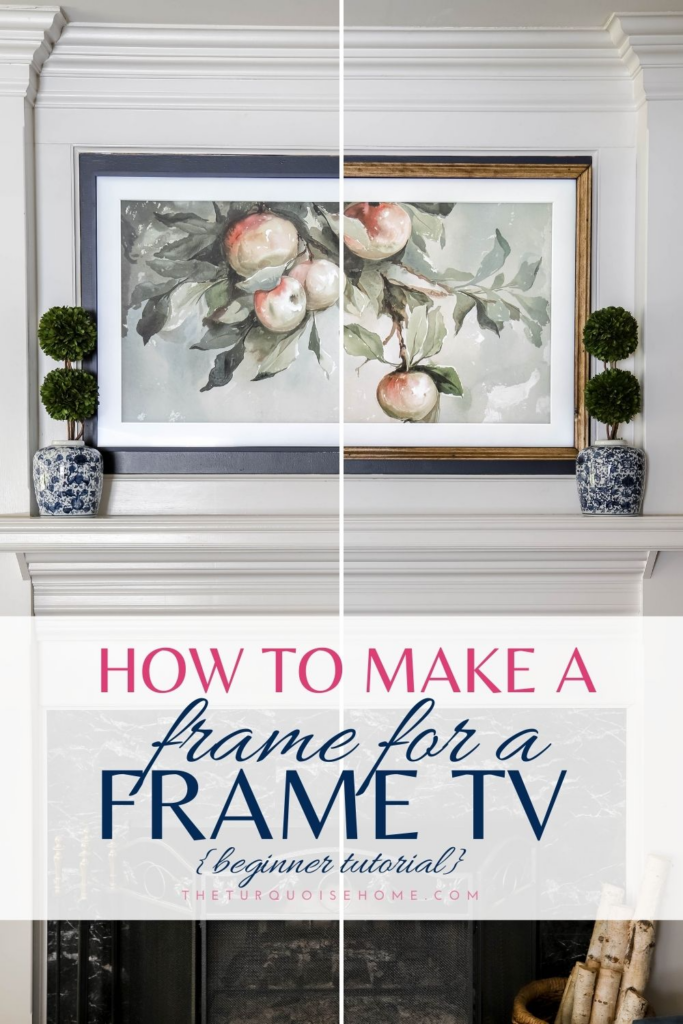
Learn how to inexpensively DIY a frame for the Samsung Frame TV with just a few basic tools and a little time!
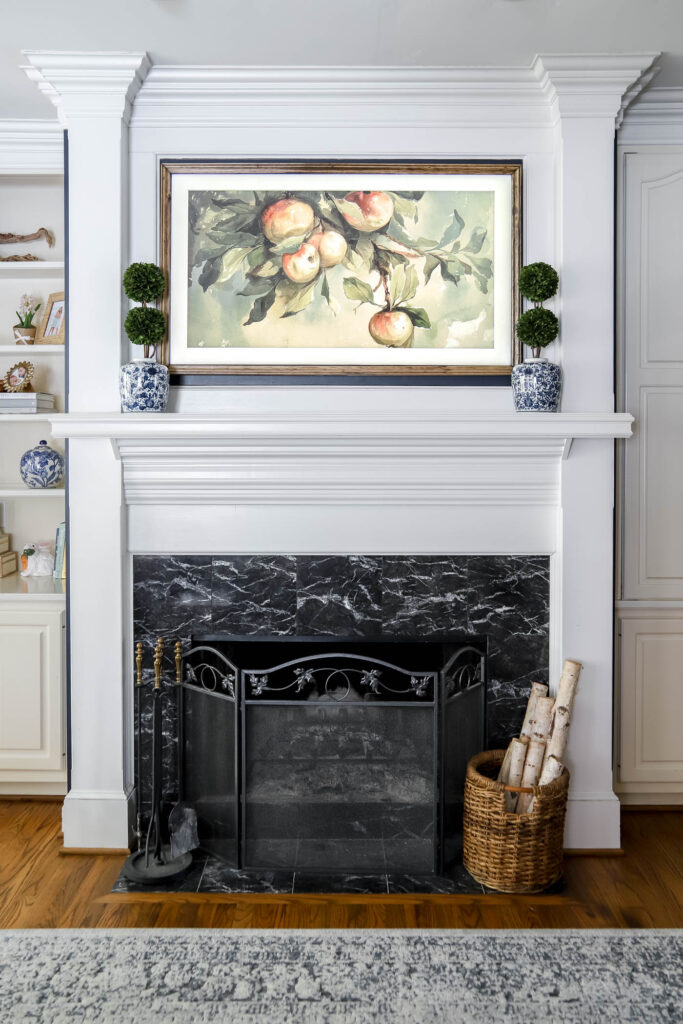
If you’ve never heard of a Frame TV, I have a full review here. In essence, it is a wonderful invention which allows this particular TV to display art while the TV is not in use.
But, one of the only cons is that it doesn’t come with an actual frame. While the TV itself sits flush to the wall, if you want it to truly look like framed art, you need to purchase an additional frame piece to fit around the TV.

Ideas for Purchasing Frame TV Frames
There are a few great options for purchasing frames for the TV, which I’ll share here. And then explain why none of them were good options for my home.
Frame 1 – Modern Bezel Frames
These are sleek, modern plastic frames that magnetically snap into place. They are sold by Samsung especially and only for the Samsung Frame TV. They come in a variety of colors that would work with any home decor, but they are too modern for my taste.
Overall the are between $100-$200 as of this writing, and I didn’t want to spend that much money on something I didn’t love.
Frame Option 2 – Deco TV Frames
These deluxe frames are more my style and start at $300+ for a larger wood or metal frame that snaps into place around the Frame TV. Don’t get me wrong, I LOVE some of these frames and would probably save up the money and buy one if it worked for my space.
But the problem with these frames is that they are too big for the space around my TV. The gap between my TV and the moulding around my television is less than 2 inches, and these frames are 2.5 inches wide. Womp. Womp.
Frame Option 3 – DIY TV Frame
But, I’m not too sad! I made my own for about $25 – and I love it. So if you find yourself wanting a beautiful frame for your Frame TV and the ones on the market are too expensive, or just don’t work, let me show you how to make your own!
Want to Save This?
Enter your email below and I’ll send it directly to your inbox!
How to Make a Frame for the Samsung Frame TV
I’ve framed numerous art items over the years, but this time I’m sharing how I framed my Samsung Frame TV. It’s been something I’ve wanted to do for a couple of years now, but never seemed to find the time. Now that our garage is organized, I’ve got my tools in the right place and the space to do DIY projects again!
Even there are several options for purchasing a frame for the Frame TV out there, they didn’t work for me, as mentioned before. The smaller bezel frames were too modern for my style. And the large, elaborate Deco Frames were too large for my space.
This post contains affiliate links for your convenience. See my full disclosure policy.
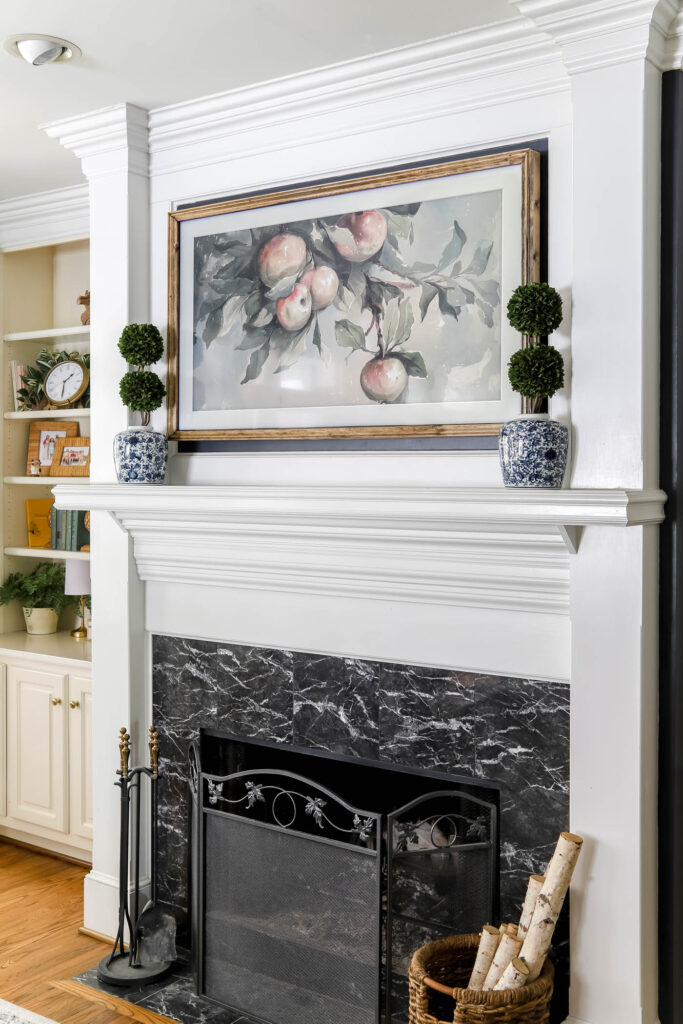
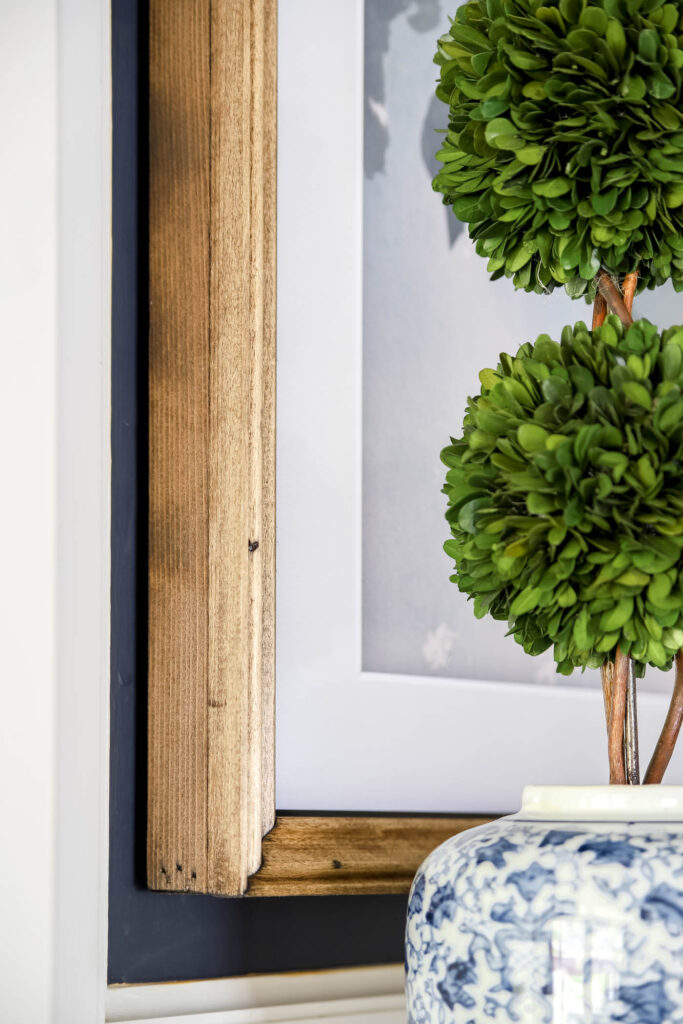
I wanted a frame with pretty trim moulding, but not as thick as the ones on the market.
So, I did what any DIY-er would do and made plans to make my own! I’ve seen other DIY Frame TV frames out there. But I wanted a small profile, stained wood frame that would fit inside my parameters.
What You Will Need to Frame the Frame TV
We have the 55 inch 2020 model of the Frame TV, so my specs will be according to our specific TV. If your TV is smaller or larger, adjust as needed.
- 2 – 1″ x 2″ trim boards at 8 feet long
- 2 – 3/4″ x 1-1/4″ unfinished wood moulding at 8 feet long (I used this exact trim piece.)
- Miter Saw (If you don’t have a miter saw, you could try miter shears or a hand saw and miter box.)
- Wood glue
- Brad Nailer Tool
- 1.5 inch finishing nails
- Pencil
- Tape Measure
- Corner clamps, optional, but pretty amazing
- Sand paper
- Paint or Stain of your choice
- Wood Putty, optional
Steps for Making a Frame for the Frame TV
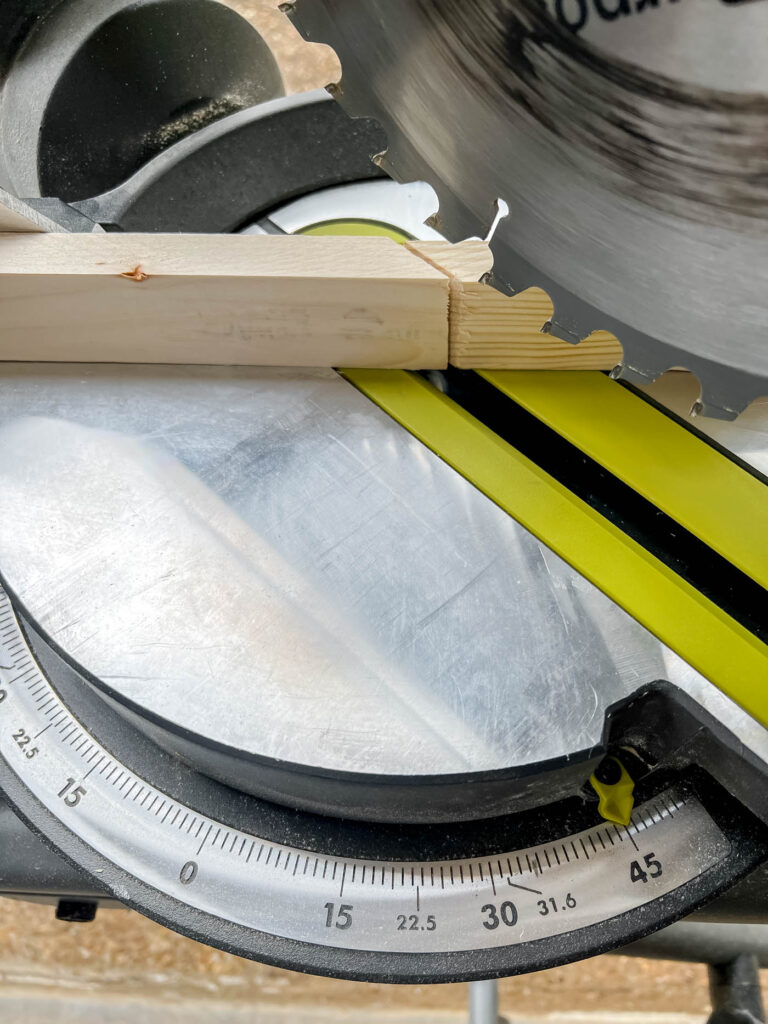
1. Cut the 1 x 2 Boards at a 45 degree angle.
You’ll want to measure your TV and cut the inside angle of the boards at the length of your TV sides. Make those 45 degree angled cuts perpendicular to each other so that the corners will fit together.
Turn the 1 x 2 boards short side up and cut at a 45 degree angle. Cut two longer boards for the top and bottom of the TV and two shorter boards for the sides.
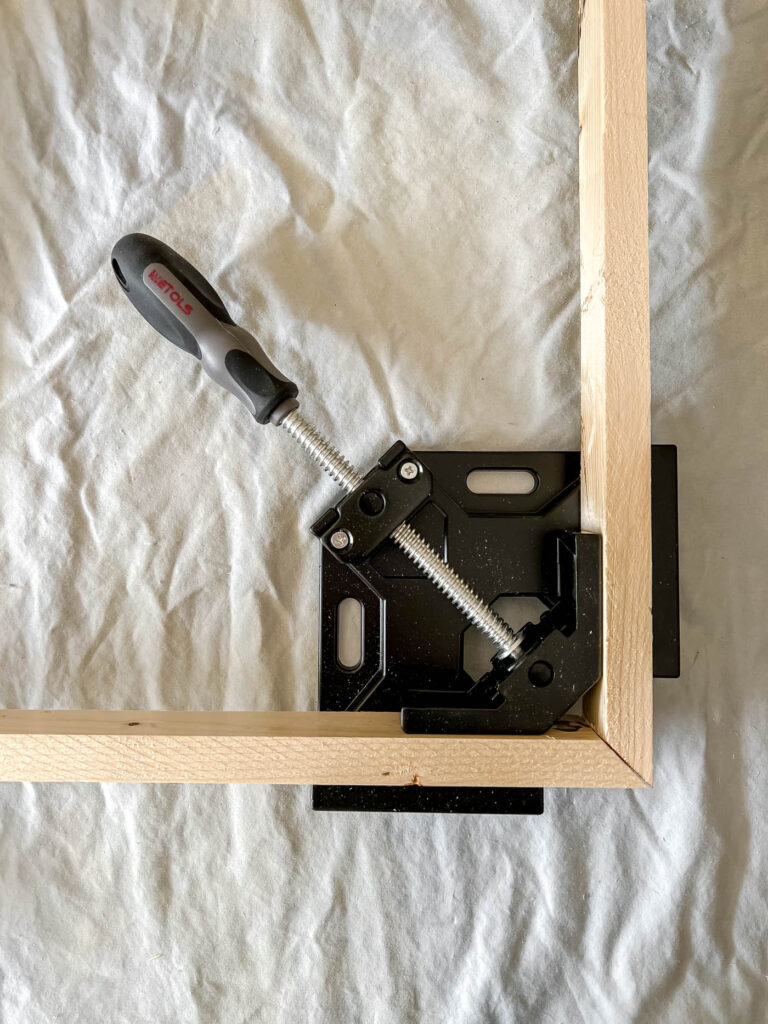
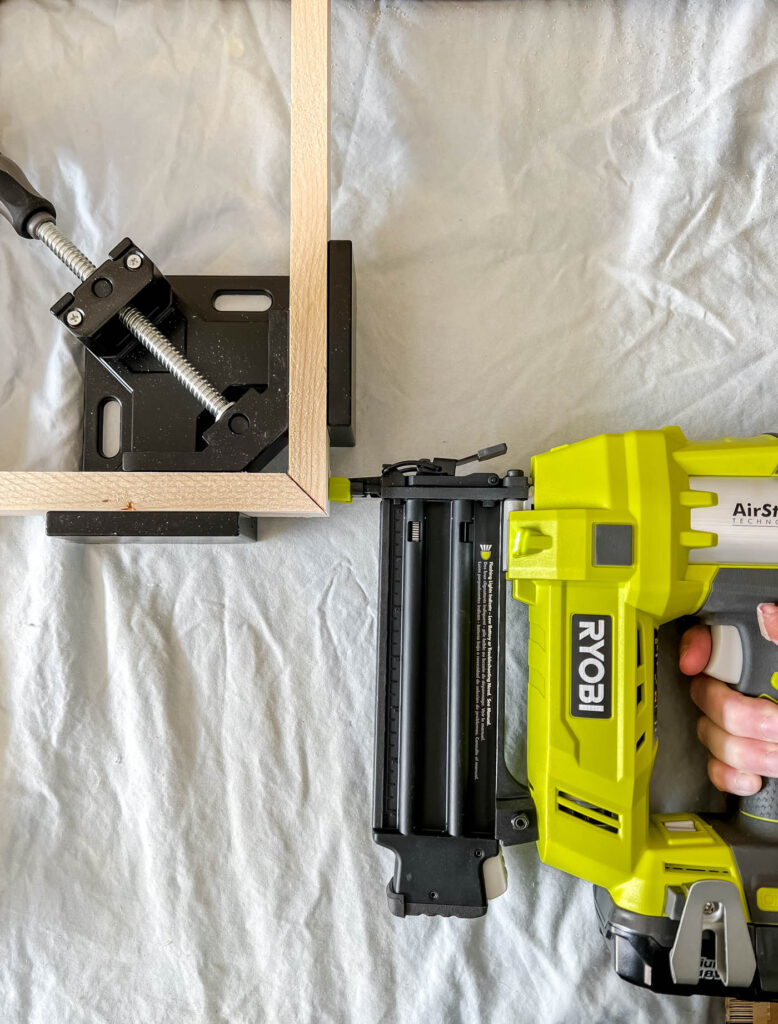
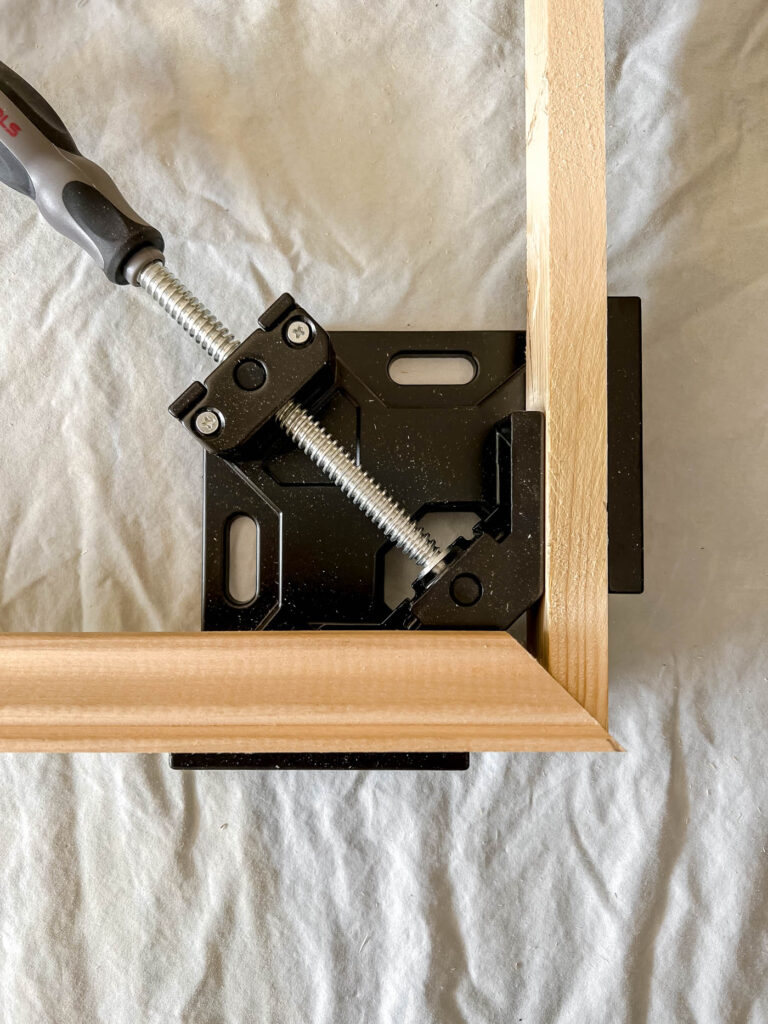
2. Use a Corner Clamp to Clamp the Boards Together
Clamp the angled ends of the 1 x 2 boards together to make a square corner. Make sure they all fit
I bought these corner clamps just for this project and it was invaluable for getting square corners just right! I know I’ll love having them in my tool box for future projects.
3. Attach the Corners with Wood Glue and Brad Nails
I glued each piece of the corner, then clamped them down and nailed them together with 1.5 inch finishing nails and my cordless brad nailer.
I nailed each board from either side to make sure they were nice and tight. Finish all 4 corners.
Let the glue dry for a few hours.
4. Check to make sure the frame fits your TV
Before moving on to the trim step, you’ll want to put the frame foundation on the TV to make sure it fits.
Mine was a little to big, so I took a piece off and cut it down just a little bit. Better to be too large than too small, though, right?
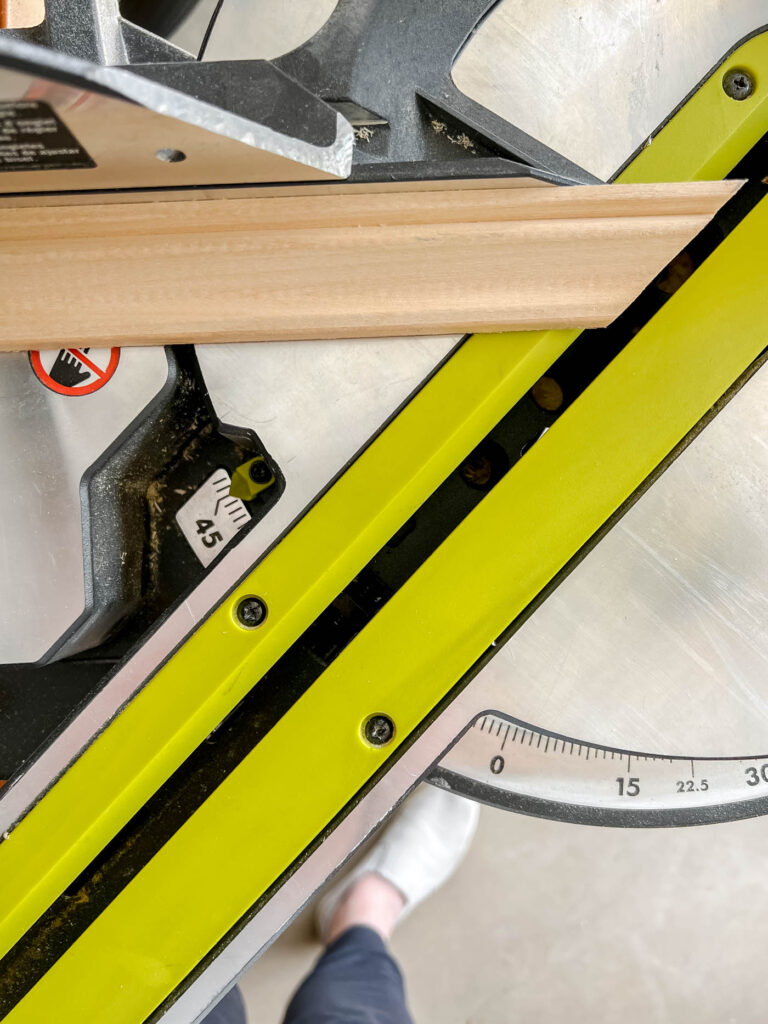
5. Cut the Trim Pieces at 45 Degree Angles
Now, cut the trim pieces to the exact same lengths as the 1 x 2’s at a 45 degree perpendicular angle.
I used the frame foundation as a guide for how long to cut my trim pieces, to make sure they covered the frame exactly.
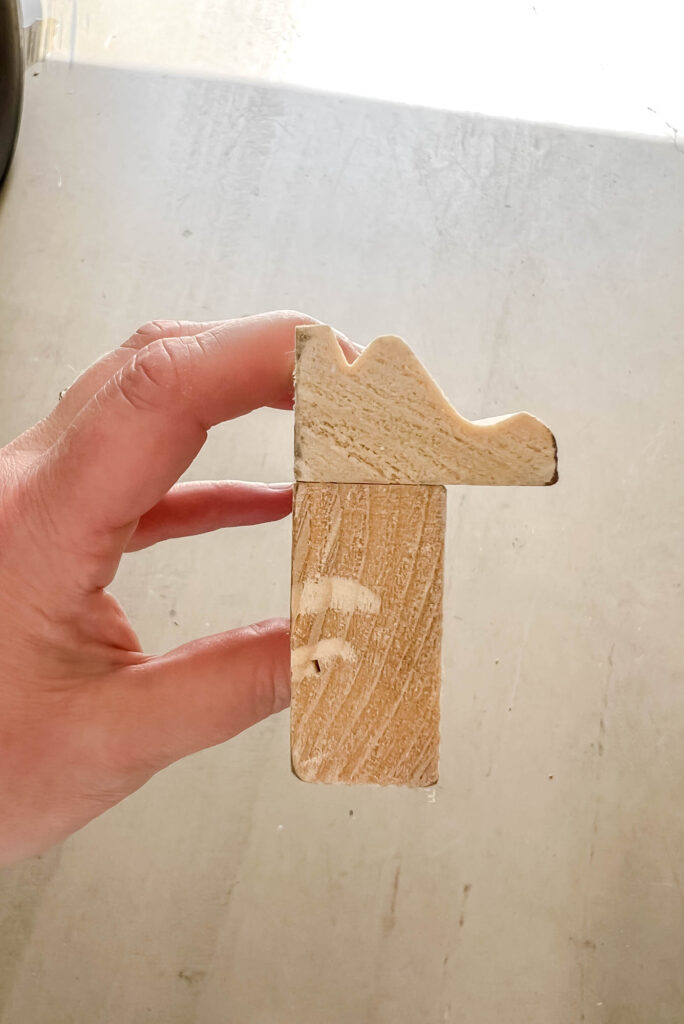
6. Fasten the Trim Pieces to the Top of the Frame Foundation
Line up the tall side of the trim flush with the exterior edge of the frame foundation. There will be an inside overhang of 1/2″ if you bought the same trim that I did. This will cover the black trim around the TV, so it’s important to match it up just right!
Use wood glue and the brad nailer to attach the trim to the frame foundation. I just used 3-4 brad nails per trim piece and attached it from the top.
I didn’t end up filling any of the nail holes since I was staining it and I didn’t mind seeing them. But I would have filled the nail holes with wood putty if I were painting it.
7. Stain or Paint the Frame
I chose to stain my frame since I felt like the room needed some warm wood tones in a sea of white painted trim. But I think paint would be just as beautiful!
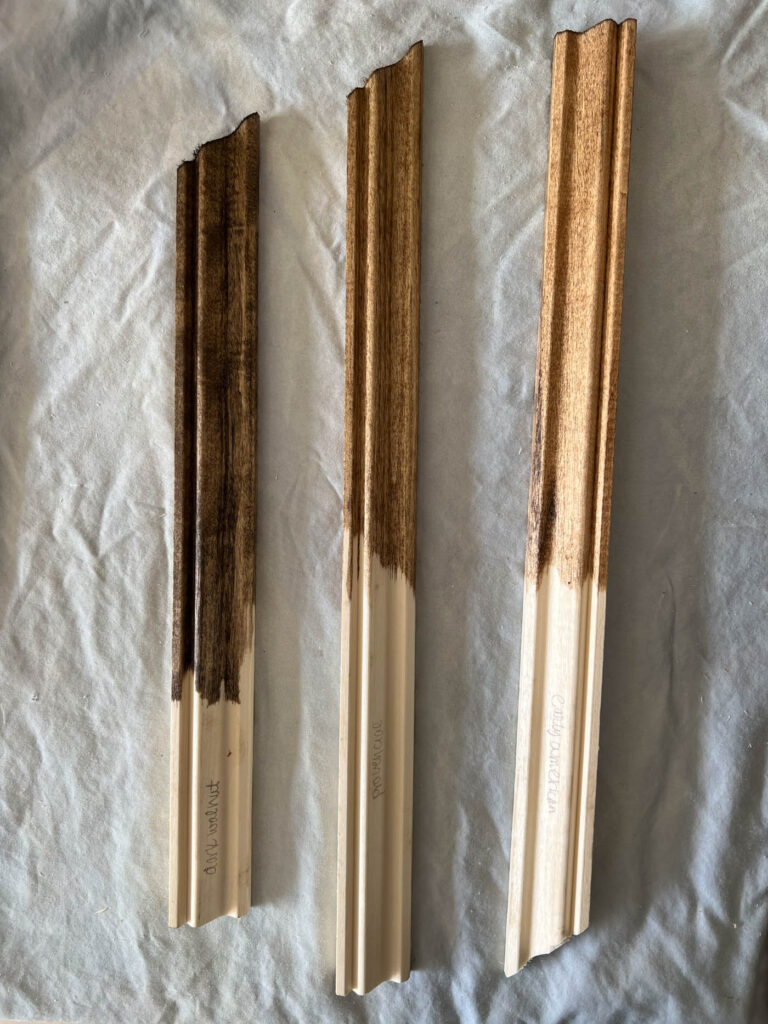
I tested out 3 stain colors I had on hand: Dark Walnut, Provincial and Early American. I originally tried Provincial (the one in the middle).
But it ended up not being dark enough and I re-stained it with Dark Walnut (the darkest color on the left). And it’s perfect!
8. Attach the Frame to the Samsung Frame TV
And by attach, I mean just push it on there. 😜
My frame is a pretty snug fit and it’s not going anywhere. We don’t ever tilt our TV down, so I’m not worried about it ever falling off. But if I was, I would probably attach it with command strips, either to the wall or the side of the TV.
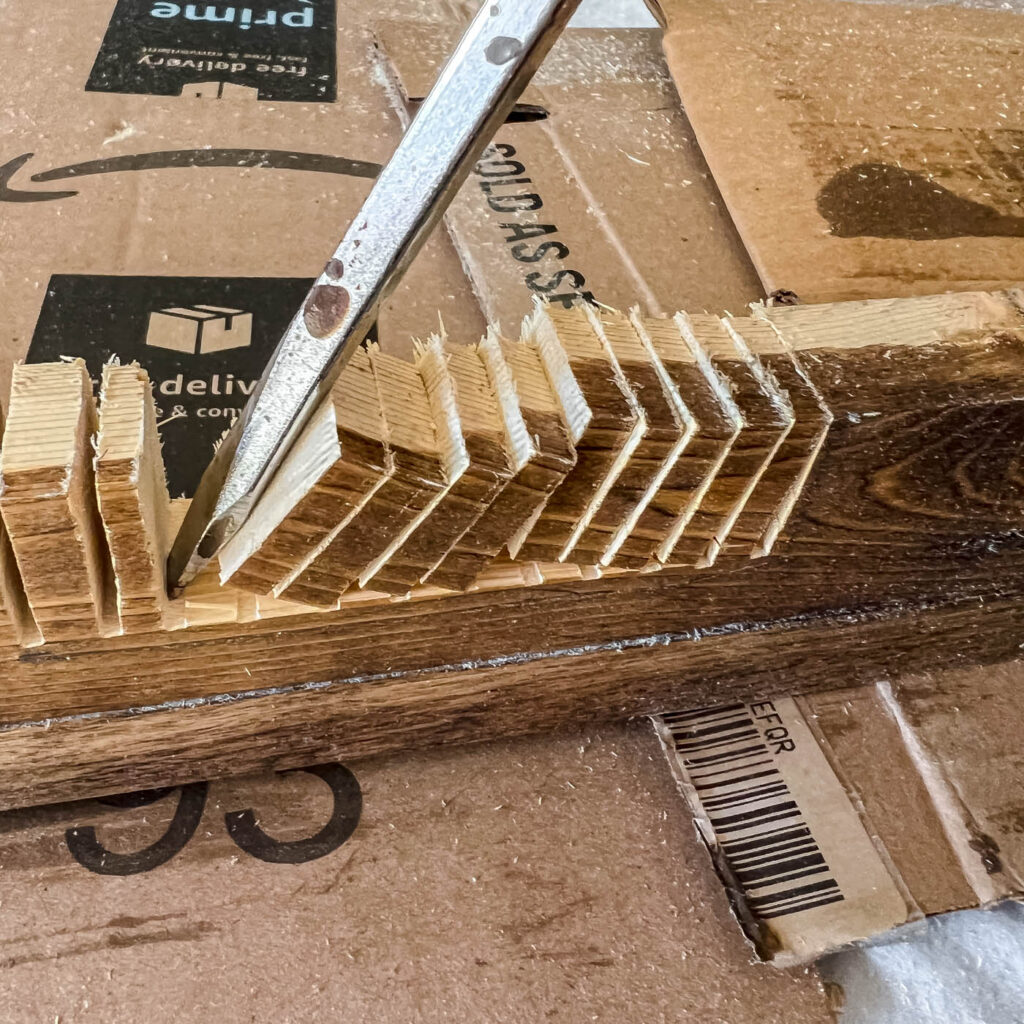
9. OPTIONAL: Chisel out a Space for the Sensor
There’s a sensor at the bottom of the TV that can detect light and motion and turn the art on or off depending on if someone is in the room. Or it will turn off if no light is detected. You can manually override this feature. But I really liked it. And with the frame on, the TV thought the room was pitch black and the art would turn off.
I hadn’t originally planned to make an opening for the light/motion sensor on the TV, but I really missed that feature. So, I took the frame down and marked where the sensor was on the frame. I used my circular saw set at 1 inch to make a bunch of cuts along the frame where it needed to be.
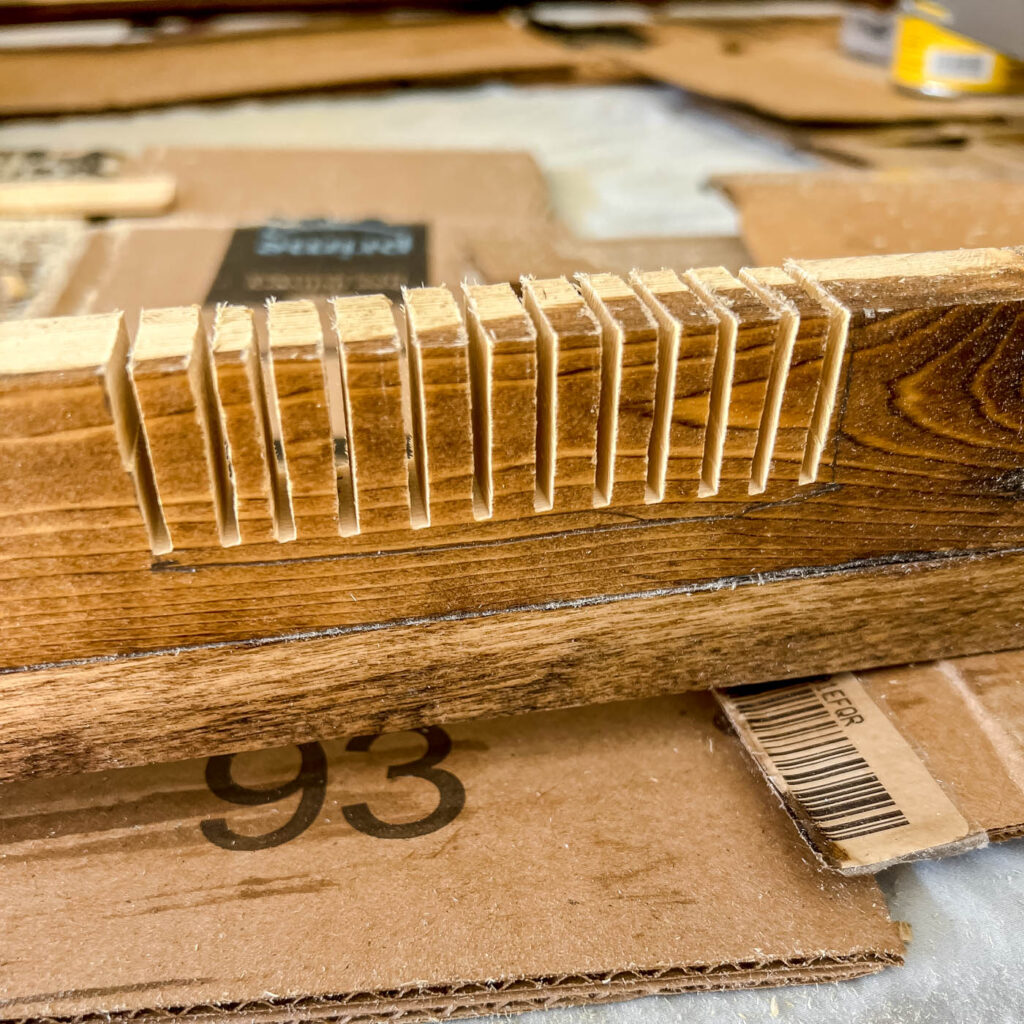
Then I took a large screw driver and knocked the pieces off. I sanded down any rough edges and called it done!
I may or may not go back and stain the inside of the notched out spot. You really can’t see it unless you’re looking for it, so I may leave it alone.
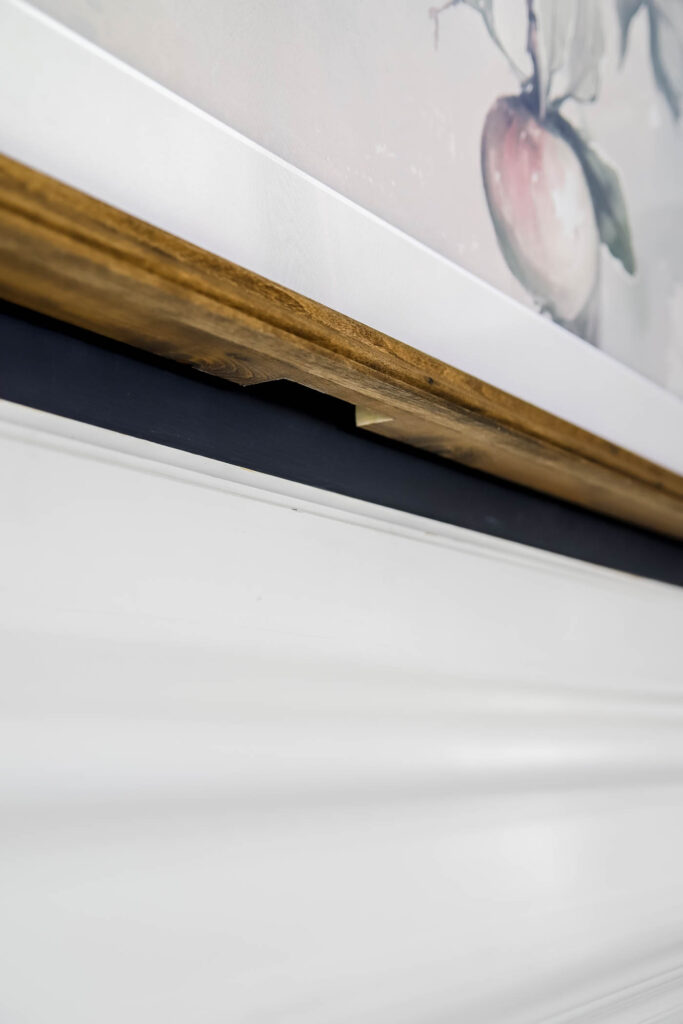
But it now works almost 90% of the way it worked before and I’m pleased that it fixed the issue for me!
This little DIY project was so fun to do! I sat back to admire my beautifully framed TV and thought, this is why I bought all of those tools. This is why I learned basic DIY… so that I could create beautiful things for my home for a fraction of the cost.
This cost me about $25 in supplies and it turned out even better than I could have imagined! I love DIY home decor.
I hope it inspires you to do the same in your home, too!
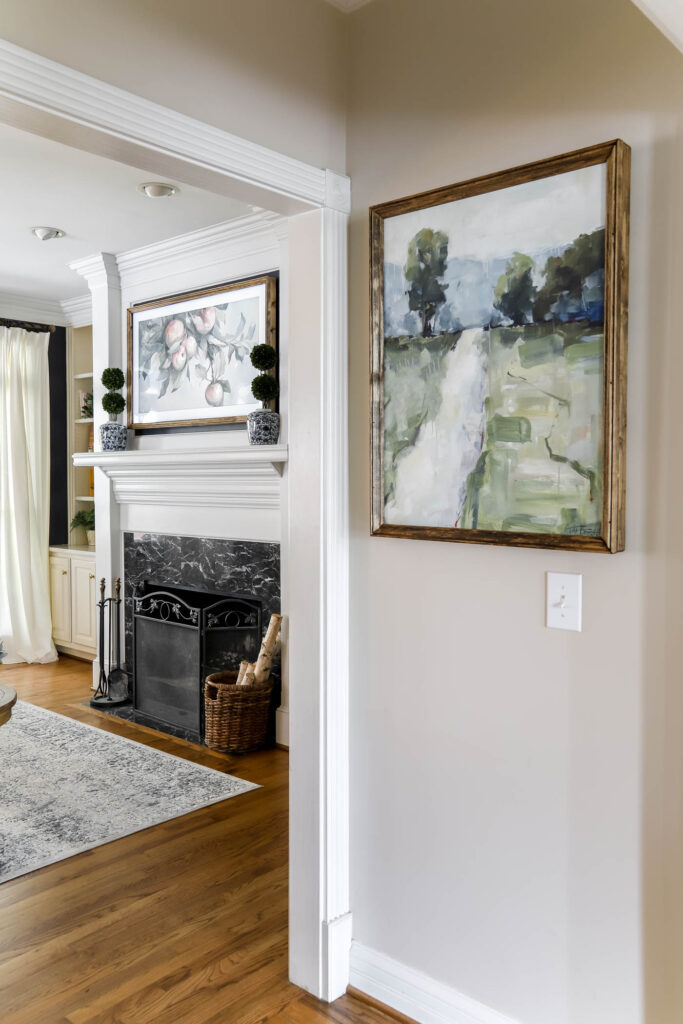
PS – I loved the frame so much that I used the exact same method to frame this canvas art I bought a few weeks ago. I knew I wanted to make my own frame for it, so I did! This frame method could work for any TV or art in your home!
More Posts You Will Love:

I know this is an old post, but I just used your basic plan to build a frame. my question is about the sensor. looks like you made a cut out on the inner frame. it still works even though the decorations part is still in front of it? Super simple way of doing this. Thank you!
Hi Vicki! Yes! It still works even though the decorative part is in front of it. The sensor that is on the TV is for detecting light and motion, so it knows when to turn the “art” on and off when the TV is not in use. When it doesn’t sense motion in a certain time period, or sense any light, then it will turn the art off. So, I wanted that sensor to be able to detect light and motion, in order to keep the art on. There are times when it’s dark during the day and the sensor will detect no light and turn the art off, but most of the time it works just fine! 🙂 And remote control sensor is emitted over radio waves (or something like that), so it’s not affected at all. Hope that helps! xo, Laura
Is your model# LS03B
Mine says it’s model # QN55LS03RA
Amazing job! It looks beautiful. We are getting ready to purchase the 55 inch TV. I was wondering if you can tell me if the white mat around your picture is actually a mat? Or is it part of the TV screen/art that you chose?
Thanks for this great idea! We just got a frame tv and hung it on the wall, Our next step is crafting a frame for it as well! I do have a question about this, however. The frame TV is an inch thick from the wall. You used a 1×2 for your base. Wouldn’t that make the frame 2″ deep? How do you reconcile that with the 1″ depth of the tv?
It might be my older Frame TV. We just got a new Frame TV for the bedroom and it’s a little thinner. So, I’d probably go with a 1×1 for the base for the new TV’s. The 1×2 fit our old TV perfectly.
I’m thinking of doing this because the deco ones are so expensive. Have you had any issues with overheating?
thanks
I have not had any issues with overheating! It’s been great and I would do it again in a heartbeat!
Thank you for this!
I have the same model of Frame TV and have been wanting to make a frame but was worried about the sensor. Good to know that your notch has helped somewhat.
Hi Beth! I’m so glad this was helpful! The notch has worked great! I haven’t had to make any other adjustments and it works just fine! 🙂 – Laura