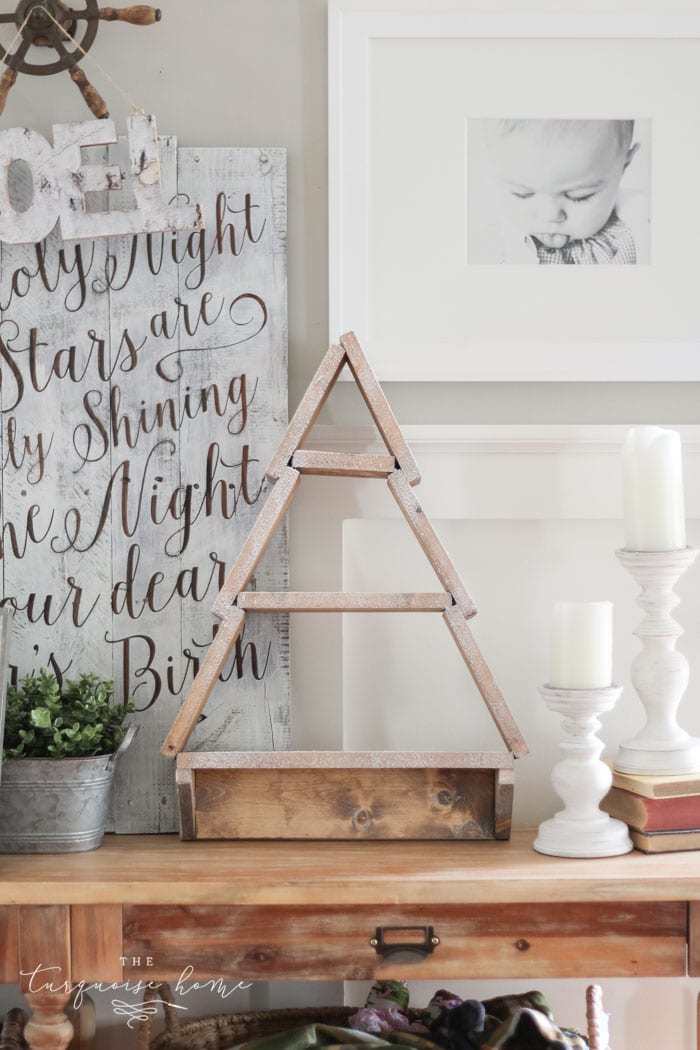
DIY Snowy Christmas Tree Shelf + Advent Calendar
Make this adorable snowy Christmas tree shelf from a few boards and tools you have on hand. Then count down the days until Christmas with a fun advent calendar.
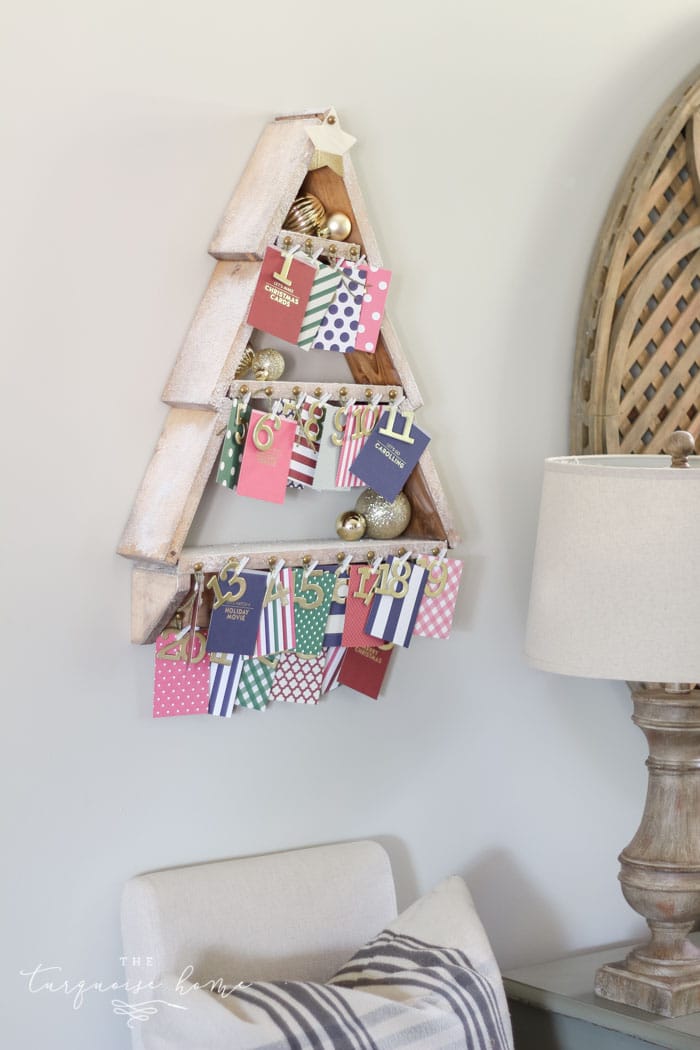
I love, love, love an advent calendar. There’s just something so fun about looking forward to opening a small gift or doing a fun activity every day leading up to Christmas. This DIY Snowy Christmas Tree Shelf is the perfect place for an advent calendar and counting down the days until Santa comes!
The supplies to male this adorable tree shelf decor item is less than $25 at the writing of this post. It was originally shared as a Do-It-Herself project from Home Depot.
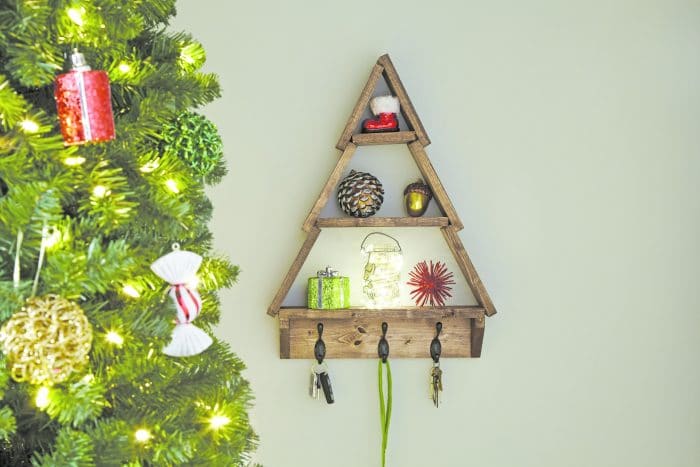
When I first saw this Christmas tree shelf, I thought it was adorable, but I needed to find a way for it to function for me. I didn’t need a key holder or any other kind of holder with the hooks on the bottom. But I did need a place to house my advent calendar that I’ve had for a few years.
In the past, I’ve strung my advent calendar cards across my kitchen chalkboard. But little hands can get into it there, so it’s not been a good spot for a couple of years.
Enter the DIY Christmas Tree Shelf! It’s a perfect place to keep our advent calendar. Not only is it adorable, but it can also be hung up high out of the reach of sticky 2-year-old fingers!
But really, you can make this shelf be anything your heart desires! Customize the decor, make it a cute place to hang your keys, or just a fun spot for decor. You can never have too many display shelves, in my humble opinion. 😉
If you go on Saturday morning, you’ll be able to make the tree shelf and you can then decorate it however you want! Simple or Fancy, it’s up to you.
What You Need to Make a DIY Christmas Tree Shelf + Advent Calendar
- 2 – 1 x 4 x 6 common pine boards
- 2″ screws (I only used 3)
- Pack of 2″ brad nails
- Pack of 1 1/4″ brad nails
- Wood glue
- Picture Hanging Kit
- Stain or Paint of your choice
- Brass Nail Tacks
- Chipboard Numbers – these chipboard numbers are perfect and you can decorate them with gold spray paint or whatever color you’d like. Glitter would be pretty, too!
- Scrapbook Paper
- Mini Clothespins
- OR a 3 Pack of Flat Black Heavy Duty Hooks {if you want to make it just like the workshop} and 3/4″ screws
Tools:
- Circular Saw (I use this circular saw and drill combo.)
- Brad Nailer
- Drill
- 1/8″ drill bit
- Measuring Tape
- Carpenter’s Square
- Clamps
- Pencil
- Safety Goggles
- Sanding Block
How to Build a DIY Christmas Tree Shelf
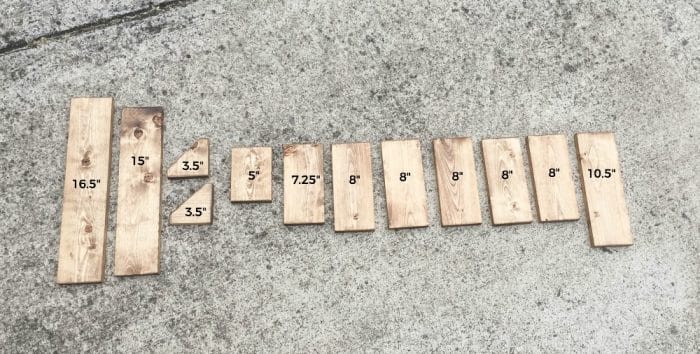
Step #1. Measure and Mark. Using your tape measure, measure your boards according to the following cut list. I make one measurement at a time, cut, then measure again. If I have more than 1 of the same cut, then I’ll use the first cut board to measure the rest. It is faster and keeps them the same length.
Cut list:
- 5 – 8″ boards
- 1 – 7 1/4″ board
- 16 1/2″ board
- 15″ board
- 2 – 3 1/2″ boards (we’ll cut a part off of these boards)
- 5″ board
- 10 1/2″ board
Those 3.5 inch pieces look a little weird because we cut off a corner of them to make them the shelf supports. Measure 3/4″ from the top right and bottom left corners and cut off the leftover. I’m not sure what to call it, but hopefully this image will help. 😊
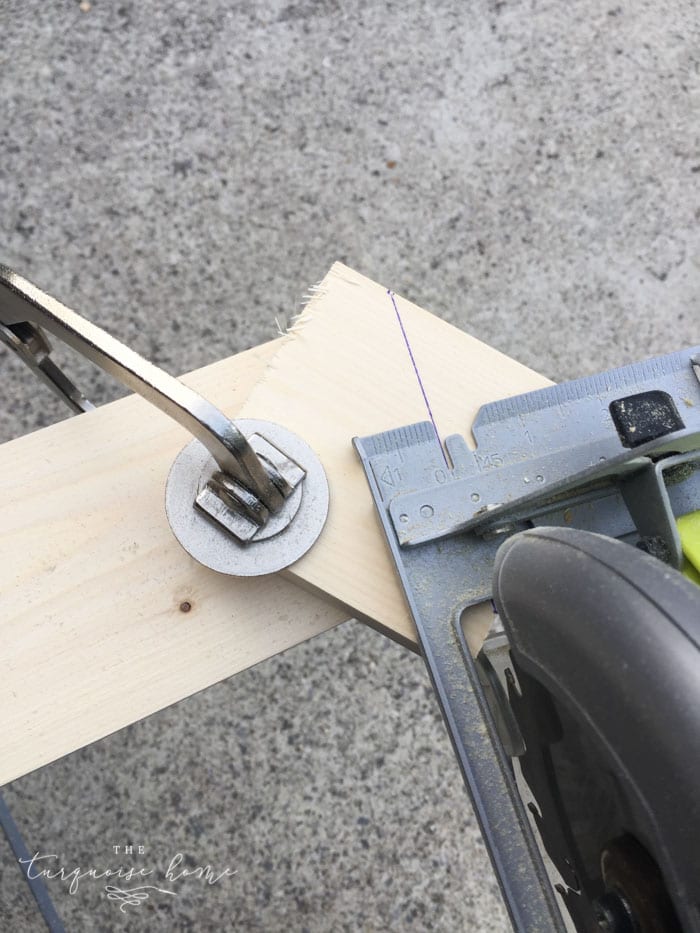
And that’s how I had to clamp it down in order to cut it with the circular saw. 😬 Make sure you stay safe and wear those safety goggles!
Step 2. Use the sanding block to smooth down any rough edges.
Step 3. Stain or Paint Boards. I chose to stain my boards with Early American from Minwax and ended up lightning it up with some white wax and SnoFlock. 😉
Step 4. Assemble the sides. Assemble side A by overlapping three 8″ sections by 3/4 inches over each one. Attach them with 1 1/4″ brad nails. Assemble side B by overlapping two 8″ sections and one 7 1/4″ sections by 3/4 inches. Attach with 1 1/4″ brad nails. Apply glue in all of the joints, and allow to dry.
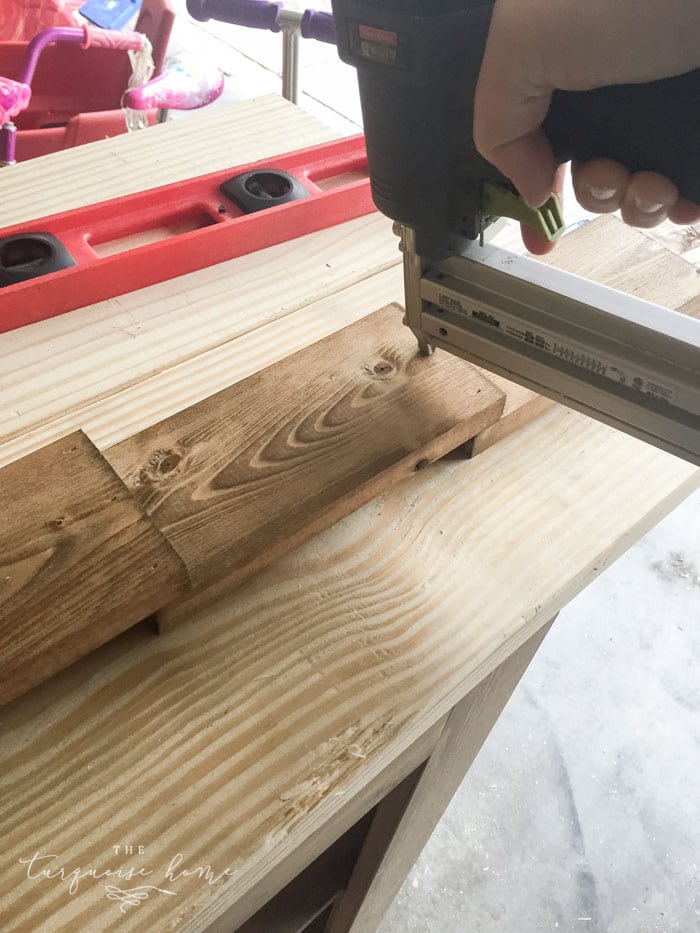
It’ll look something like this when you’re done with each side. The one below shows the side upside down. I nailed them this way so that the nail holes would be on the inside of the tree.
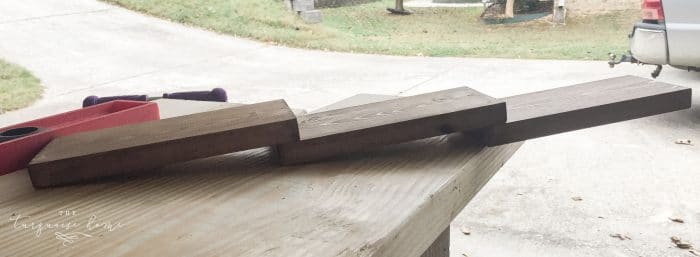
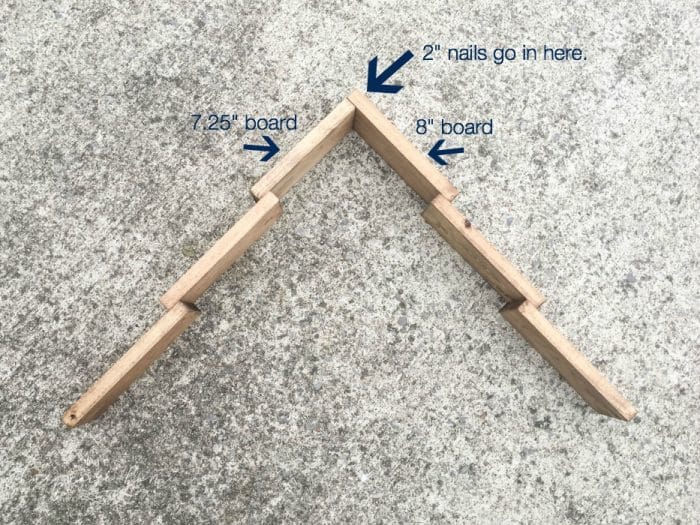
Step 5. Put sides together. Line up side A and side B together at the top. Like in the photo below, you’ll want to have the shorter (7.25″) side below the longer side. You’ll attach the 2 sides by using the brad nailer to nail 2″ nails in the top of side A.
Step 6. Bend the Frame. Now you will probably think this next step is weird, because I did, but just go with me. You will now carefully bend the assembled sides down until both sides are 16.5″ apart. Grab your 16.5″ board periodically to make sure you don’t bend them too far. This is why gluing the sides together as well as nailing them in a good idea. I didn’t glue mine together at first and they wanted to fall apart a little bit during this step.
Step 7. Attach the Shelves. Add the bottom shelf (16.5″ board) to the bottom of the two sides using 1.25″ brad nails and wood glue. Then attach the other two shelves with brad nails and glue.
Step 8. Build the Bottom Section. Place the 15″ board perpendicular to the bottom shelf, leaving room for the shelf braces on each side. Attach it to the bottom shelf with 1.25″ brad nails. Then screw it in, using 1.25″ screws. Pre-drill the holes to avoid splitting the wood.
Then add the shelf braces to each side of the 15″ board using 1.25″ brad nails and wood glue.
Step 9. Attach hanging hardware. Attach picture hanging kit across the back of the shelf. Hang on the included hook, or an existing hook. It holds up for 30 pounds.
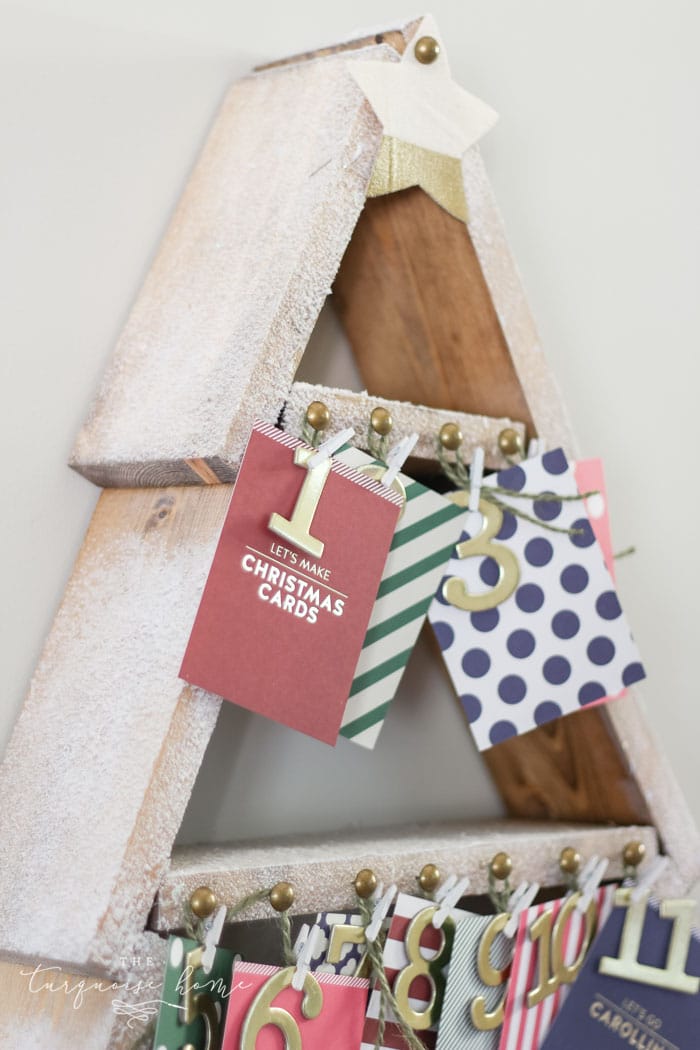
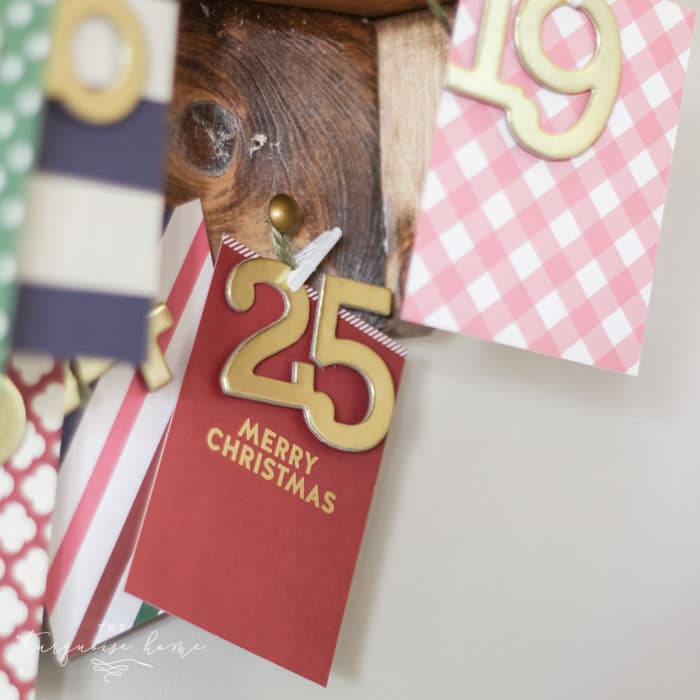
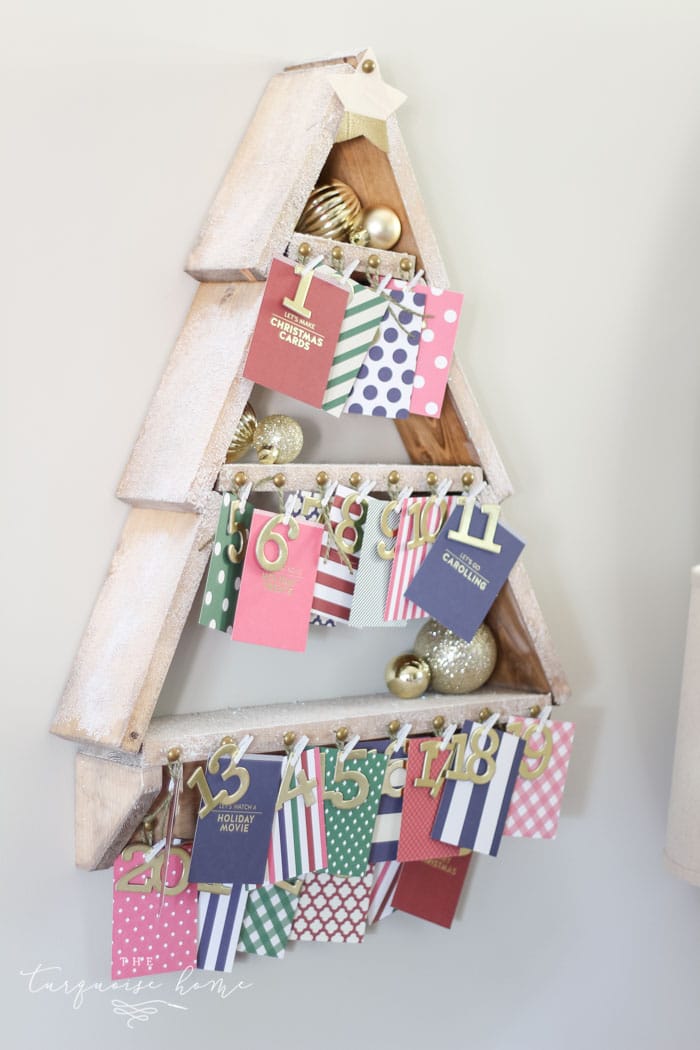
Step 10. Add Embelishments and Advent Calendar (or hooks). I nailed in the brass nail tacks along the front of the shelves and then tied green twine on each one.

This allowed me to clip the numbers and cards on with the clothespins.

Hang it up and enjoy!
Ideas for Making Your Own Advent Calender
You can really create an advent calendar like this out of any cute, holiday-themed scrapbook paper. Just write your daily wishes on the back and you’re all set! You can even buy some chipboard numbers, paint them gold, and then you’ll be cooking with grease!
- Let’s make a paper chain countdown to hang in the kids’ bedrooms
- Let’s write a letter to Santa
- Let’s make Christmas cards
- Let’s make paper crowns and talk about the wise men who visited Baby Jesus
- Let’s bake some holiday treats
- Let’s watch funny Christmas YouTube videos
- Let’s decorate the tree
- Let’s visit Santa
- Let’s make a present (with free printable gift tags!)
- Let’s open a present
- Let’s read a Christmas story
- Let’s drink hot chocolate
- Let’s go ice skating
- Let’s decorate Christmas cookies
- Let’s make playdough snowmen
- Let’s give a present to someone in need
- Let’s watch a Christmas movie
- Let’s have a Christmas music dance party
- Let’s decorate gingerbread houses
- Let’s have a game night
- Let’s go caroling
- Let’s color a Christmas coloring page
- Let’s make some paper snowflakes
- Let’s look at Christmas lights
- Let’s leave out milk and cookies for Santa
If there’s anything you can think to add, let me know!
Additional sources:
- Advent Calendar cards – from an Ali Edwards & Emily Ley “December Daily” collaboration a few years ago. No longer sold.
More Posts You Will Love:
I just wanted to let you know I really enjoy all that you share – thank you for sharing it with others!
Have a very blessed day.
Thank you, Christina!!
Laura,
What a sweet Advent calendar, and now you have the perfect spot for it!
gail
Thank you, Gail!