DIY Photo Transfer To Wood (Step-by-Step Tutorial)
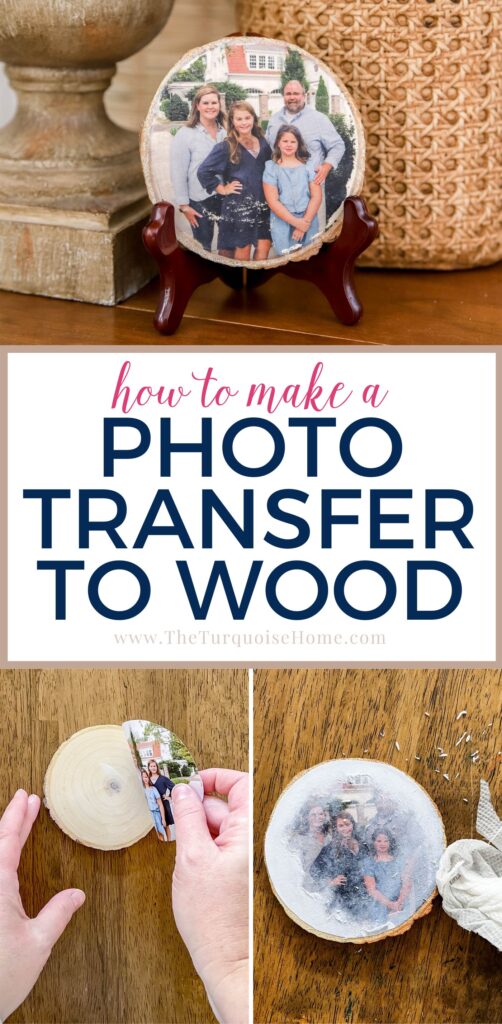
Ever wondered how to make a personalized gift that feels rustic, cozy, and heartfelt? This Mod Podge photo transfer to wood project is one of my absolute favorites! It’s budget-friendly, simple enough for a weekend DIY, and turns your favorite memories into beautiful, personalized wood decor.
I recently discovered a new way to use a photos and free printable in our home! Transferring a photo to wood is such a cool way to make any kind of photo decor. I love that you can personalize any type of gift with this simple and inexpensive Mod Podge transfer method.

This post contains affiliate links for your convenience. See my full disclosure policy.
It’s literally 6 quick steps. The hardest part is waiting for it to dry, so just plan ahead a little bit and you have yourself a gorgeous piece of new decor! Or use it to make gifts for friends and family!
Update: I’ve since used new method to speed up the process, so you don’t have to wait quite as long. I recently made one of these in less then 20 minutes! I’ll share the process below!
If you’ve never used Mod Podge before, it’s basically a watery glue that dries clear. You can get it in matte or gloss finishes. I always like a matte finish for these projects.
There are numerous options and creative ideas for how to use these photo ideas. So, any sentimental photos that you have would make a great gift idea transferred onto wood! I share my favorite ways to display these wood pieces at the end of the post.
Want to Save This?
Enter your email below and I’ll send it directly to your inbox!
What is a Mod Podge Photo Transfer?
A Mod Podge photo transfer is a method where you use Mod Podge medium to move a printed image onto a wood surface. It creates a vintage, worn-in look that’s perfect for farmhouse decor or meaningful handmade gifts. All you need is Mod Podge, a photo, and a little patience!
Supplies You’ll Need for a Photo Transfer to Wood Craft
- Mod Podge
- Laser Printed Photo or Image (Inkjet won’t work for this method. Print it in a mirror image on thin paper. See more notes below in Step 2.)
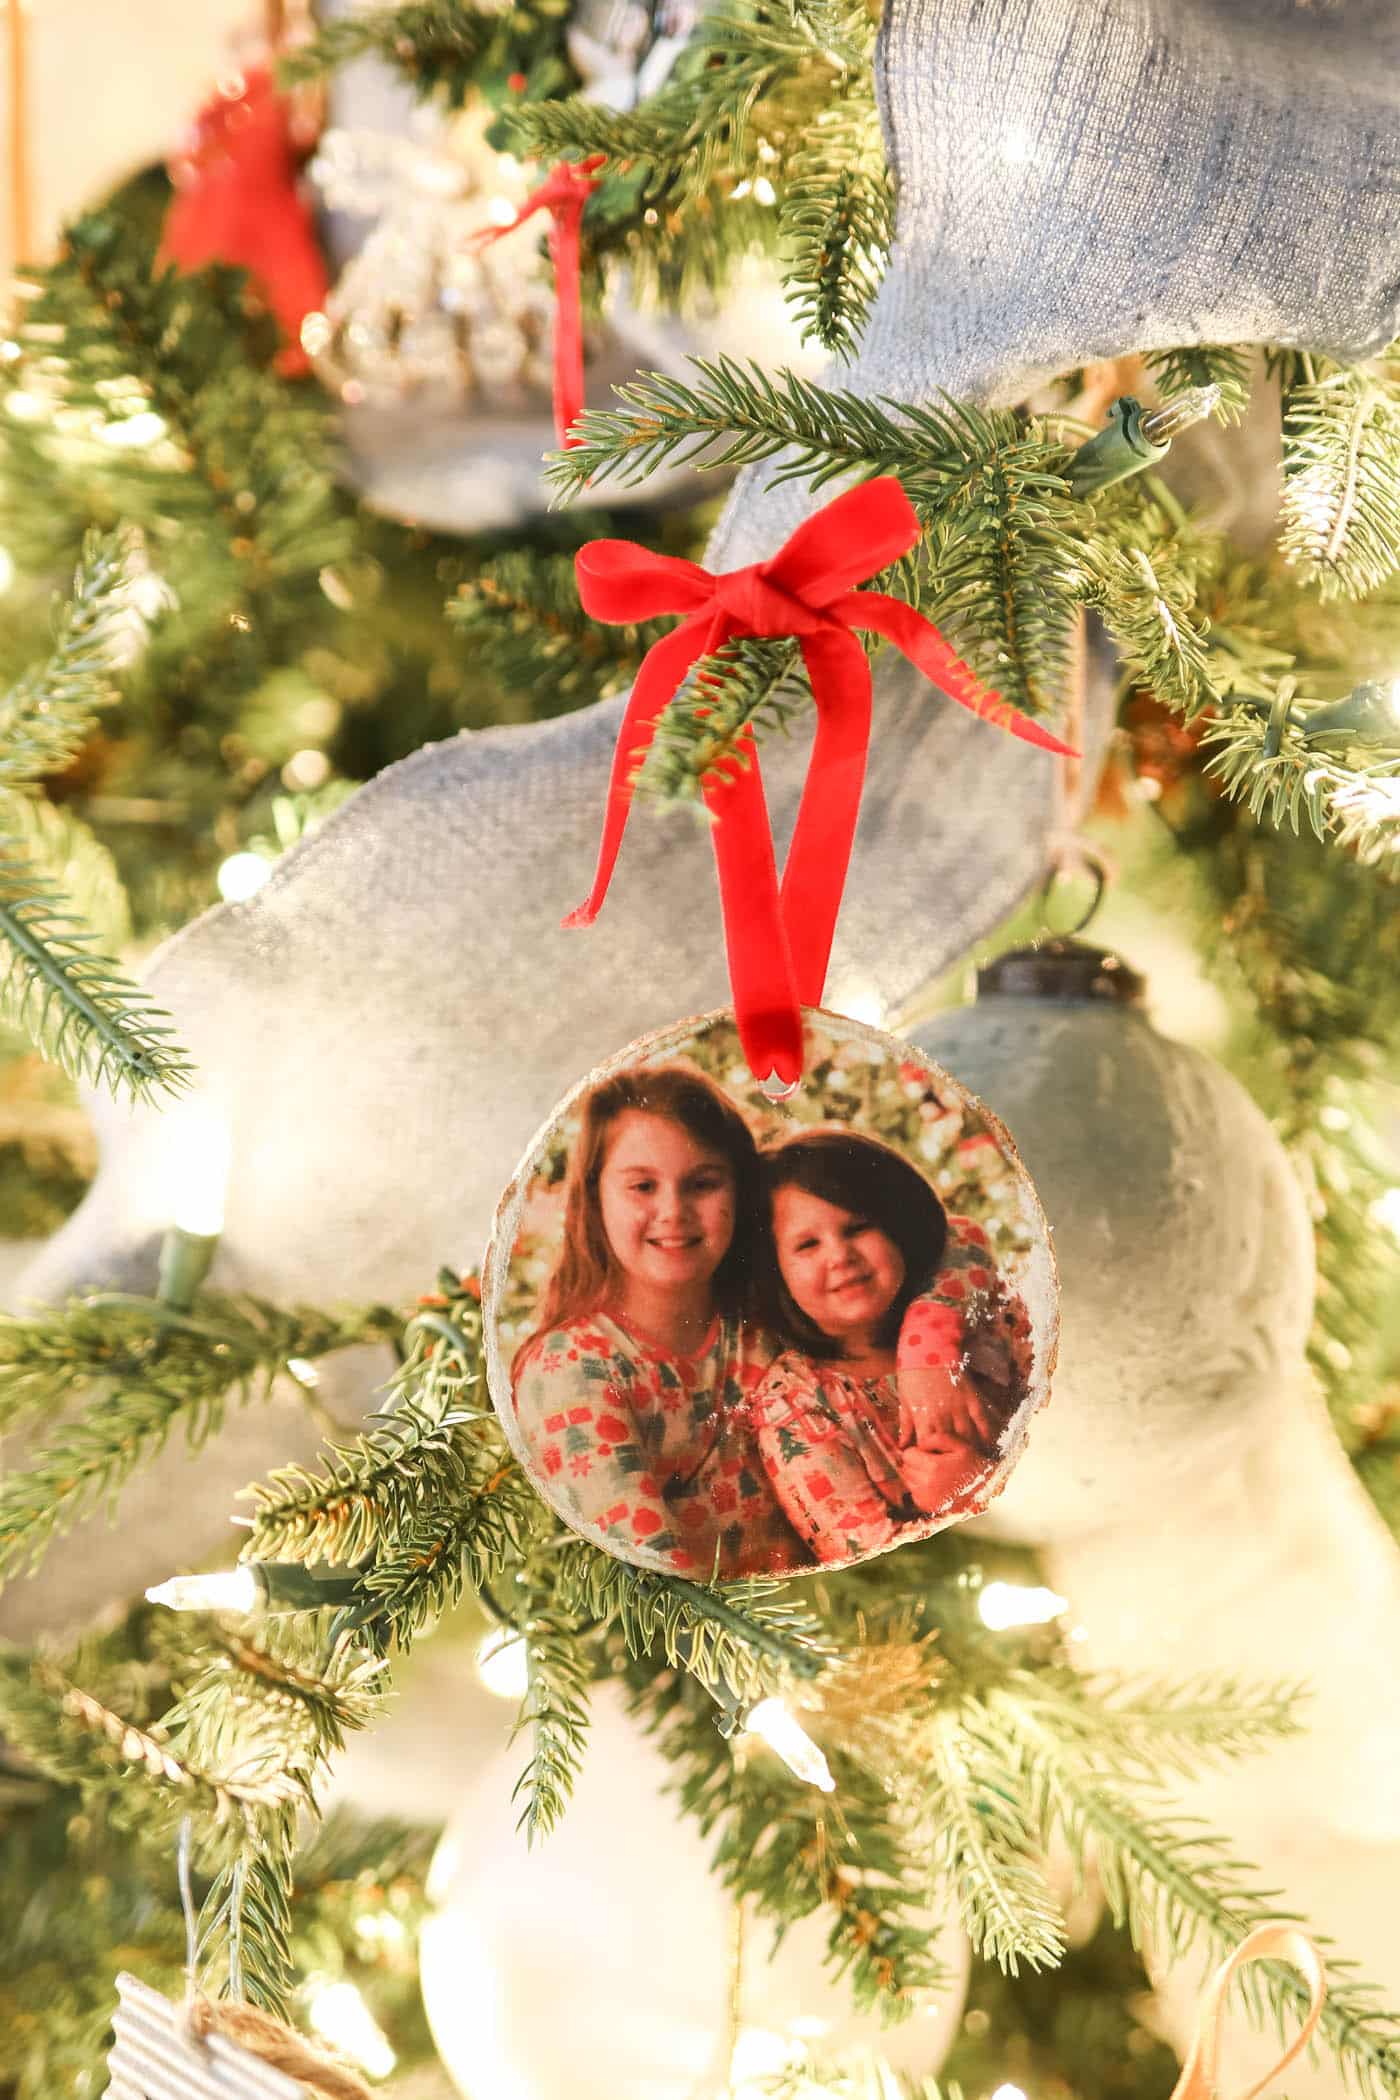
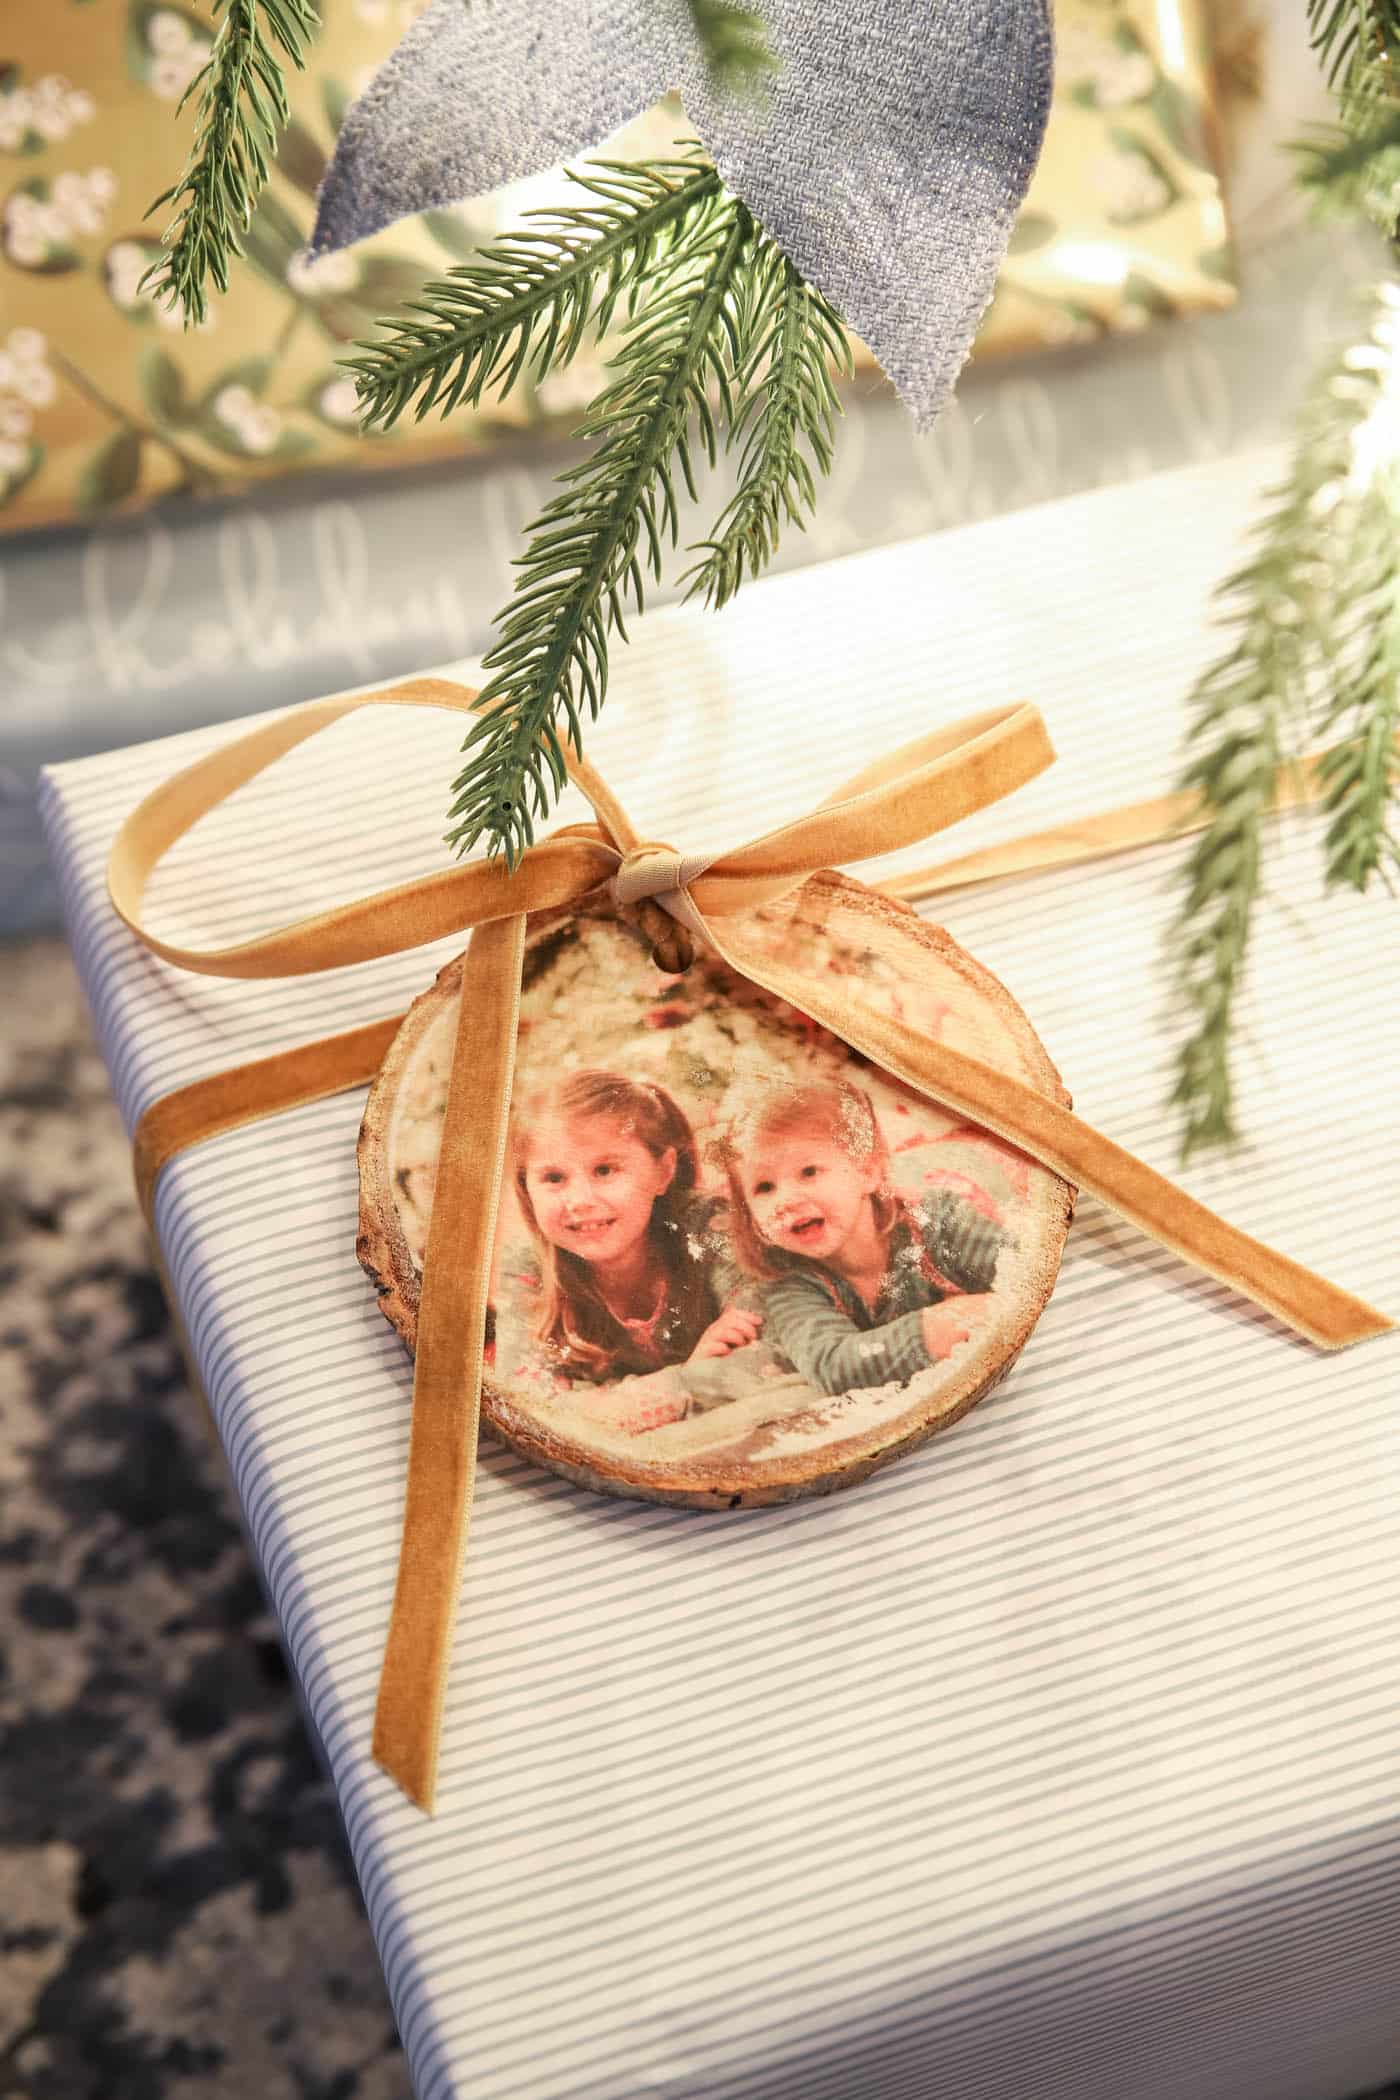
- Unfinished Wood Surface – These small round wood slices would make great Christmas ornaments or gift tags! I chose this wooden plaque for one of my projects.
- Scissors
- Burnishing tool (like a credit card or old gift card)
- Foam Brush or Small Craft Brush
- Wash Cloth or Paper Towel
- Hair dryer, optional
- Drill and drill bit, optional
Steps to Transfer a Photo to Wood
1. Gather Your Supplies
Order or purchase your wood pieces. I like these wood slices with rough edges, but you can use any type of wood block, plague or round for this project.
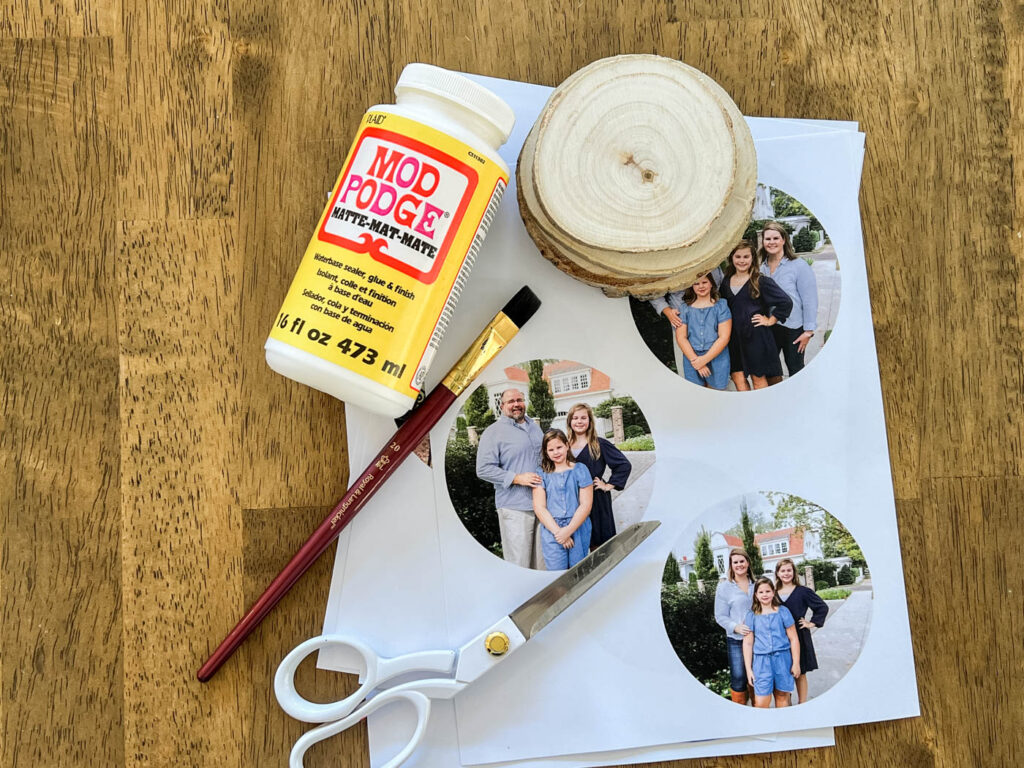
Also grab your Mod Podge, paint brush and cloth or sponge. You will obviously need your photo, too, which we cover in the next step.
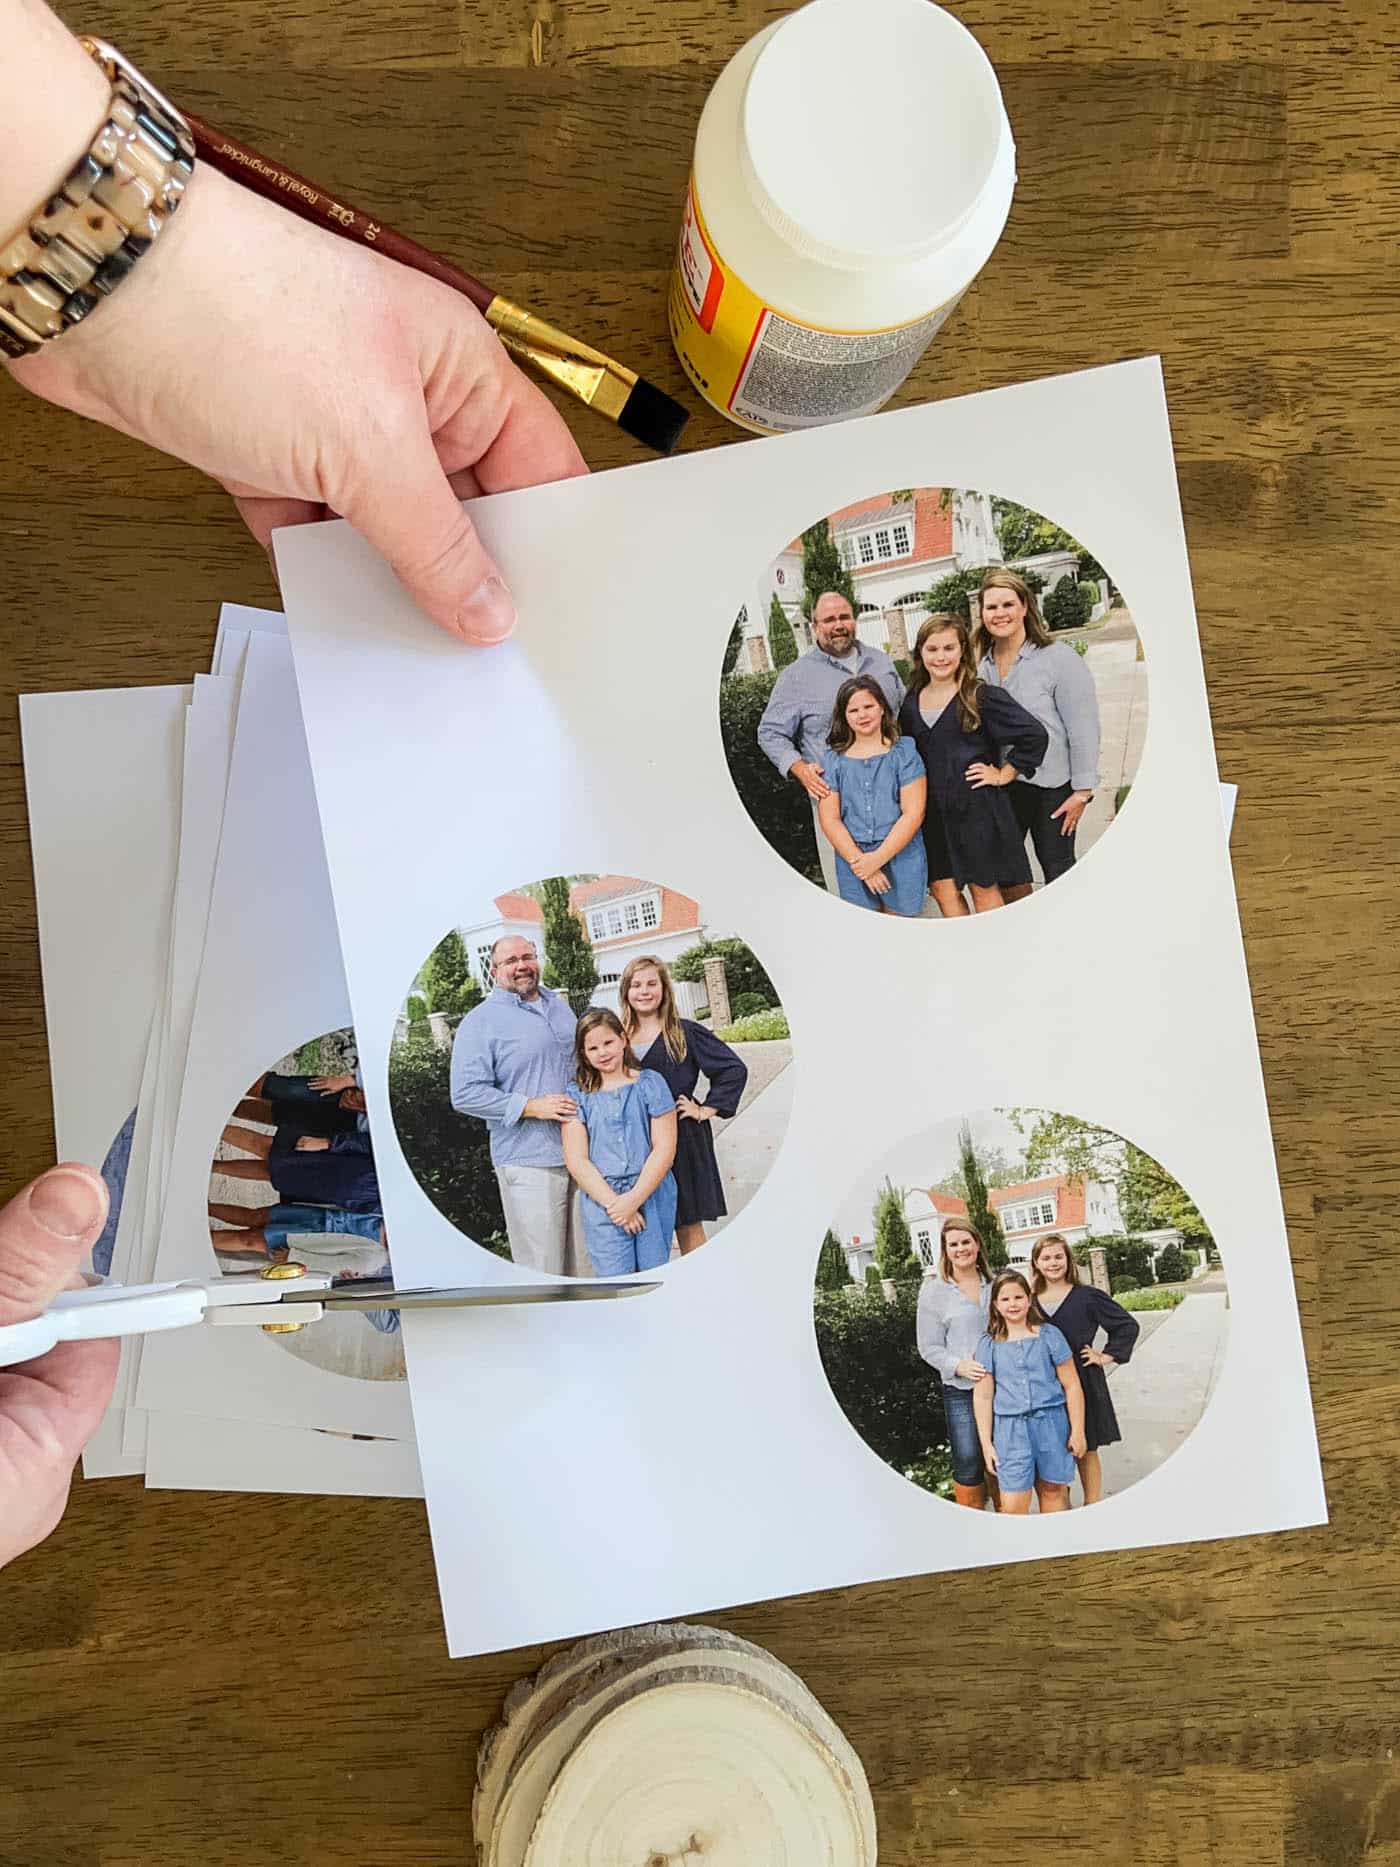
2. Choose & Print Your Image or Photo
You want to make sure of a few things before you print out your photo/image:
- Mirror the image if the direction matters. Art with words will need to be mirrored, but many times it doesn’t matter if you’re using a photo. If you need a good photo editing program, I really like Canva or PicMonkey for a very user-friendly way to crop and edit images.
- Resize the image on a page, if you need to. I create 4-inch photo circles in Canva because my wood slices are about 4 inches in diameter.
- Print your photo or image with a laser printer. An ink jet printer won’t work and that’s all I have at home, so I sent my photos to Staples to be printed.
- Use regular printer paper. You want the paper to be thin (~22lb. paper) so that it’s easy to rub off once it has adhered to the wood.
- Cut out the photos with the scissors.
3. Adhere your Photo to the Wood with Mod Podge.
Paint a medium layer of Mod Podge on the wood until it’s completely covered. Not too light and not too thick.
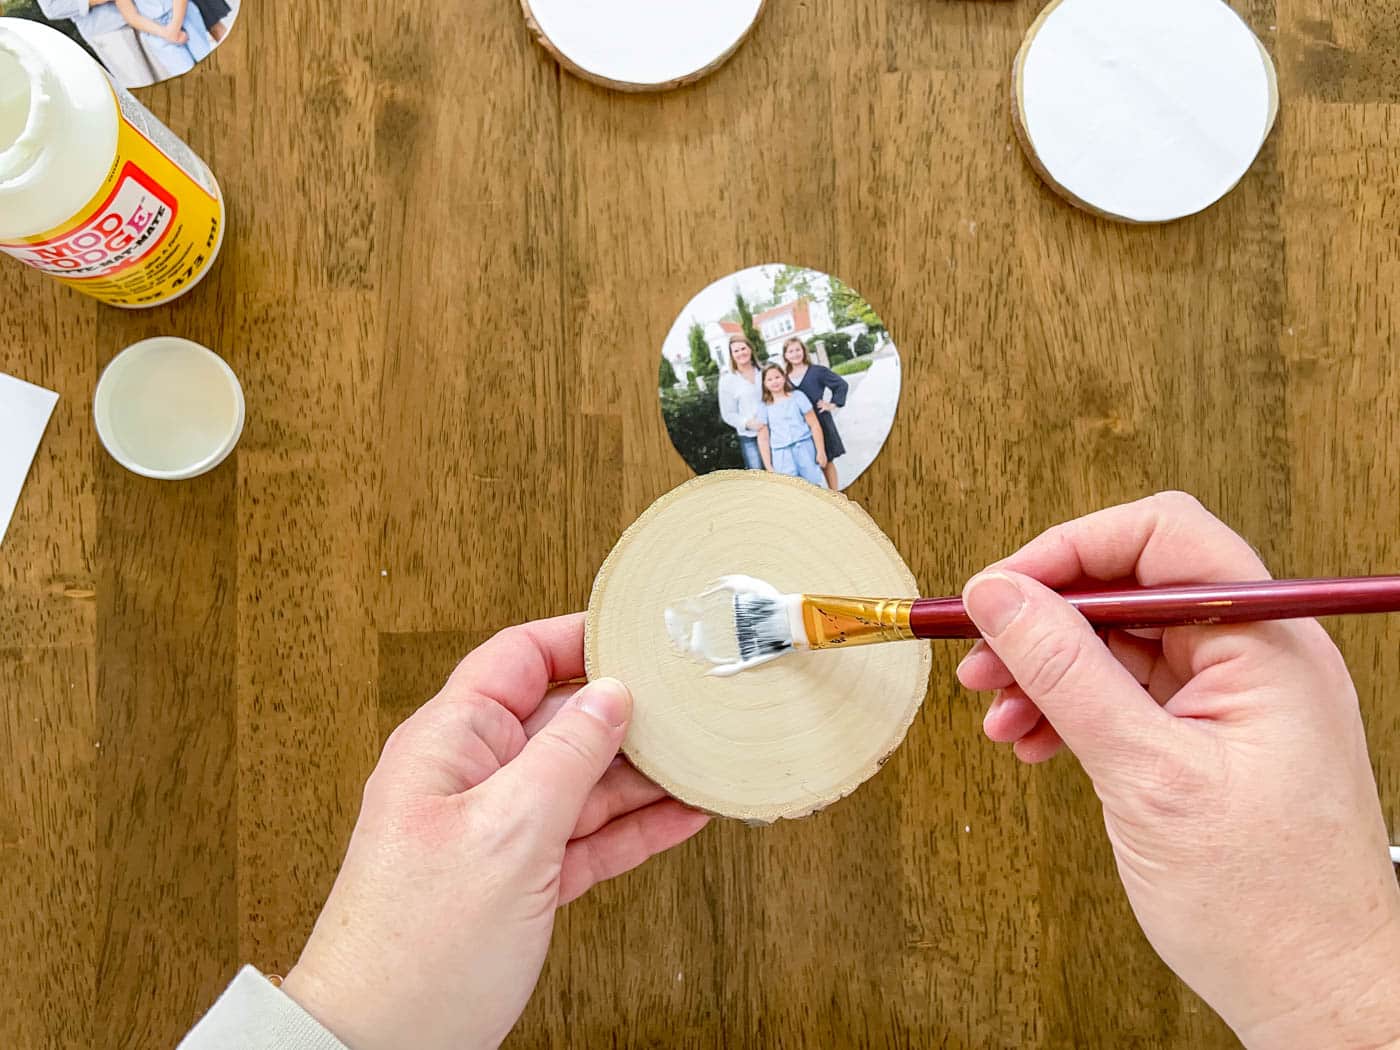
Then place the photo, face down on the wood slice.
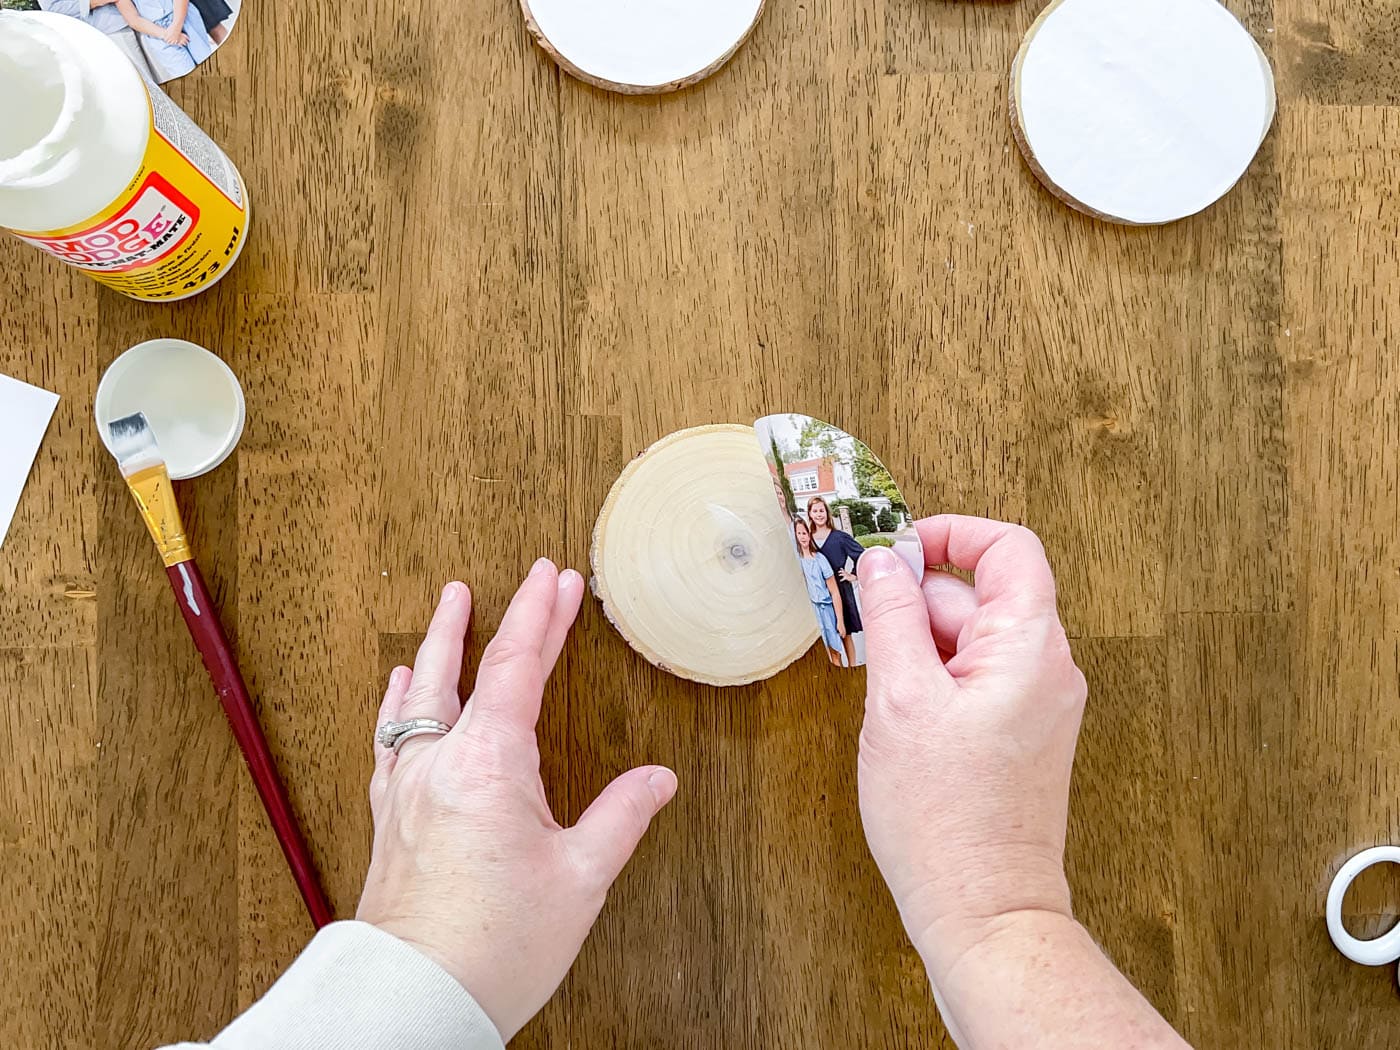
Press out any air bubbles with your fingers or a credit card. If there are any air bubbles, then the photo won’t adhere to the wood there.
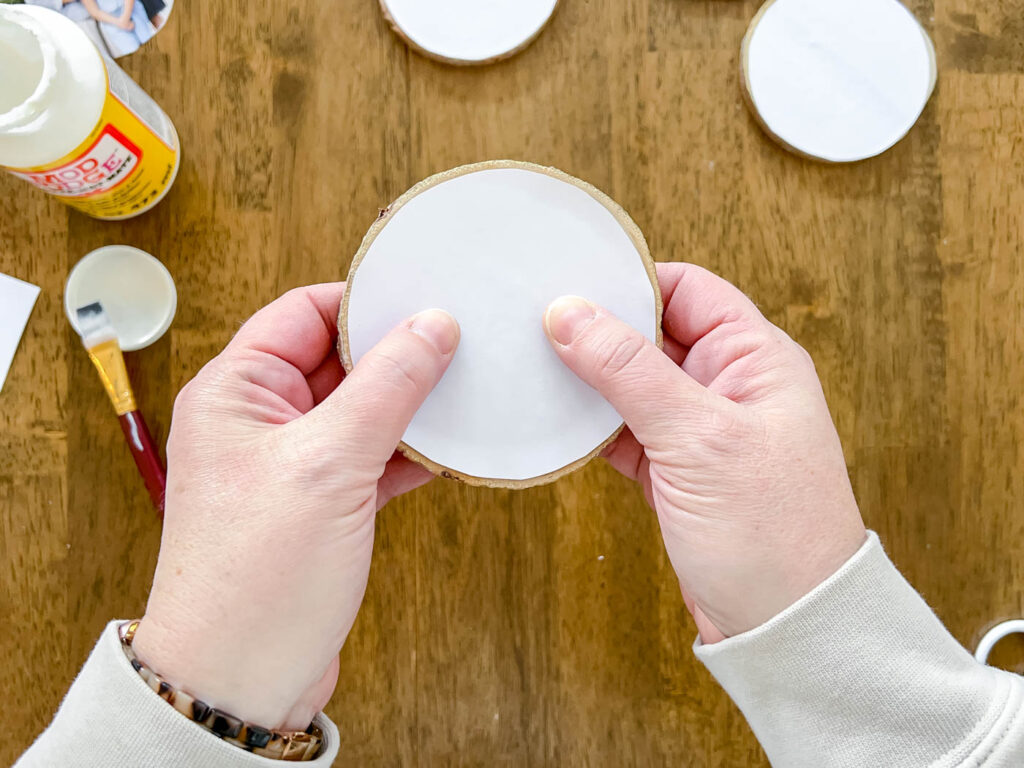
4. Allow the Mod Podge to Dry Completely
I’ve seen tutorials that recommend letting the Mod Podge dry anywhere from 24 hours to 72 hours. I let mine dry for about 48 hours and it was perfect. So, use your best judgment, but I believe the longer you can leave it to dry, the better the final project will turn out.
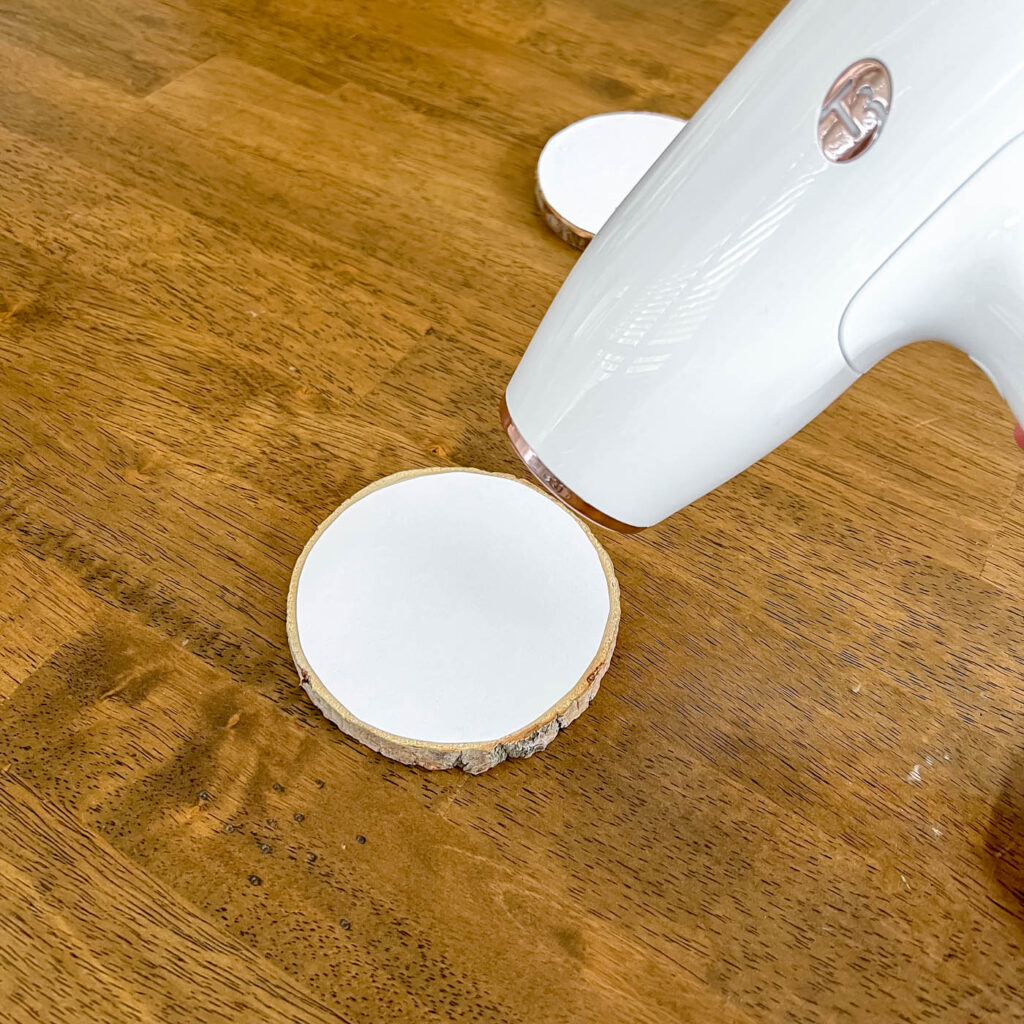
Quick Tip: Use a Hair Dryer
You can use a hair dryer to speed up the waiting process. I dried my wood slice for about 2-3 minutes on medium heat until the photo was adhered really well. I then let it cool off before continuing to the next step.
5. Rub Away the Paper Backing with a Damp Cloth
Once the Mod Podge is completely dry and cool, it’s time to remove the paper backing.
Wet a wash cloth or paper towel and wring out the excess water. It shouldn’t be dripping with water, but definitely wet enough to wet the paper.
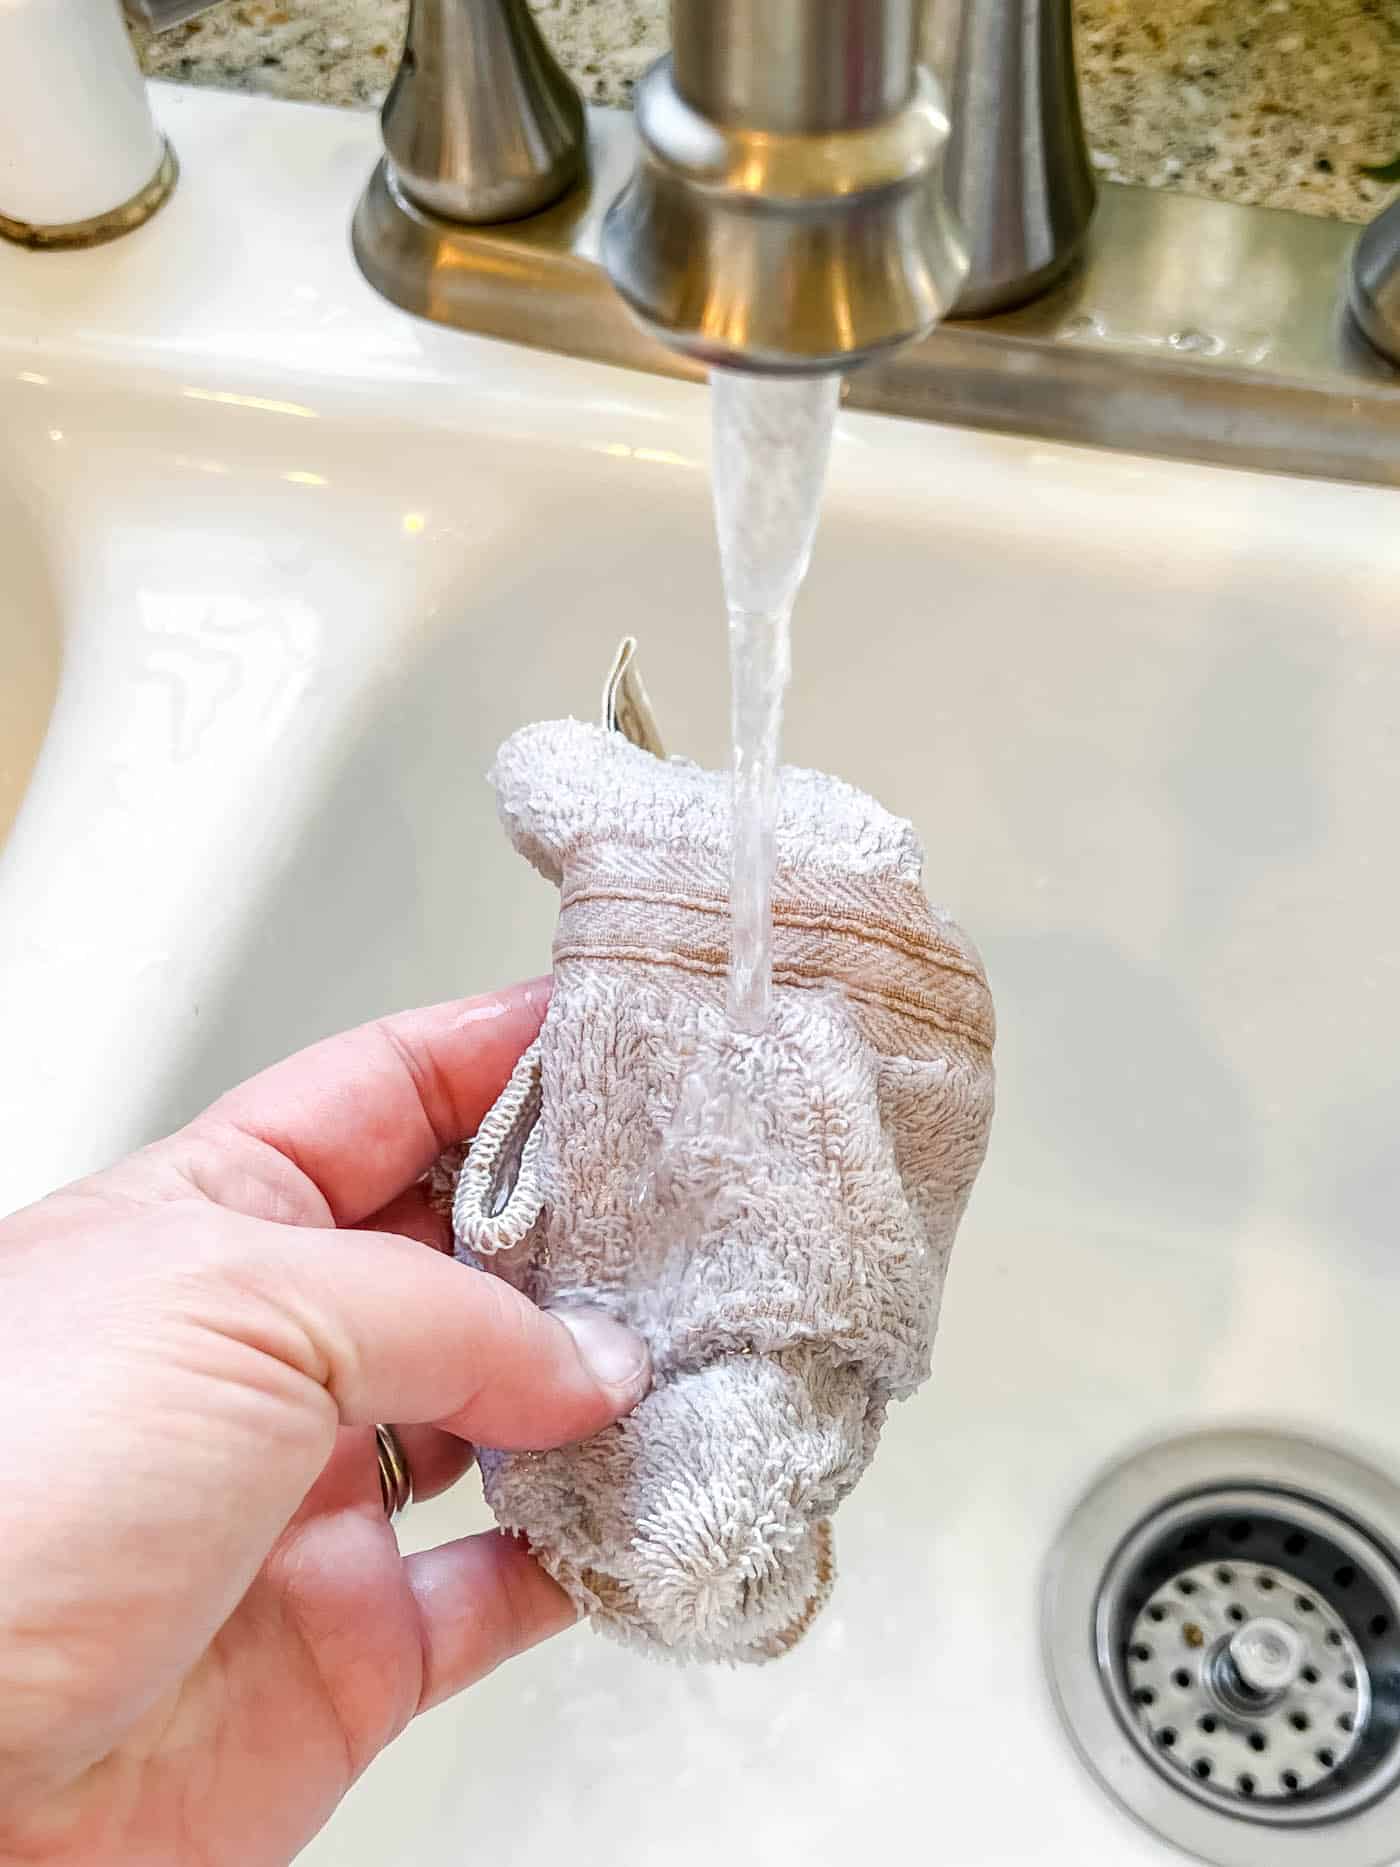
Then start gently removing the paper a little bit at a time by rubbing gently. It’s easy to rub too much and remove the image completely, so take your time and go slow.
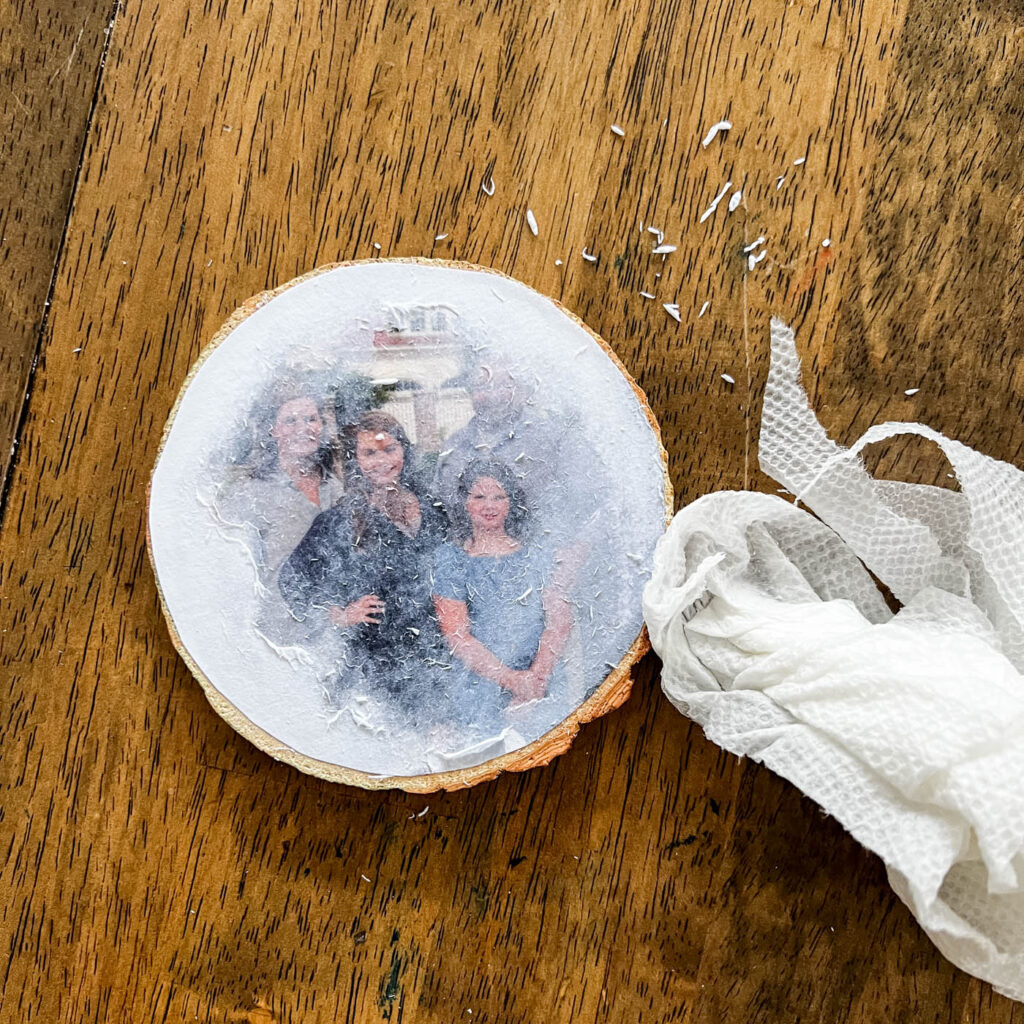
You will have to make a few passes at this step because once it dries, you’ll realize there are still paper fibers on the wood. Keep going over it gently until all of the paper is gone.
I could rub my fingers over it and could tell if there was still paper left or not.
If you start to scratch the image, be more careful. Or you can always go to the rustic look. 😉
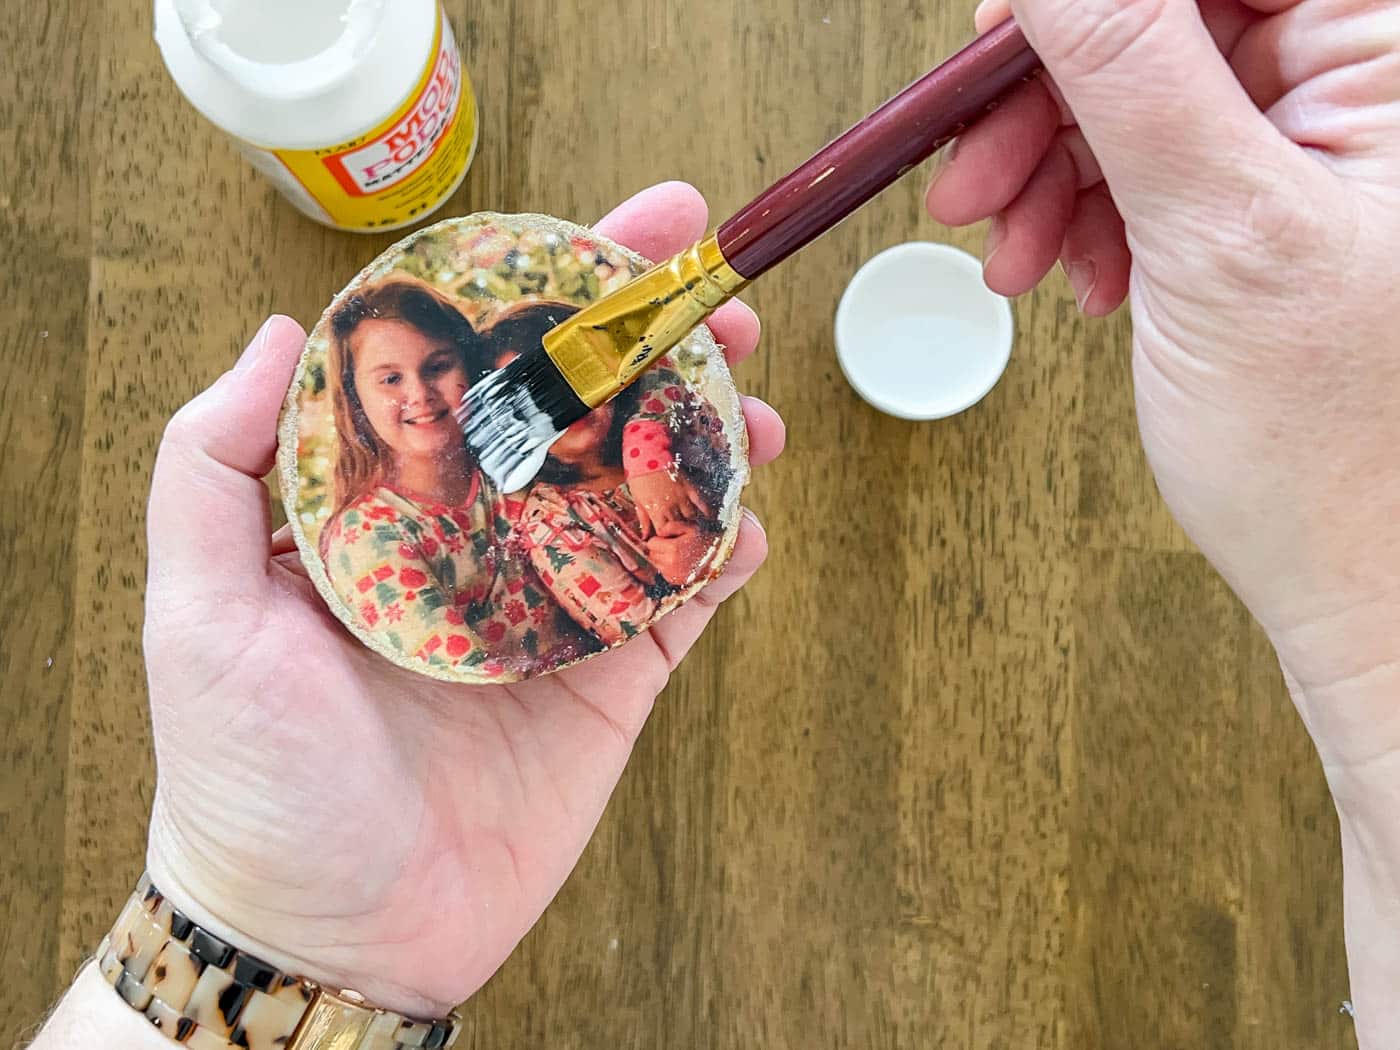
6. Use the Mod Podge as a Sealer
If you want your piece to be extra protected from any dust or water damage, paint a thin layer of Mod Podge of the top. This will keep is sealed and nice and pretty for years to come!
I think the final product turned out beautifully and I love that it was such an easy project (even kids can help make them)!
And now I have a million ideas for how I’m going to use this method to create pretty things for my home! I’m going to use some more photos of my family as gift ideas, so I can’t wait to share those with you soon!
FAQ’s about the Mod Podge Photo Transfer Process
Question: Can I use Mod Podge Photo Transfer medium or the original Mod Podge medium for this project?
Answer: You will need to use the original Mod Podge medium for this craft project. The newer Mod Podge Photo Transfer medium is made for transferring laser photos to fabric, not wood!
Question: What kind of printer do I need for a Mod Podge photo transfer?
Answer: A laser printer is best. Inkjet printer ink will smear or dissolve in the medium.
Question: Do I need to use photo paper for this craft project?
Answer: Absolutely not! The thinner the paper (like a 22 lbs.) the better! Use regular printer paper, not card stock or photo paper.
Ideas for Displaying a Photo Transfer to Wood Craft
1. Make a Decorative Plaque
For this example I used my fall wreath printable, because it was already a mirrored image. But you can use anything you’d like. If you need to reverse an image, I’ve always used PicMonkey. But if you don’t use PicMonkey, I would just do a Google search for “how to mirror an image”.
I love making beautiful home decor with things that are free or that I already have around the house. This is why I LOVE decorating with free printables. Cheap & easy – and all you need is a good color printer.
Note: When you get to the printables, just look for the files that have “mirrored” in the name.)
** If you are already a VIP e-mail subscriber, you can find these printables in the free printable library. The access to it is included at the end of every e-mail I send.
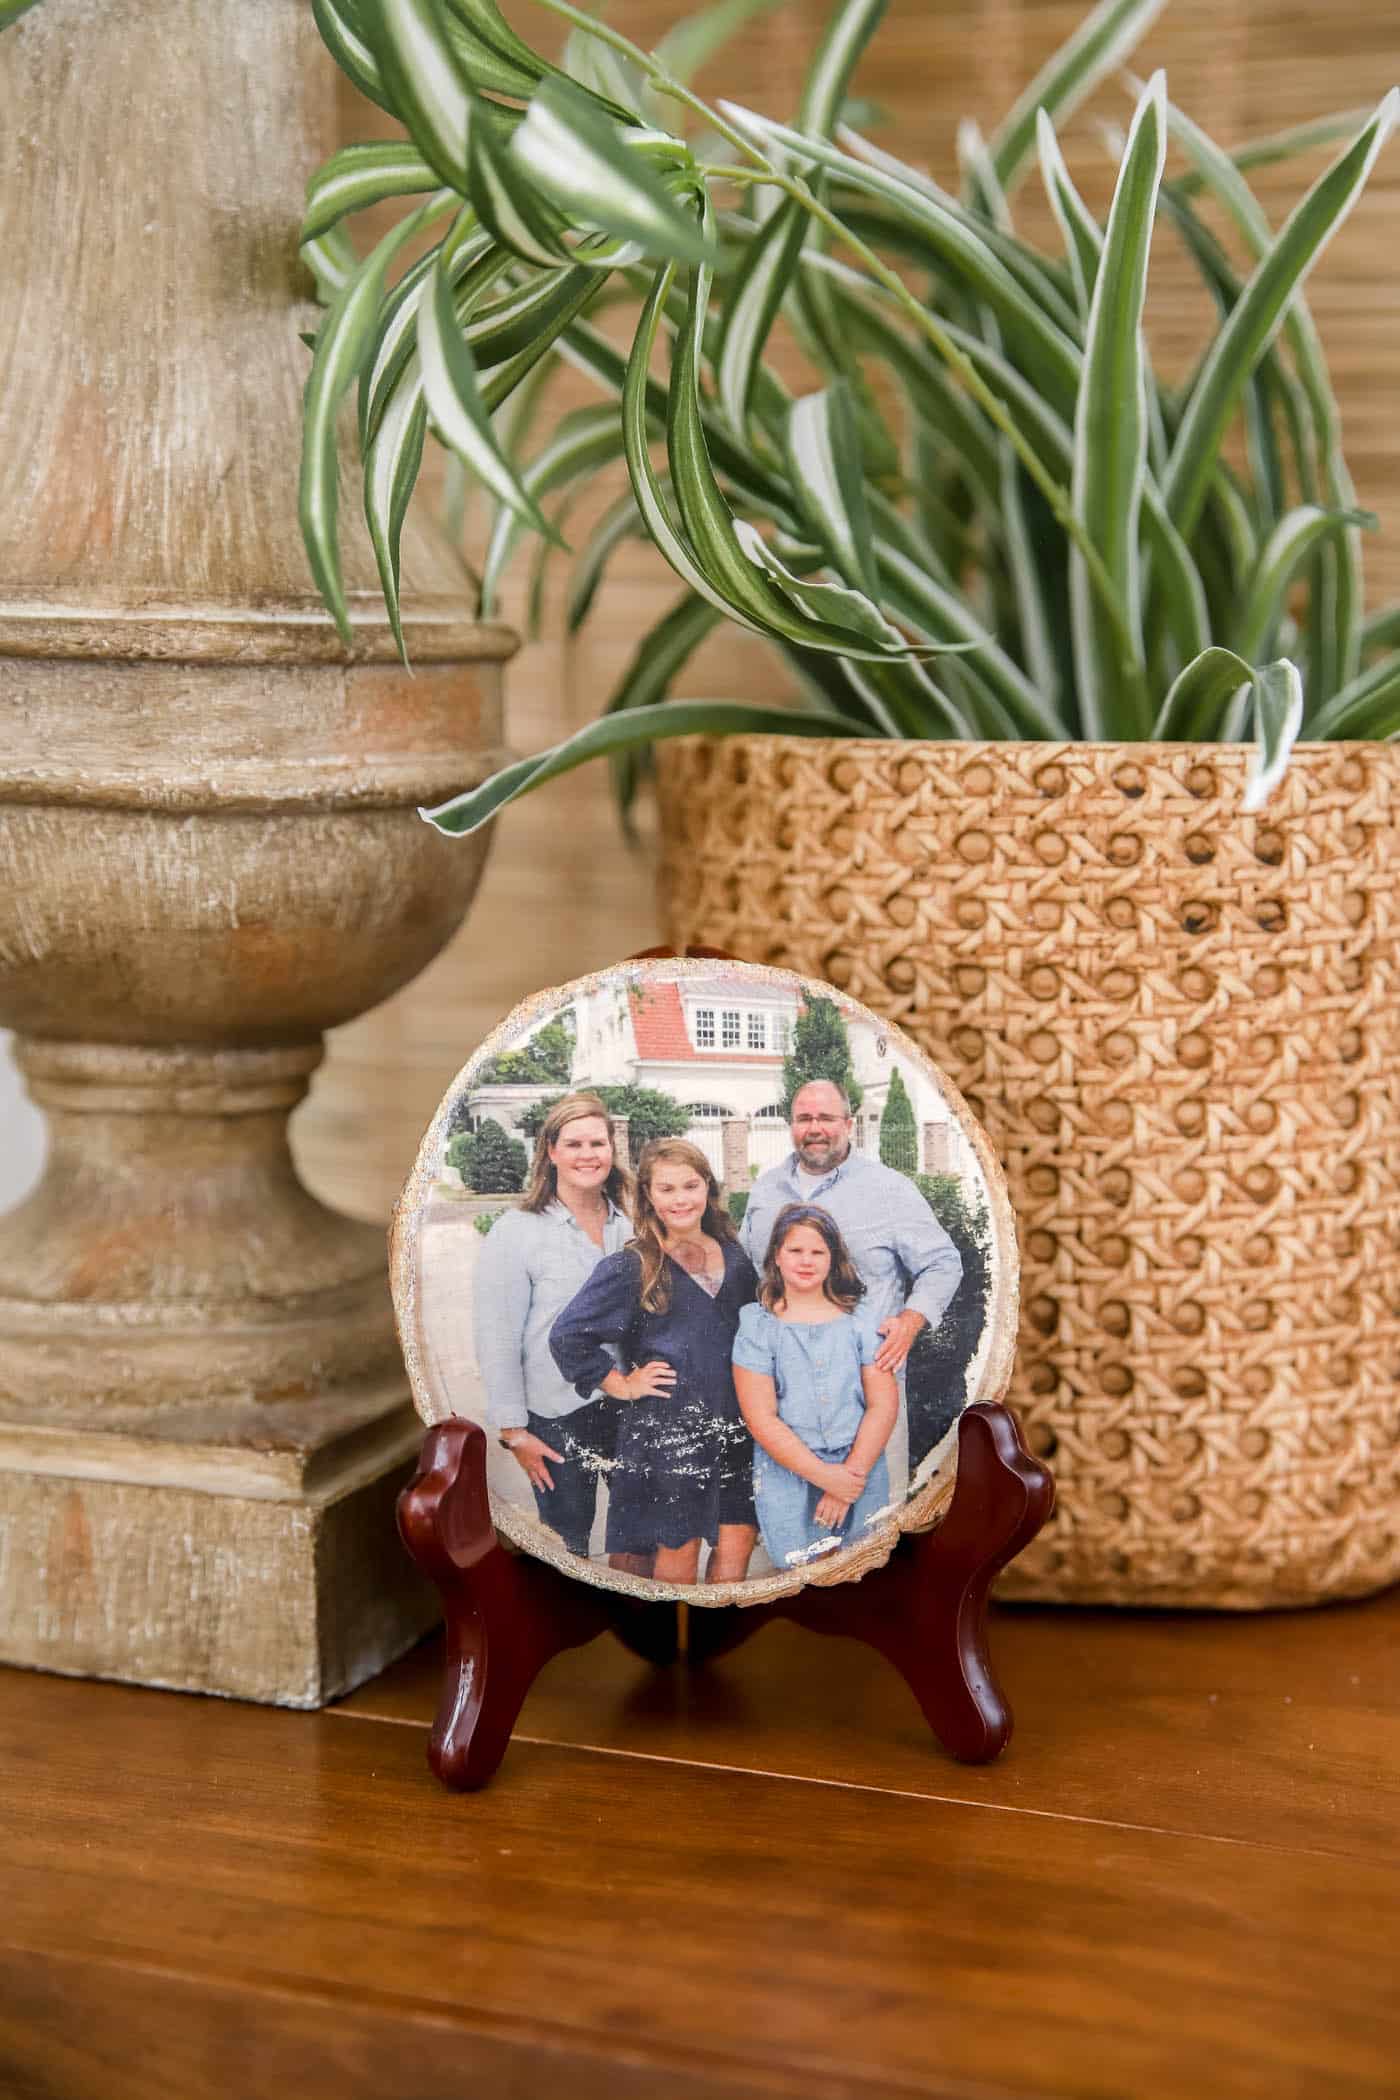
2. Place a Photo on Wood Slice in a Stand
3. Hang a Christmas Ornament
If you want to make yours into an ornament, simply drill a hole into the top of the wood slice. Then string some ribbon through the hole and hang it on the tree! It’s a great gift for grandparents or parents!
4. Decorate with a Gift Tag
Find a picture of the gift recipient and make a personalize gift tag for them! This would be such a fun way to know whose gift is which… just look for their face!
I hope this Mod Podge photo transfer tutorial inspires your next cozy DIY! If you try it, tag me on Instagram or drop a comment below — I’d love to see your beautiful photo creations.
More Craft Posts You Will Love:

Can a photo that I picked up from Walgreens work on transferring a picture to wood ? I’ve never done this before and l really want to learn how to do it ! thank you.
Hi Sue, It can’t be just any photo on photo paper. It has to be a photo printed on thin printer paper with a LASER JET printer. A regular photo wouldn’t work. Sorry! xo, Laura
my son is an artist (ink pen or graphite pencil). Could this work for his hand drawn sketches, or would we need to feed them into a printer to copy?
Hi Darby, you’ll need the ink jet ink to make it work, so you’ll have to copy it in the copier!
I love this idea for my son’s winter class party, but we have only one hour so I can’t do the mod podge and let it dry… could I use a laminated pic and glue it to wood? What kind of glue would work? Of course, it wouldn’t have the wood transfer look but not sure how I can remedy that with such little time available. Thanks!
I hope you found a solution! I probably wouldn’t choose this craft for a kids school party since it would be harder for young kids to remove the paper without tearing up the picture.
did the modge podge bring out the natural wood grain? I’m looking for a product that doesn’t do this because I have some wood cookies with a very dark spot in the center that will discolor the image.
Hi Stacy, I don’t think it brought out the wood grain, but you might want to test it on a small spot first. – Laura
You didn’t answer if this can be done on painted wood surface. Will it work???
Hi Barb, I think it would work on a painted surface, too! I might get two copies of the paper you want to transfer, just in case it doesn’t work. But I think it would!
can you use the same technique to transfer photos onto mirrors and plastic?
why was my reply cancelled?
Hi Margot, I don’t think it would work on mirrors or plastic. xo, Laura
Do you know anyone who will take my photos and transfer them to wood with clear coating?
Do you recommend a coat of sealant or anything to protect the picture once on the wood? If so, what kind?
Hi! It’s not necessary to put a sealant on it, but it doesn’t hurt to try it! Personally, I would put a thin coat of Mod Podge over it to act as a sealant. Hope this helps!
Does this work on painted wood?
why was my reply cancelled?
Wow! I’ve always kept myself updated on your projects. It never fails. Keep sharing your very creative ideas, Laura.
This is a brilliant idea 😀 got my brain spinning ready for next Christmas now 😁😁 thank you ❤️
Do you recommend a final top coat of Mod Podge? My granddaughter wants to make these for her parents for Christmas. Thanks in advance!
Hi June – it definitely wouldn’t hurt to add a coat of Mod Podge over the top to protect it!
Thanks so much! Laura
Great idea. So creative.
Thank you!!
Do you have any Christmas images?
This looks really beautiful and easy. Maybe my students could make these for their parents for Christmas.
If I want to transfer an old family photo, do I need to reverse the photograph image? And then send it to a laser printer? Or is this just for “word” type images?
I want to take an old photo of my grandma and put it on a wood slice.
HELP!
Thanks!
Hi Laura,
What is the printer that you always recommend? My sister is in the market for a new one.
Thanks, and love your projects!
Barb
I’ve searched everywhere but I don’t see a “mirrored printable” on your website. Thank you.
This looks soooo cute! But I cannot access the mirrored image…. And I have no idea how to mirror an image in picmonkey.
Help!
Thank you!
Hi Rachel! So sorry about the mixed up link in my post. Here’s the link for the mirror image printables… https://theturquoisehome.lpages.co/free-fall-wreath-printables/
Once you get to the Google drive folder, look for the files with “mirrored” in the title and those will work! And depending on what programs you have on your computer, just search for “how to mirror an image in Word” or “how to mirror an image in Paint”… I didn’t want to provide a link to a tutorial when I don’t know what programs everyone has!
Hope this helps! Laura
The link for printing takes you to a web page you have to sign up and pay for. I had a password to your printable page and that doesn’t work either.
Hi Gena, the link was bad – so sorry! Here’s the real link for the printable I used: https://theturquoisehome.lpages.co/free-fall-wreath-printables/
Hope this helps!
Laura
I love the photo transfer to wood with Mod Podge. I have an inkjet printer however. Will that work as well?
Hi Victoria, I didn’t try it with my ink jet, but I read in other tutorials that they don’t work. That’s why I had to go to Staples. But you can try it on a scrap piece of wood and test it out! Let us know if you do!
xo, Laura
In order to download the free printables I need to sign up for Leadpages? Is that right?
So sorry, Judi! I had the wrong link in there. Here’s the correct link for the printables — https://theturquoisehome.lpages.co/free-fall-wreath-printables/
xo, Laura