DIY Farmhouse Headboard {how to}
I used the Ana White farmhouse bed tutorial to make a headboard for our new king bed!
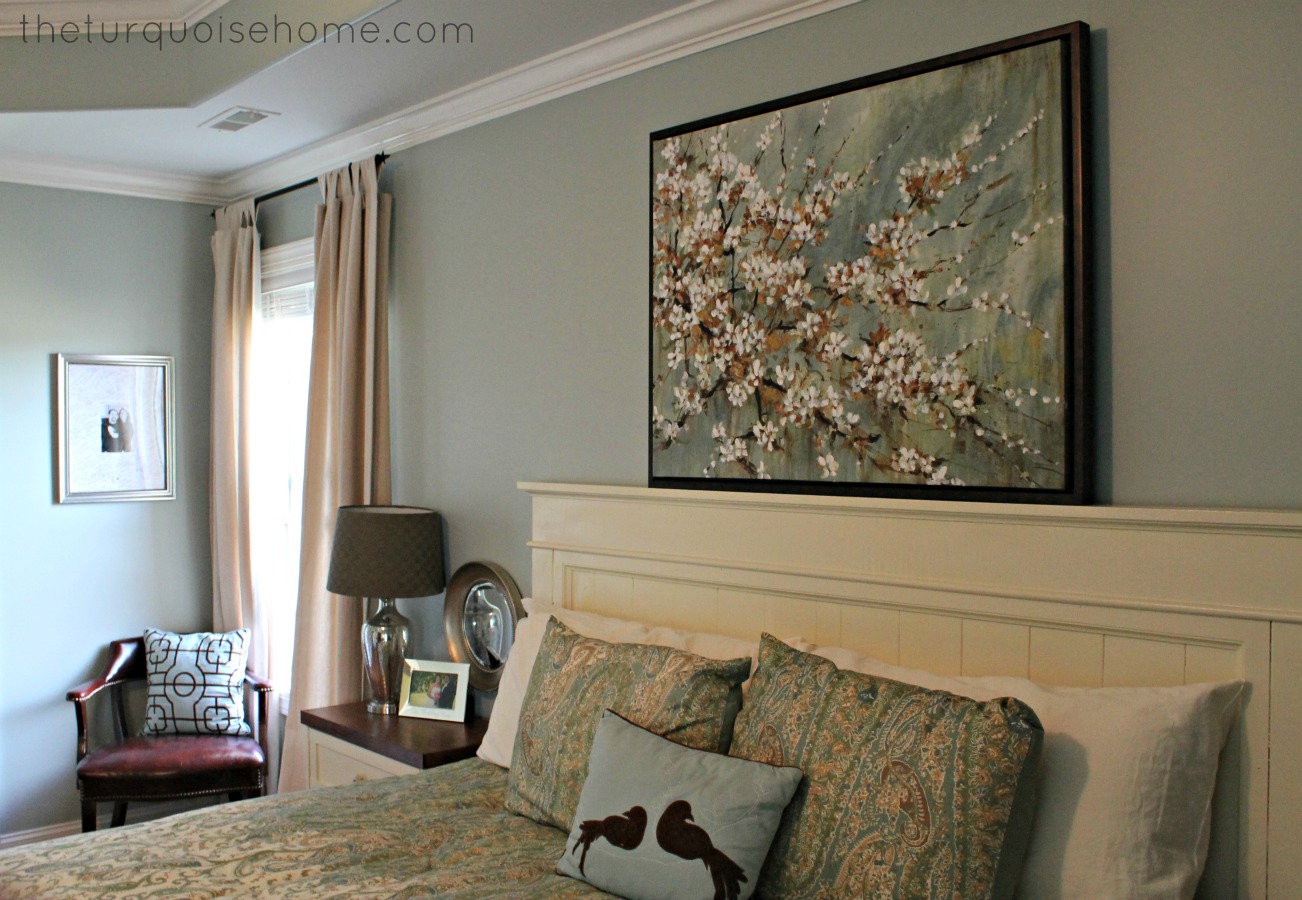
I shared my new master bed headboard on Wednesday and I hope you loved it as much as I do! It’s probably my favorite project I’ve done so far.

The headboard is Ana White’s “Mom’s Fancy Farmhouse Bed” headboard. She has plans for the whole bed, but I just wanted to build the headboard. I had to make a few adjustments because her plans are for a queen sized bed, and we have a king. So, I basically added extra planks to widen the headboard panel and then built it from there.
Want to Save This?
Enter your email below and I’ll send it directly to your inbox!
I am not going to give a step-by-step guide to build the headboard, because you can get that from Ana’s plan. But, I will give you my shopping and cut lists. And show a few tweaks that I made.
Shopping List:
4 – 1×6 @ 8 feet long
2 – 1×2 @ 8 feet long
2 – 2×6 @ stud or 8 foot length
1 – 2×4 @ stud or 8 foot length
1 – 1×3 @ 8 feet long
1 – 1×3 @ 24″ long (or longer, I think I bought a 36″ piece and cut it down)
2 1/2″ wood screws
1 1/4″ finish nails for nail gun
1 – 8′ stick of chair rail for top moulding
3 – 8′ sticks of base cap for moulding around inside of panel and for the top tier on the headboard
Tools I used:
Miter saw
Nail gun
Electric sander
Electric drill
Carpenter’s square
Cut List:
12 – 1×6 @ 24″ (panel boards)
1 – 1×3 @ 24″ (middle panel board)
2 – 1×2 @ 21″ (side trim for panel)
2 – 1×2 @ 69″ (top/bottom panel trim)
1 – 2×6 @ 69″ (base of panel)
2 – 2×4 @ 48″ (legs)
1 – 1×3 @ 78″ (top of headboard)
Cut your moulding to fit your bed exactly
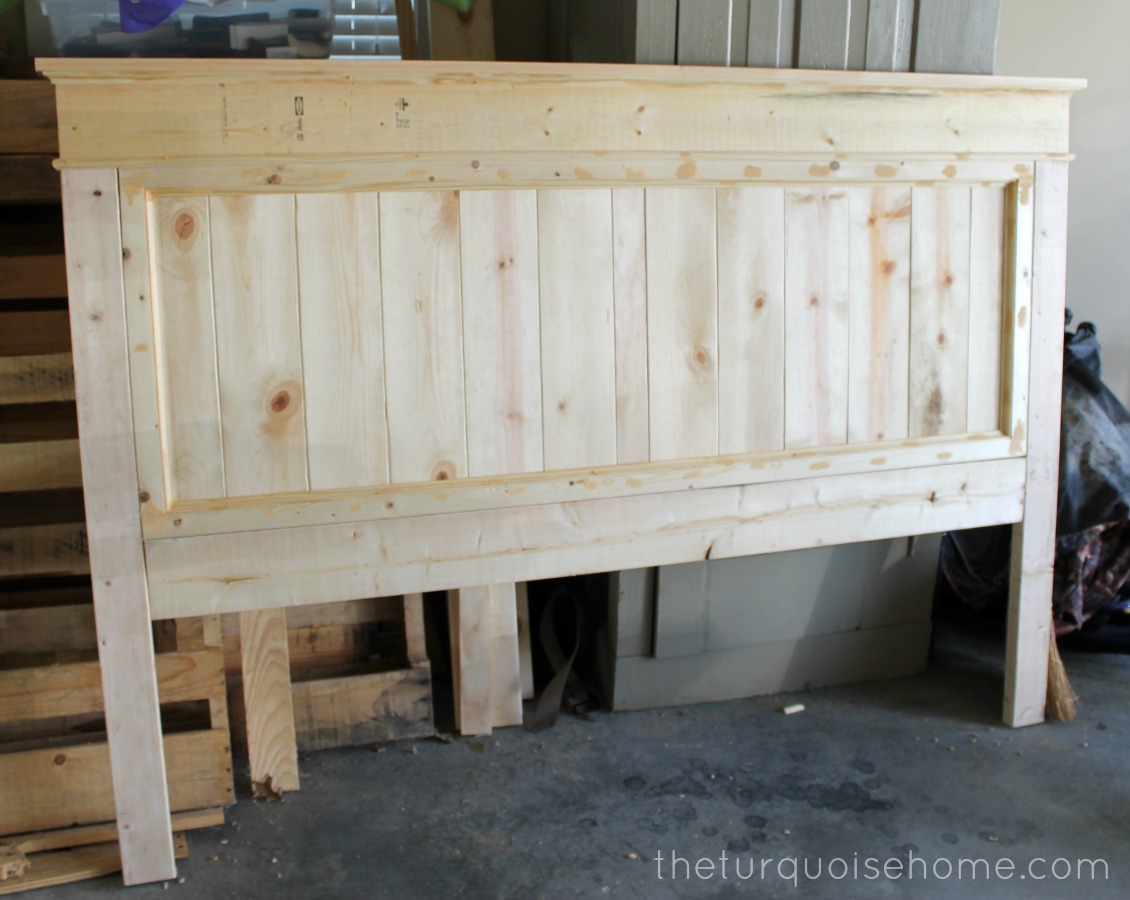
I started by cutting the panel boards and sanding the edges.

I held the boards in my hand while sanding down the edges that would be seen, to give them a more defined “plank” look.

I bought a carpenter’s square to make sure the panel was square before I nailed in the trim. I took this picture before I had all of the panel widths figured out. I had to go back to Lowe’s to get the extra 1×3 piece to make the middle panel piece.

Here you can see the 1×3 middle panel piece that I used. I have six wider panels on each side, so it still looks good. And you can see how the sanded edges give the panels more definition and “plankness.” Yes, I just made up a word.
After everything was nailed in I used wood putty to fill the holes. And primed the whole piece with my favorite primer: Zinsser Cover Stain Primer. I use it on all of my projects that need primer. And since it’s oil based, I buy cheap brushes and throw them away. I don’t like dealing with paint thinner. No thanks!

You’ll also want to use this primer in a well-ventilated area. The garage works perfectly.
Once the primer dried, I gave it two coats of Antique White by Sherwin Williams. It’s the same color I used for the bed side tables. And I had lots of paint leftover from that project, so I had all of the paint on hand. Yay!
There really is nothing like taking a pile of lumber from the hardware store and creating something beautiful for your home! It brings me such a sense of satisfaction.
More Posts You Will Love:
Hello,
I am wondering what your final measurements are of the headboard? Length and height?
Thanks!
Height is 54.25in
Width is 76in
Just a note only (3) 1″x6″x8′ are needed, you will get (4) 1″x6″24″ from them.
Thank you very much Laura! This will be a great addition to my home!
How much do you think a king size head board like this would retail for. I just built one and changed it a little and looks great.
Hmmm, I have no idea without doing some research. I would just look around and find something similar online and price it in that range! Good luck!
I have the same painting and a similar colored bedspread. But my paint color is a dark turquoise. It just doesn’t look as restful as your room! What is your wall color? Thanks!
Hi Linda, it’s called Palmetto Grey. And it’s a discontinued color from Porter Paint. But it’s very close to Silver Sage from Restoration Hardware.
Love this headboard, going to have my husband build me one! Is all the measurements for this one for a king size bed? Thanks!
Krista
I planned on doing this ana white project, but I too have a king and only wanted a headboard, so you just made my life a lot easier! Since it’s just a headboard, did you still attach it to your bed frame? Or did you attach it to the wall? I wasn’t sure what I was going to do, and was worried that attaching it to the frame wouldn’t make it sturdy enough. Beautiful job, by the way!
Jeni
Ummm, I have a confession. I’ve never attached the headboard to the wall OR the bed. Ha!! I always meant to get something with which to attach it to the bed, but I just never have. Attaching it to the wall sounds like a great idea, though. I think you could go either way and be fine!!
Laura, this is simply FABULOUS! Great job! and congrats on being featured at DIY showoff!!
Thanks friend! I hope you’re having a great weekend. 🙂
Hats off to you -this looks like a high end piece -how did you tack on the top wood? And the side legg pieces ?
I love this design! Thanks for sharing a tutorial! 🙂
I love this design! I am in desperate need/want of a headboard! Thanks for sharing!
I’m just discovering your beautiful blog today through the 36th Ave. party. I love your headboard, and I LOVE the color of your bedroom! I was going to ask you what color it is, but I see you have a “Home Tour” button, and you probably answer it there. I think I’ll come to your house for a tour now!:) Nice to meet you!
Welcome!! And thanks for taking the time to leave a comment. 🙂 The color in my bedroom is Palmetto Gray by Porter Paints. Unfortunately it’s a retired color, and I’m not sure how you could get it. BUT, I’ve been told that it’s very similar to Benjamin Moore’s Gray Wisp. I bet it’s equally as beautiful!
I love this! SO pretty and fresh.
I’ve featured you today!
Wow that’s beautiful! I love the feel it gives! Following you from Look what I made blog hop!
Nissa
Really beautiful! You did a great job!
Kelly
This is so impressive and so pretty…thanks for sharing!
Turned out beautiful!!! Thank you for sharing at the Give Me The Goods Monday!
Wow! This is gorgeous! I can’t believe you made it.
Amazing! It’s really beautiful!
Just wanted to stop by from The Scoop to say hello
Mandy @ The Hankful House
I am so impressed with this! I would love to make a gorgeous headboard like yours! Awesome job! Thanks so much for sharing at Time to Sparkle : )
xoxo Liz
You did a fabulous job on this! I love it. I found your project at TwelveOEight 🙂
Oh I love this headboard! I pinned this to my DIY board. Stopping by from the Time to Sparkle party. Have a great evening!
Julie @ This Gal Cooks
You are a DIY rockstar! Just pinned this! Thanks for sharing at “The Scoop”! 🙂 Samantha
Beautifully done. This is such a grogeous headboard, I love your design. Stunning. Hugs, Marty
Thanks so much for linking to Make the Scene Monday @ Alderberry Hill. You are being featured this evening!
I hope you are having a wonderful weekend, and join me tomorrow evening for Make the Scene Monday #72!
Hi! I’m new follower of your blog!
Hi Laura, Great Job! It does feel so good to create something so nice for your home. Everytime I look at something I created it makes me smile! Your headboard is beautiful!!
Thank you so much!!
I love this headboard. I was wondering if you could tell me about how much all the wood cost. I I m going to put my husband to work this weekend!
Hi Jenica, I’ll have to get back to you on that one. But I’m going to price it out at Lowe’s this week as I’m making on for a friend. So I’ll comment back later this week and let you know! Thanks for taking the time to leave a comment!
You did such a beautiful job on that headboard, Laura! (I love your wall color, too.) Such a pretty room.
Hi! I love your headboard project! Great job! I am your newest follower. 🙂 It looks like we started about the same time.
CONGRATS!!! You have been featured at The DIY Dreamer… From Dream To Reality! Come on over and grab your featured button, you deserve it!!
ABSOLUTELY STUNNING!!! I want a headboard like that!!!
Thanks so much for sharing this at The DIY Dreamer.. From Dream To Reality!
Thank you Christine!
Love the headboard! I had pinned your ikea hack side tables a while back and recognized them in the picture. I just pinned your headboard while participating in the Just us Four Pinterest Party. I’m contemplating similar projects for my guestroom and master bedroom. I really want to do an Ana White headboard for the master bed. I have a Rast drawer that I also want to hack. Thinking of something similar to yours. 🙂
Awesome headboard! I love a good IKEA hack. 🙂