How to Stencil Curtains
Learn how to make your own drapes! Finding curtains you love can be such a challenge. Make your own by learning how to make DIY stenciled curtains!
Hey y’all! Well I’ve got a project here for you that I’ve been working on slowly for almost a month.

This post contains affiliate links for your convenience. See my full disclosure policy.
I’ve been looking for the perfect curtains for my living room for a while now. And while I’ve found a few fabrics I like, my ceilings are 12 feet high, so it’s expensive to buy fabric for four 12-foot panels. Yikes!
I knew I wanted curtains with a pattern, so I decided to buy plain curtains and stencil them myself!
I used the shorter IKEA Lenda curtains in my master bedroom, and knew I loved them. And so, I bought the bleached-colored Lenda curtains in the 118″ length. At $29.99 for two panels, you can’t beat that!

And then I went in search of my stencil. I’ve been eyeing the Moroccan trellis stencils for months. I have plans to use the stencil on a wall in the future, so I bought something I could use on my curtains and on my wall.
I finally settled on the Marrakech Trellis Allover Stencil. These Moroccan trellis stencils are so on trend right now, and I just love them!
What You Will Need to Stencil Curtains:
- 8 oz. of Craft Paint per panel
- Fabric Medium
- Curtains – laundered and ironed. I used the IKEA Lenda curtains.
- Stencil – I used this Marrakech Trellis Allover Stencil
- Foam Stencil Daubers
- Large Drop Cloth or Sheet
DIY Stenciled Curtains: How To
OK, now to the actually stenciling.
1. Select the Paint
First, let’s talk about paint. I used craft acrylic paint mixed with Martha Stewart’s fabric medium. I was naive and didn’t realize how much paint I would need. You need a LOT of paint because the fabric will absorb some.
I mixed several paint colors together, along with the fabric medium, to get the perfect shade of medium gray/beige. If you mix paint colors to get the right one, be sure to write down the formula! I ran out right before I finished the first panel. So glad I had the formula!
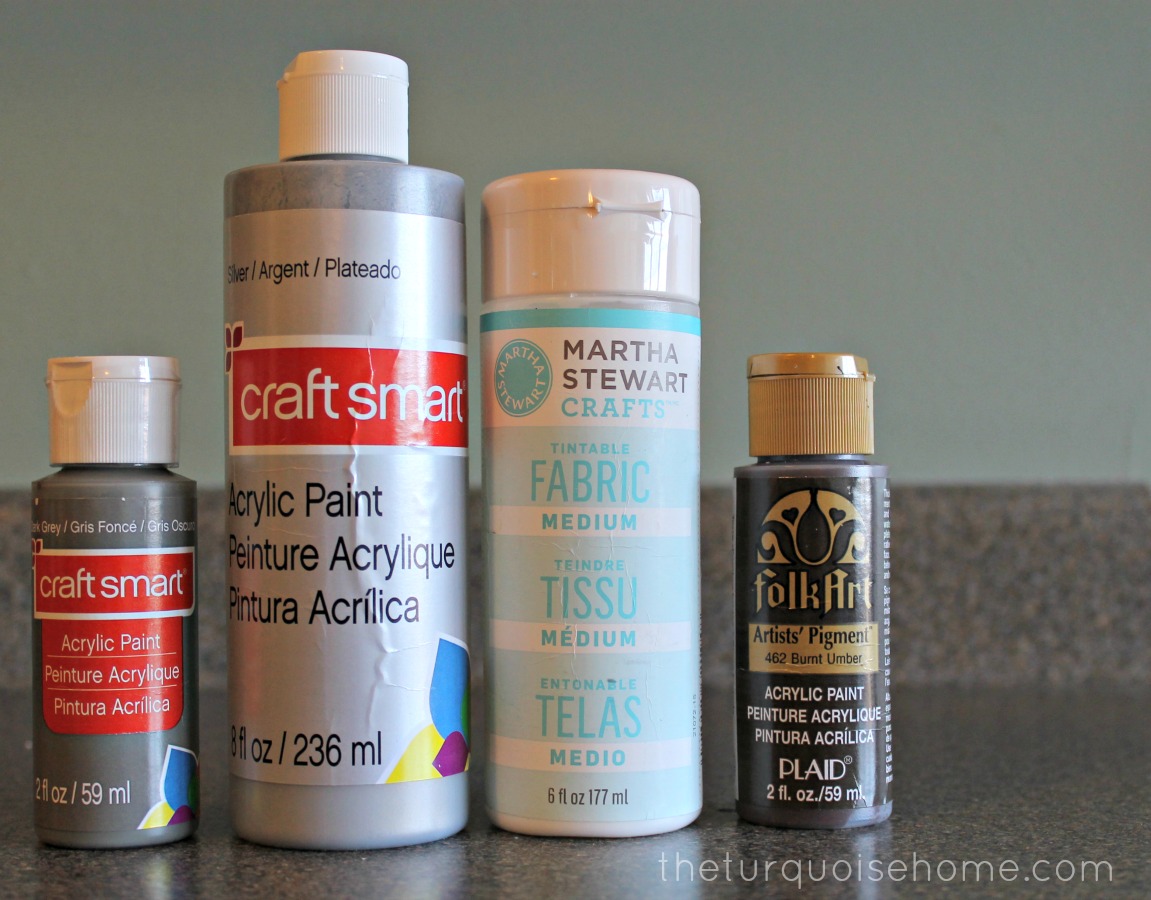
Here’s the formula I used:
2 oz. gray
1 oz. silver
1/2 oz. burnt umber
3 oz. fabric medium
And that only covered almost a whole panel, so in the end I’d say I needed 8 oz. of paint for one panel. I had to go back to the store and get more paint.

The color I was going for was a greige, and I love it! It looks like a gray in liquid form, but once it dried on the curtain, it looked more brown. So, it’s exactly what I was trying to create. Yay!
2. Prepare the Painting Space for Stenciled Curtains
You’ll need a large space for your stenciling. I cleared a space in my living room, so that I could stencil after Miss A goes to bed. (And it’ll be dry by the time she wakes up in the morning.)
You’ll need something to cover your work space … unless you want paint on your floors. I used a queen bed sheet, and it worked pretty well. No paint got on the floors.
The sheet did move around some, which makes it hard to keep the curtain straight and even. So a canvas drop cloth would probably work even better!

3. Stencil the Curtains one section at a time
Lay the stencil squarely over a section of the curtain. I started at the top to make sure it was even across the width of the curtain. Use the foam stencil daubers to get a littler paint and dab it over the stencil. It’s important to use an up and down motion, not side to side.
Once the paint is dry, lift the stencil off and line it up on the next section.
Repeat until the whole panel is covered in the stencil pattern.
One of the biggest challenges was stenciling the curtain in a straight line. The Lenda curtains have several seams running down them, so it helps a lot in trying to keep everything straight.
It only took me a about an hour to paint it. I highly recommend finding something soft to put under your knees. My knees hurt the next day from crawling around on the hardwood floors.

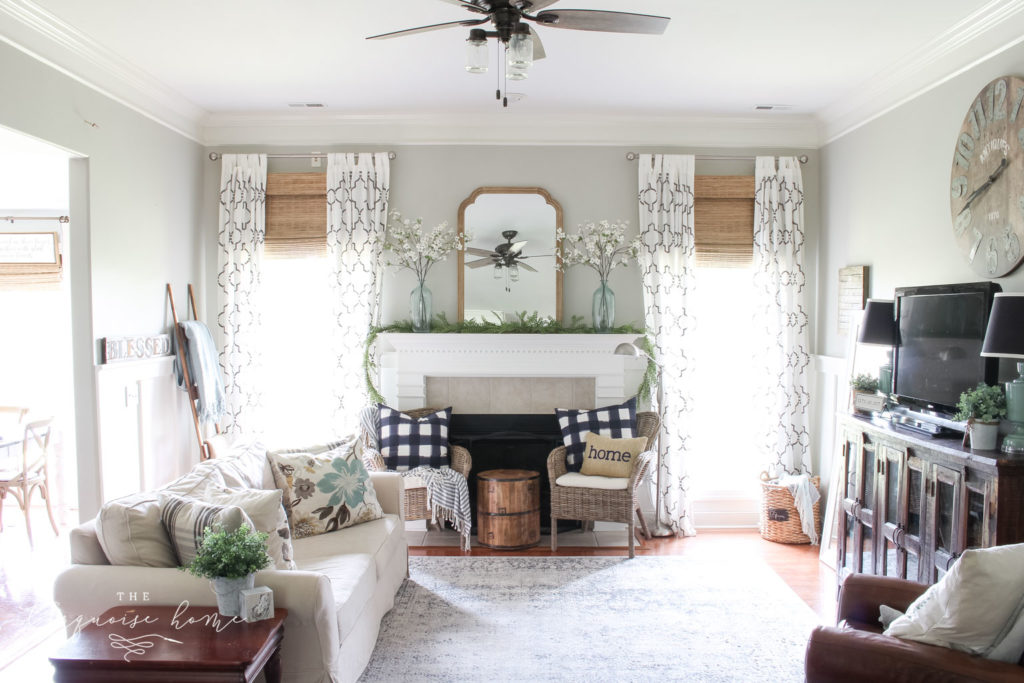
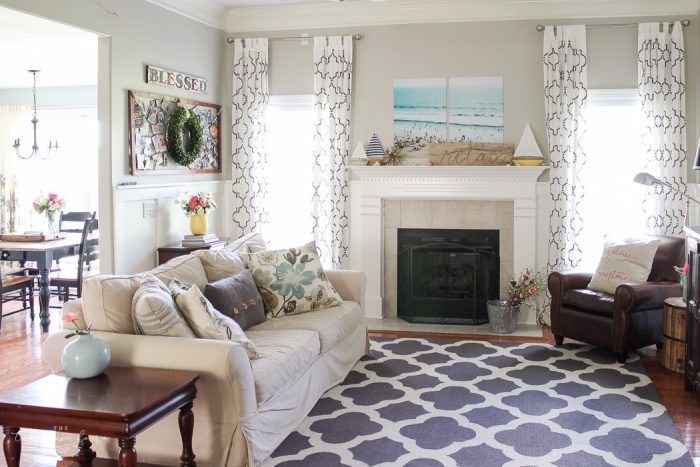
I love the way this one turned out and can’t wait to complete this project and see them all hanging in my living room.
I only have one panel finished so far, but I finally got to the store today to buy more paint. So now I can paint the rest of the curtains. I plan to reveal them all when I reveal my Christmas mantel! You get a little peek here, but there’s more to come.
(Update: Check out all of the stenciled curtains in my Living Room Reveal!)
Have you ever stenciled anything? If not, what would you stencil?
Update in 2022: We’ve since moved out of this home, but over the years these stenciled curtains were one of the most popular items in my home. I got questions about them constantly, and it’s still one of my favorite DIY’s to date!
More Posts You Will Love:

I just bought 4 panels very similar to these – BUT I HAVE THAT STENCIL – AND I HAVE THOSE CURTAINS !!!
Wish I’d seen these a little sooner – they’re beautiful – what a fantastic job you did!
I’m pinning this for sure – thanks so much for sharing!
XOX
Oh man!! So close!
How great are those! I love it. I have been trying to find a good post for stenciling curtains too.
Thanks for linking to Create Link Inspire at The Crafty Blog Stalker. You have been featured and pinned! Thank you for sharing.
–Katie, TheCraftyBlogStalker.com
Thanks so much, Katie!
Hi! Just stopping by to let you know you have been featured at Nap-Time Creations from the Create Link Inspire party. I’ve got some fabulous fabric themes features this week. So glad to have you part of the group. I’ve spread the word {and tagged you} around my social media. Would love if you could help to spread the word as well. Thanks and see you at the party next week! Emily
Stopping by from the Hit Me With Your Best Shot Link Party. I love your curtains. I have been wanting to make stenciled curtains for a while and completely forgot about the great prices at Ikea! Your whole living room is beautiful and how awesome that you have 12 foot ceilings!
Thanks so much Katie! I’m so glad you dropped by!!
I love they way they turned out and the depth they add to your living room! This is such a great idea and I’m tempted to try this on the curtains in my bedroom.
OMG!!! I love that.
I knew I recognized these gorgeous curtains! Your stenciling is perfection. I’m a bit stencil-impaired myself. 🙂
I love this idea. I have some drop cloth curtain panels I purchased at a yard sale ages ago…might just have to do this.
Wow! What a beautiful idea.
P.S. I found you through Making the World Cuter link party.
These are gorgeous! Where did you get the stencil? I love it!
Hey Heather! The stencil came from http://cuttingedgestencils.com. LOVE them!
I just posted almost the exact same project a couple of months ago! I found so many blogs with painted curtains and never came across yours until you posted this on Facebook today. So funny! ~Lisa
There are a lot out there! But it’s such an inexpensive way to get the curtains you want. 🙂
Wow. Those are awesome! I’d love to have you link up to the Do Tell Tuesday party–I’d love to feature these!
These are so lovely! I’ve been trying to decide what to do to spruce up our family room curtains. Stenciling may be the answer. Thanks for some DIY inspiration!
They look awesome! I have been trying to get up the nerve to stencil curtains, you really did a great job!
You can do it, Mindi!! Thanks for stopping by!
Gorgeous!! You’ve been featured on Give Me The Goods! And on my FB page today 😉
Hugs,
Jamie @ somuchbetterwithage.com
Thank you, friend!!
Oh my goodness! Those are stunning. I think I’ve just figured out what I’m going to do with my bare bedroom windows. Pinning to my home decor board. If you get a chance I’d love you to show them off at All Things Pretty.
Thank you so much Kathy!! And thanks for pinning!
This is such a clever idea. Love the stencil you chose and the panels look perfect in the room.
Thanks for sharing,
Suzanne
Pieced Pastimes
Thanks so much, Suzanne! Have a great day!
These are gorgeous! Thank you so much for sharing on Suburbsmama. Hope to see more from you on the next party.
Thanks so much, Rita! I’ll be back next week … I’ve got you on the calendar! 🙂
I absolutely LOVE these, thinking about making them for my bedroom!
Morgan
http://www.dizzypets.etsy.com
You so should, Morgan!!
I noticed this was an “older” post…but I am sooo glad you linked this up! I LOVE what you did to those curtains! Your living room is sooo pretty! Thanks for sharing at {Homemade By You}
Thanks Katie! Love linking up to your link party. Have a great weekend!
Great job, don’t know if I could do that or not. It’s hard to find a place to lay something down for any length of time due to a furry kid in our house that loves to lay on anything I put down. He’s also big and hairy. Have to think on that one. Also I’m not the most patient person in the world, like projects to get done quickly. Guess that means I won’t be having gorgeous stenciled curtains.
Love the stencil you used, not too busy, great pattern on the curtains, they look great on the windows. Looks like you did a great job keeping the pattern straight, don’t imagine that was the easy part of painting them. Hope you had enough paint so you could finish the job. Always have extra paint on hand, things just seem to turn out that way. You must be very patient besides talented. Happy days
Hi JaneEllen … it wasn’t easy to keep them straight, and they aren’t perfect, but they are good enough! I rarely meet perfection, or ever … so good enough works for me. 🙂 They look good hung up, so I’m happy!! Thanks for stopping by and taking the time to comment!
Beautiful! Pinned! If you have time, I’d love it if you would link this to Family Fun Friday – we have over 100 bloggers and 600 readers every week. 🙂 Thanks so much! Monica
Hi Monica, thanks for pinning! I’ll be sure to check out your party!!
Looks great! I don’t think I would be able to keep them straight. Thanks for sharing! Stop by my Friday’s Five Features tomorrow and link up this post (and others)!
Hi Becca, the seams down the fabric definitely helped! They aren’t perfect, but you can’t tell when they are hung up. 🙂 Thanks for stopping by!!
looks great! i have high ceiling problems too:) i tried stenciling them with that exact stencil, but it just wasn’t turning out how i envisioned. love the gray!
I definitely had moments where I wasn’t sure it was going to work, but I’m pretty pleased with the outcome. And it’s not perfect by any means! 🙂 Have a great weekend, Carissa!
Holy awesomesauce, Batman! I’m pinning this because we have the exact IKEA curtains that you do, but they’re in a box in the basement because I needed a change. Um…hello! I can change them myself with stencils! Pinning and tweeting this post, immediatamente.
You’ll love that they have seams down them to keep your stencil on the straight and narrow. Can’t wait to see what you come up with!!
Gorgeous! I can tell that this took a lot of time and effort but the end result is fabulous!
Thanks so much, Lisa! I hope you have a great weekend!
These came out beautiful. I totally want to do this now!
Hi Kim, I’d love to see them if you do tackle this project! Thanks for stopping by!!
I LOVE THESE, so cute! These would be perfect for our master bedroom, I am thinking I am going to need to make these ASAP! Thanks for sharing, I am so glad I found you at the Inspiration Exchange Link Party!
Thanks Jenn! I love them still, so much! I hope you do end up doing them. Let me know if you post them!!
Your home is just so beautiful. Everything you post has me drooling! I have several panels of plane white “sheet” curtains in our home, and I would just love to stencil them like this! Thank you for the inspiration!
Kylie @ Absolutely Arkansas
Oooooh, your curtains sound like the perfect candidate for a stencil makeover. I have some plain curtains in my bathroom that I’d love to makeover as well! Thanks for taking time to comment!
They turned out absolutely beautifully! Kudos to you for tackling such an ambitious project!
Aww, thanks Val! They were definitely worth the effort and the sore knees. 🙂
These are gorgeous!! They really make a statement. I always stick to solid panels, but I’ve been thinking about painting mine for awhile. I love how these turned out so perfectly with a stencil! I think my pattern would be all over he place 🙂
Thanks Christy! Mine aren’t perfect, which is why there aren’t any close-ups. 🙂 But nobody sees the imperfections except for me. You could so do this DIY! 🙂
These look great. I started stenciling some curtains using the same paint and fabric medium. I kept ending up smudging my paint when I moved the stencil. Tricky business. But these look so good I think I need to revisit this plan.
Thanks for sharing.
Sarah
Creative Ramblings
Hey Sarah! It is super tricky to make sure you don’t smudge the paint. And my curtains aren’t perfect by any means. I was VERY super careful when I moved the stencil, though. I tried to make sure I was setting it in the right place, and didn’t move it around once it was on the fabric. And every so often, I would wipe the bottom of the stencil to make sure there wasn’t any paint on the under side. Definitely give it another try! And I’d love to see the final product!
These look great! Don’t forget to link up to The DIY’ers!
Thanks Kayla! Have a great week!!
Your curtains turned out so beautiful! I’m stopping by from Give Me The Goods Monday.
I would love it if you’d link this post (and any other craft, DIY, recipe posts) to my blog hop. I’d love to see you there!
Thanks Carrie … I’ll be sure to stop by!
wow great idea, you are truly very talented…loved your website keep up the good work..I plan to stencil one of my old curtain too thanks for the great idea 🙂
Thanks so much! I hope you do try it – such an easy way to spruce up a space!!
This is such a great idea!!
Thanks so much, Cara!!
The curtains look amazing with the rest of the room! I just bought some similar blue and beige curtains from Target, I didn’t think of stenciling them myself. Great job.
I saw your curtains in your living room reveal. You did a great job and your room looks fabulous!
So – how long did you wait between stenciling and then moving the stencil to another spot? I’m worried that I’ll end up with a smudgy mess. :/
I didn’t wait long, but tried to be careful. If I noticed the paint was getting under the stencil I wiped it off. And I did end up with some smudges. But I was too impatient to wait. 🙂
Hey, found your blog! This is way cute! You are so crafty 🙂
Thanks Amanda! Love your blog … so fun!!
love it Laura! great job on this!!
Thanks!!