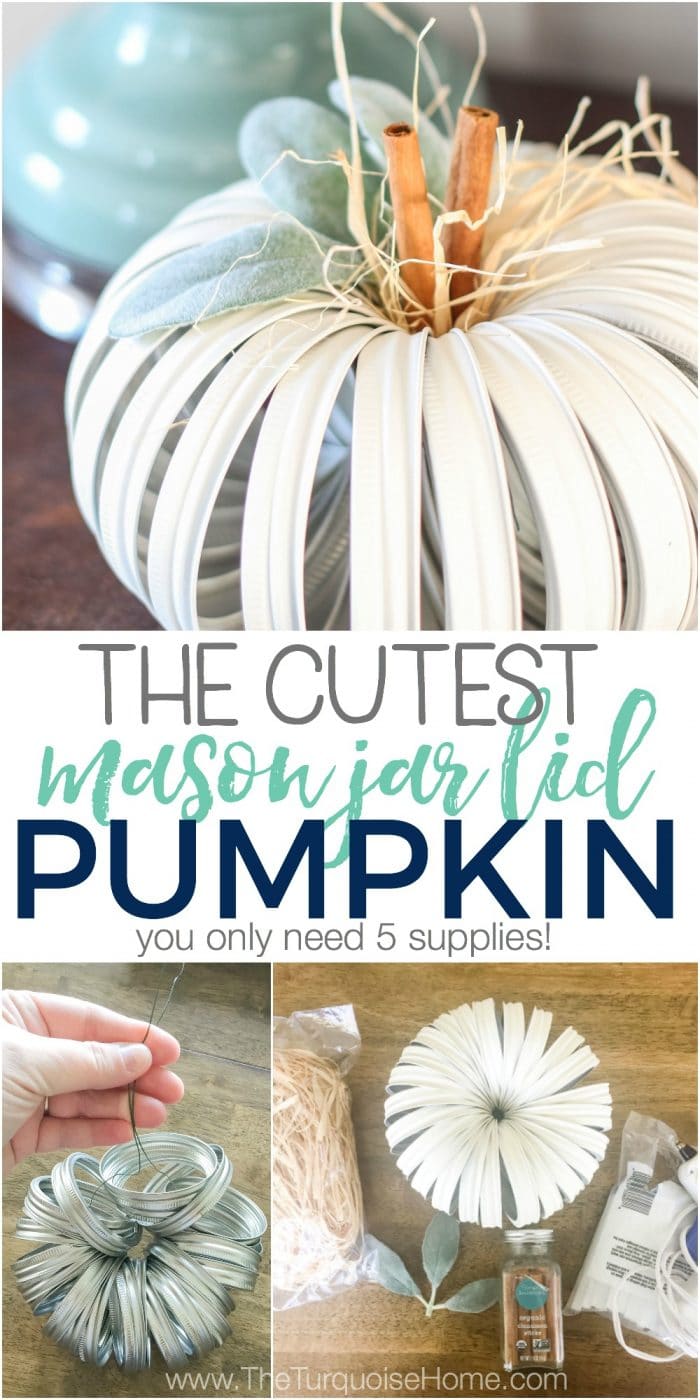
Mason Jar Lid Pumpkin Craft

This Mason Jar Lid Pumpkin is such a cute craft idea and so easy to make, you’ll be making some for all of your friends. Using just five basic supplies, this project takes about 30 minutes or less! Yay!!
My first mason jar lid pumpkin was made back in 2012 when these started appearing on the fall craft scene. We made them as a craft at a women’s retreat and I promptly came home, set it on the media cabinet and admired its cuteness for the fall season. The picture I took in my fall home tour that year got major attention on Pinterest.
People loved it!!
I never got around to making a tutorial for it, like I promised. Well, not until now.
When I went to look for my orange mason jar lid pumpkin the other day, I came up empty handed. I must have decided to donate my cute lil’ pumpkin to the local thrift store.
So, I decided to make a new one and share the super simple steps here. Seriously, it’s almost silly to call this even a tutorial because it’s just too easy.
But maybe that will inspire you to go purchase the supplies and make your own since it will take you less than 30 minutes – not counting drying time. But even that’s not too long if you use the same paint that I used.
This post contains affiliate links for your convenience. See my full disclosure policy.
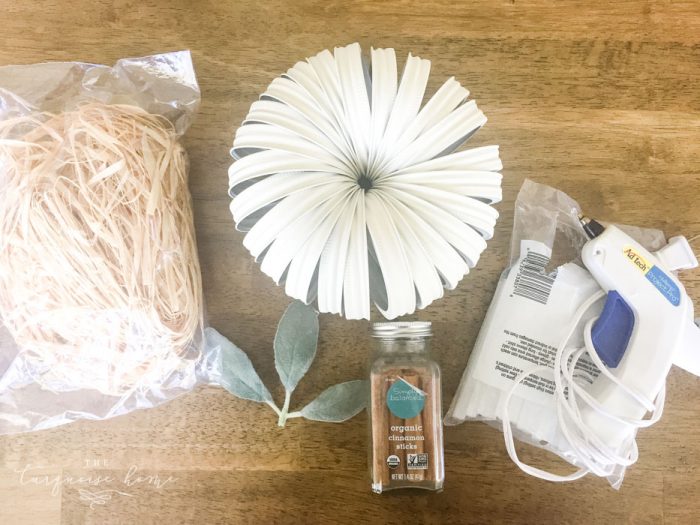
Supplies Needed for a Mason Jar Lid Pumpkin
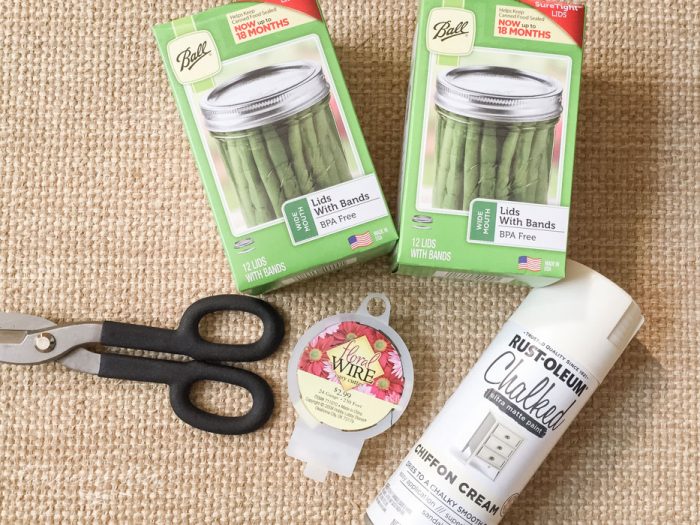
- 24 Mason Jar Lid Bands (wide mouth) – You don’t need the actual canning jar lids, just the lid bands.
- Floral wire and wire cutters
- Spray paint – in the color of your choice. I chose Rustoleum’s Chalked Paint (Chiffon Cream).
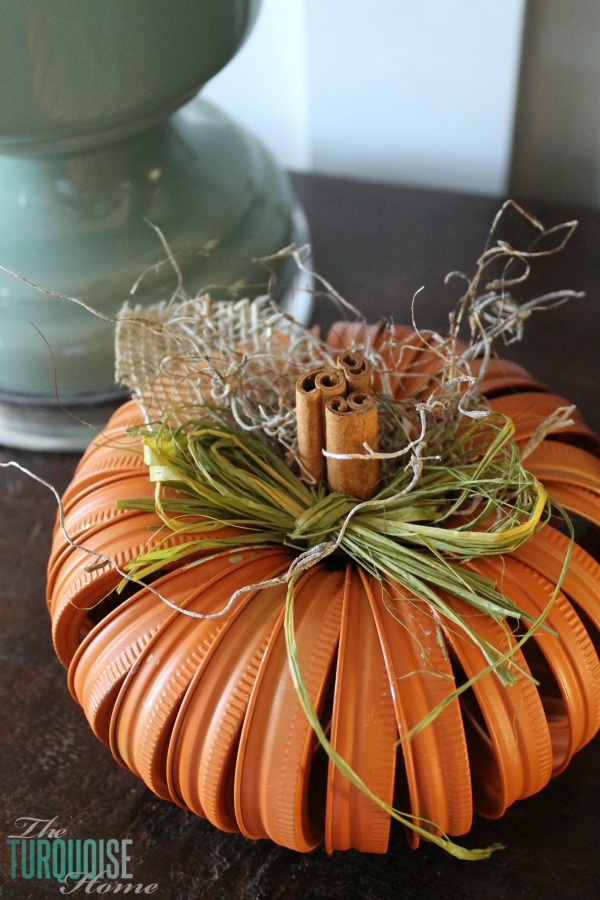
- Cinnamon Sticks – for the “stem”
- Glue Gun and Glue Sticks
- Other finishing embellishments – like leaves, moss and raffia are optional. See mine at the end to see what I did. Use your imagination and get creative!
How to Make a Mason Jar Lid Pumpkin
1. Cut a piece of floral wire
Make the wire long enough to string 24 lids on it. I made mine a little extra long, but that works great when trying to tie it off.
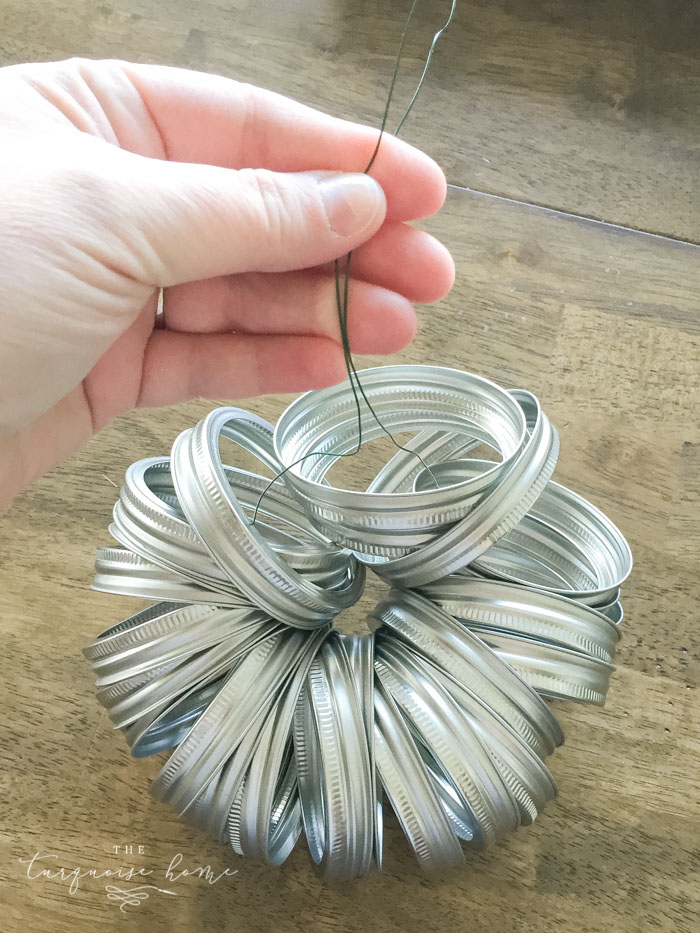
2. String the jar rings onto the wire all facing the same direction.
3. Tighten the wire in the middle of the bands as tight as you can.
This is honestly the hardest part. You want it to be tight enough that they don’t look like a mason jar lid necklace. But leave enough room to put your cinnamon sticks in the middle as the pumpkin stem.
4. Spray paint the lid bands the color of your choice.
I chose Rustoleum’s Chalked Paint spray paint in Chiffon Cream. It was the first time I had used a chalky paint in a spray paint form – and I’m obsessed!! I’ve already made a list of all the things I’m going to spray.
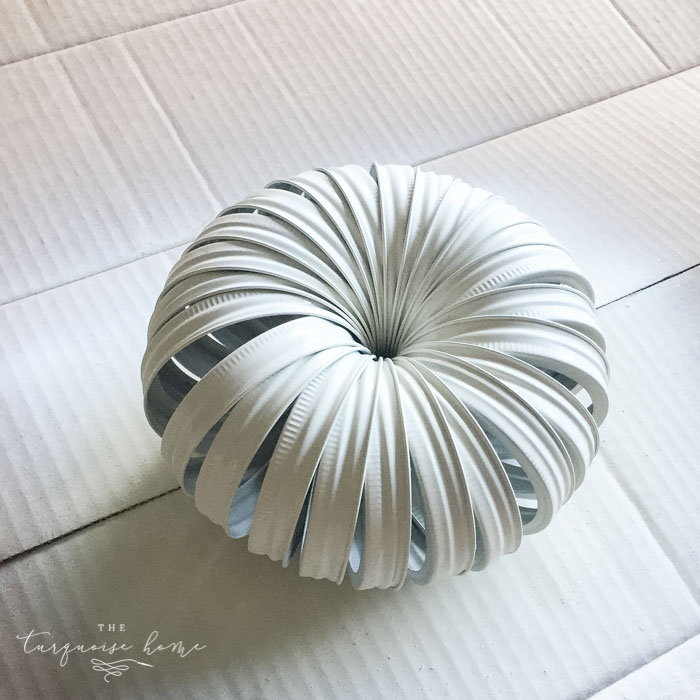
It goes on quick and thick. Then it dries pretty fast, too. Like in less than 30 minutes. This is awesome for an impatient girl like me. I painted 2 quick coats and that’s all it needed. You can also distress it easily. LOVE it!
5. Add the “stem” and other pretty embellishments
The sky’s the limit here. You can add jewels, paper, color, leaves in a variety of fabrics or styles – let your creativity go wild here.
In my original mason jar pumpkin, I had some wiry grass stuff (that’s the official name, for sure 😉) and a raffia bow along with a burlap leaf. These items were all provided by the coordinator of the craft night, so I got to use a little of my own creativity, but not much.
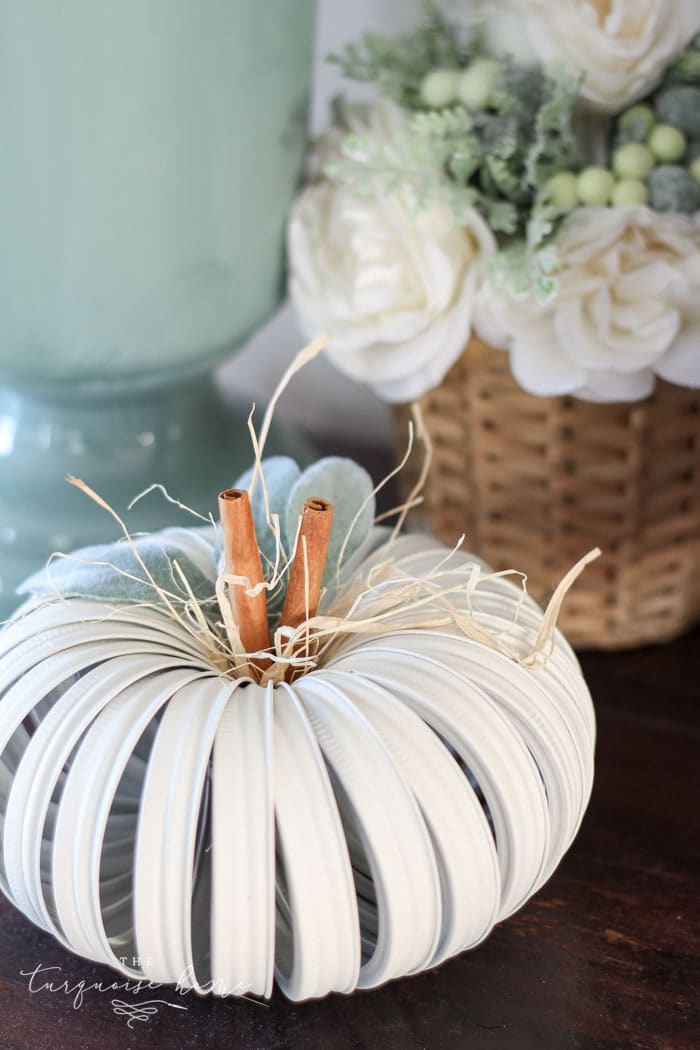
This time I decided to go with some skinny little raffia stuff and lamb’s ear leaves for my cute lil’ canning ring pumpkin. I considered doing a bow again and decided not to this time.
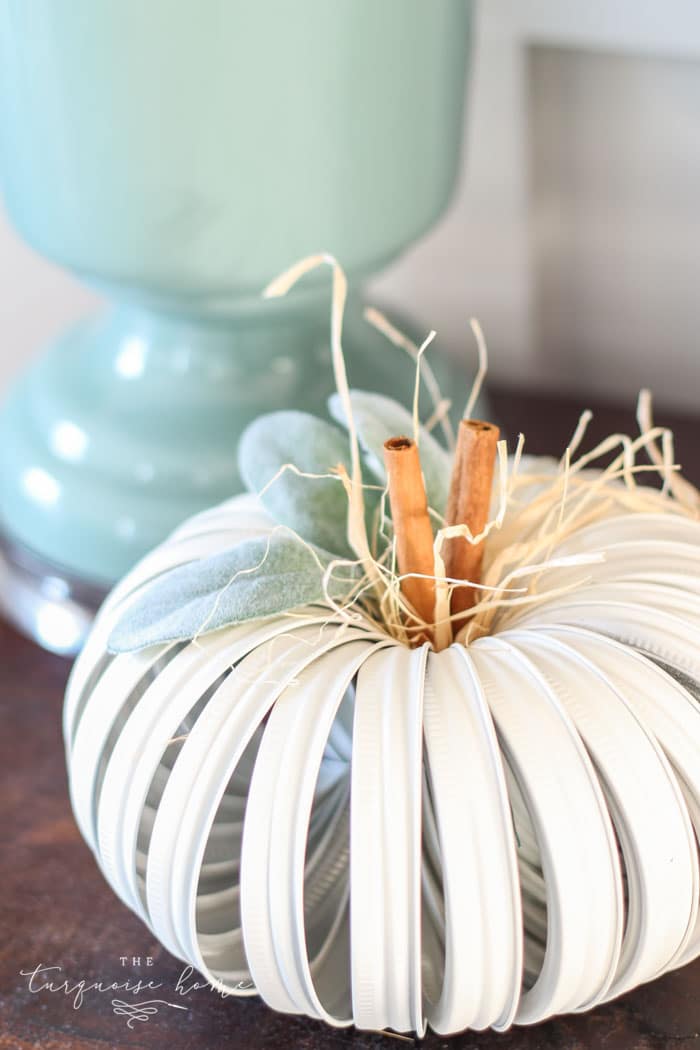
I used my hot glue gun to glue everything in place.
Final Thoughts
It’s so cute and I love how it turned out! So much more neutral. And as you’ll see in my upcoming fall decor posts, that I’ve gotten rid of almost all the orange in my fall home decor. Sometimes I just get the itch to change it all up! So, this new farmhouse-y, neutral pumpkin fits right in!
If you don’t have time to make this cutie today, I hope you’ll pin it for later…
Or bookmark it on your web browser.
Either way, I hope you’ll make one of these super easy, adorable mason jar lid pumpkins and show me how you did it! I’d love to see my inbox flooded with every variety of these things. (email me at [email protected])
OK, that’s all. Go get your craft on!
More Posts You Will Love:
So cute. I made it into an apple with red spray paint and will do a small green apple, too, but my favorite is the pumpkin. Thank you!
What would be your ideas to use this idea but do it into a Christmas ornament?
pumpkin is really cute. used chalk rust-oleum chiffon paint, but it does not stick on the lids. What’s happening???
Oh no!! I’m not sure, because mine stuck fine. Maybe try a primer spray paint first?
These are GENIUS! They’re so cute and elegant and SIMPLE to make! I love the white with the cinnamon sticks. Soooo cute. I featured your tutorial in my recent roundup post because I loved it so much! Thank you for sharing! I can’t wait to make these!
Awww, thank you so much, Rissa!!
pumpkin is really cute. used chalk rust-oleum chiffon paint, but it does not stick on the lids. What’s happening???
This is my first time to your site. I have to say I was thrilled I ran into this. I really like the easy way of making little pumpkins and I surely will be making these. I can’t wait to see what’s next. Oh you were talking about the lids maybe something christmas? Just thinking. Loving what your doing😊
Welcome, Mary!! I still have those lids sitting around here somewhere. I think sending them to my daughter’s preschool this year for them to make Christmas ornaments would be a cute idea! xo, Laura
This is an amazing idea!! I would’ve never thought of using mason jar lids to make a pumpkin. Looks so great, good job!!
Awww, thanks so much, Fiona!!
So cute! I noticed you painted it after you tied them together…….was it hard getting an even cost on the inside?
Hey Jessica! It wasn’t hard at all, actually. I had the same concern, because when I made the orange one the first time, someone else had painted all of the rings first and then we assembled them. I decided it was worth the time savings to me to try to spray them after I tied them together. It worked great! There are some places where you can see a little bit of silver underneath, but it doesn’t bother me! xo, Laura
So cute! My orange Mason jar lid pumpkin must’ve hopped into your donate pile too! I can’t find mine either. I’m crushing on the new farmhouse styled one anyway. 🙂
Question for you! Where did you find the lambs ear leaves? Michael’s?
Thanks!
Hi Stephanie! They are from Hobby Lobby, but have been HARD to find in the stores. They look like they are available online and on sale for 50% off every other week. Don’t buy them unless they are on sale!! https://www.hobbylobby.com/Floral-Wedding/Flower-Stems/Green-Lambs-Ear-Stem/p/153285
xo, Laura
Love love! Seen on Pin but love the neutrals and rustic look of yours. Will be makING these with my son! Thanks.Laura! Your still my favorite Blog!
While I’m here. How can I update or change my email to your blog? Or should I just sign up with my new e-mail? Thanks devoted follower. 😃
Cute pumpkin. What is the total cost to make?
Hi Judy, I spent $10 for the lids and about $7 for the spray paint. I had everything else on hand, so it’ll be a little bit more if you have to buy a glue gun, cinnamon sticks, etc. 🙂 Thanks for reading! xo, Laura
Very cute! I’m going to try this…
Yay! Elon, You’ll love how easy it is and how cute it turns out! xo, Laura
Super cute. Love this.
This is so cute! I have seen them on Pinterest, but I like how you added the twine and cinnamon sticks!
Thank you, Mary!!
Super cute! As for the leftover flats, you can glue 2 of them back to back with a ribbon loop in between and decorate with scrapbook or wrapping paper and various embellishments and make Christmas tree ornaments. Pinterest has lots of ideas if you search canning jar lid ornaments. Your older daughter would probably have fun with it as well😊
I definitely think we’ll be doing some kid crafts with the leftover flat part of the lids! She WILL love that. Crafting + time with Mommy = a WIN! Thank you for reading, Vicki! xo, Laura
I need to make one!! Thank you for the idea 🙂 You could make cute snowman faces with your lids.
Yes! Great idea, Stephanie! Thank you for reading! xo, Laura
That is so cute. I love it. I would have to put some glitter on it. HA! HA!
Haha, Betty! I’m usually anti-glitter because I hate to clean it up! LOL