The Average DIY Girl’s Guide to Painting Cabinets
Learning how to paint cabinets doesn’t have to be overwhelming! Follow the simple steps and you’ll have painted cabinets that you love!
Back when I revealed my guest bathroom makeover, I told you that I’d share all of the nitty, gritty details of painting the bathroom vanity cabinets. I’m finally ready to share the Average DIY Girl’s Guide to Painting Cabinets. It’s so easy, no professional tools are needed! Yay!!
I’ve been wanting to paint these cabinets for as long as we’ve owned this house. When we walked through this house to see it for the first time in the buying process, I noted all of the honey-oak cabinets and knew right then and there that I would paint them all.
But I have been scared.
I don’t own a paint sprayer and I didn’t have the money to pay a professional. All I could see in my mind was big paint drips and long brush strokes all over my cabinets. I know people paint their cabinets all the time, but my nearly perfectionist tendency didn’t want to mess them up and then have to live with something worse than honey-oak cabinets. So, I’ve been frozen.
Until … I found the best cabinet paint and went for it!
Paint has come a long way over the years, and now they have excellent self-leveling qualities that make painting cabinets a dream. It’s still a big DIY job, but it’s so much easier to get great results if you use the right products.
I now use Benjamin Moore’s Advanced paint line in satin or semi-gloss finishes for all of my cabinets and trim.
So, for my big home project, I decided to tackle the smallest cabinets in my house first: the guest/kid bath cabinets. Baby steps, y’all.

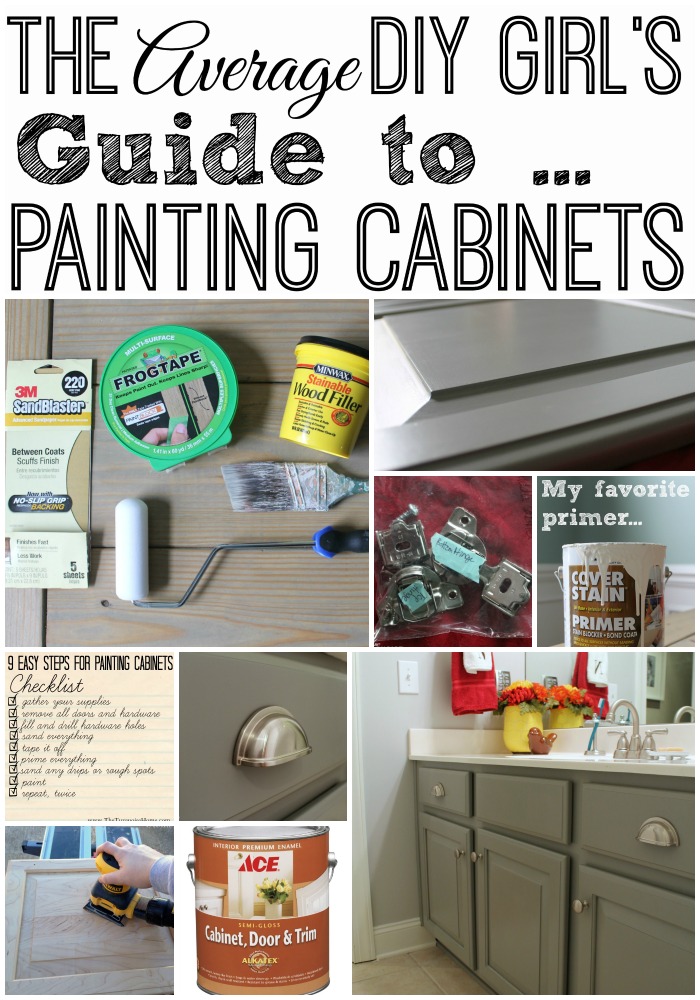
Tools Needed for DIY Cabinet Painting
- Painter’s Tape
- Sand paper (I LOVE this sander.)
- Brush {I use Purdy brushes, because they’re the best and will last forever. Mine’s been around the block a time or two … and is 15 years old.}
- Foam Roller
- Paint for Cabinets. I prefer Benjamin Moore’s Advanced paint line in a satin or semi-gloss finish.
And now … drumroll please … how to get that amazing painted finish …
How to Paint Bathroom Cabinets
1. Gather your supplies
Again, I’m your average DIY girl without all of the fancy paint equipment, so it’s simple brushes and rollers. Nothing crazy here!
2. Clean the cabinets to remove all dirt and grease
I used a de-greaser to clean my cabinets, but you can also use a liquid sander afterwards and you can probably skip step 4!
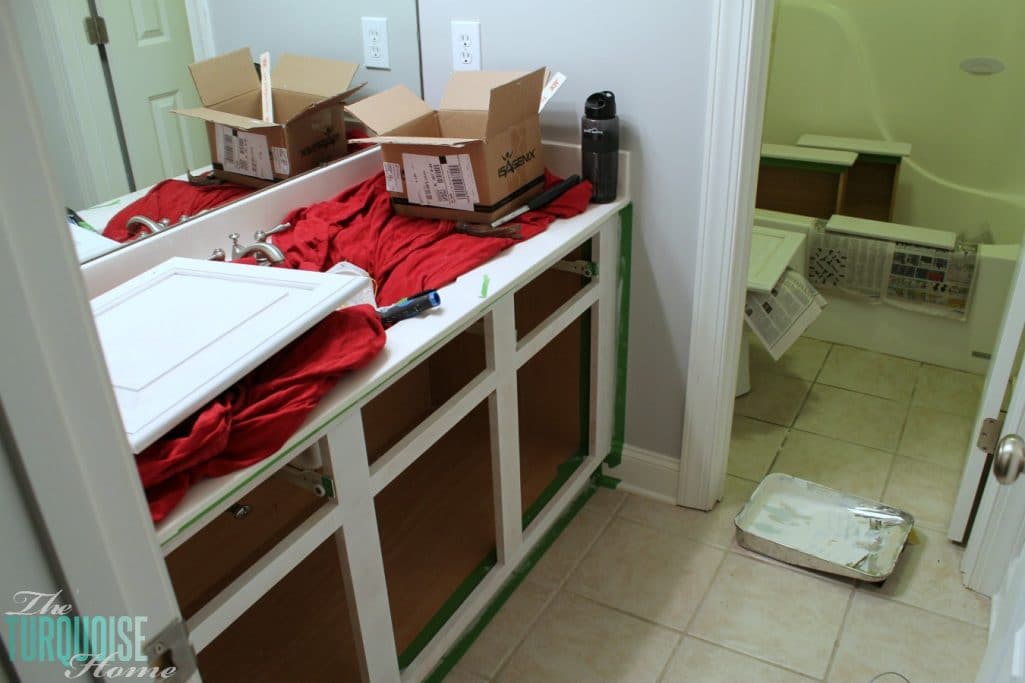
3. Remove all doors and drawers, drawer fronts and hardware
Oh, and go ahead and remove the stuff from under the cabinets as well. I assume that’s obvious, right? 🙂
Make sure to label the hinges and hardware when you remove them!
Trust me. If you don’t label and keep them separate, it’ll be a pain to get them all back in the right place. I know it looks like I followed my own advice, which I did.

You can also protect your countertops by taping the edges and/or covering them.
4. Fill and drill new hardware holes
You’ll only need to do this step if you’re changing out the hardware on your cabinets and drawers. In my case, I only changed the hardware on the drawers, so I just filled the one hole in the middle and drilled two new holes for the new hardware. (This is my favorite wood filler.)
5. Sand everything (then wipe off the dust)
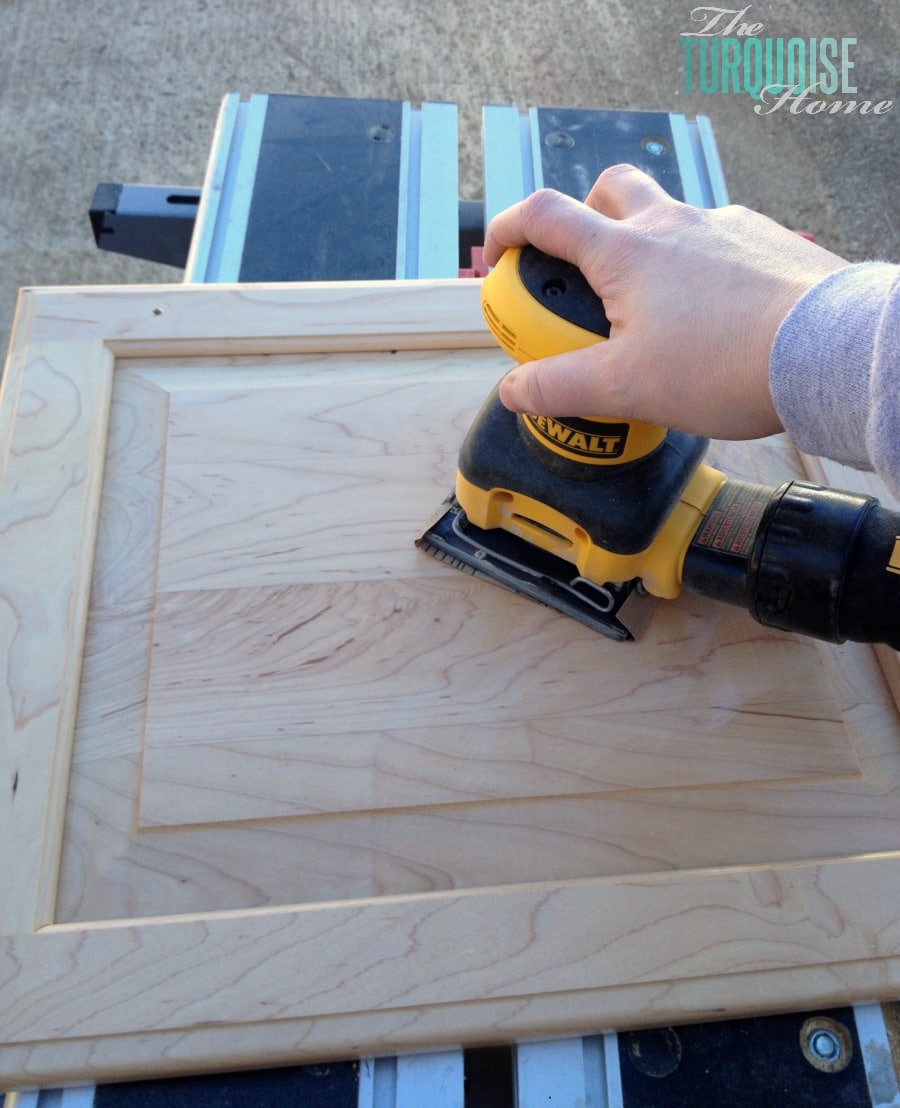
I took the cabinet doors outside and gave them a quick once-over with my finishing sander and 220-grit sandpaper. If you have old paint or a lot of grime to sand off, use a 120-grit sandpaper first, then finish with the 220-grit sandpaper.
I didn’t want to get all of the finish off, just lightly scratch them up to give the primer something to grip. And I hand-sanded the cabinet frame.
6. Tape the walls and floors off
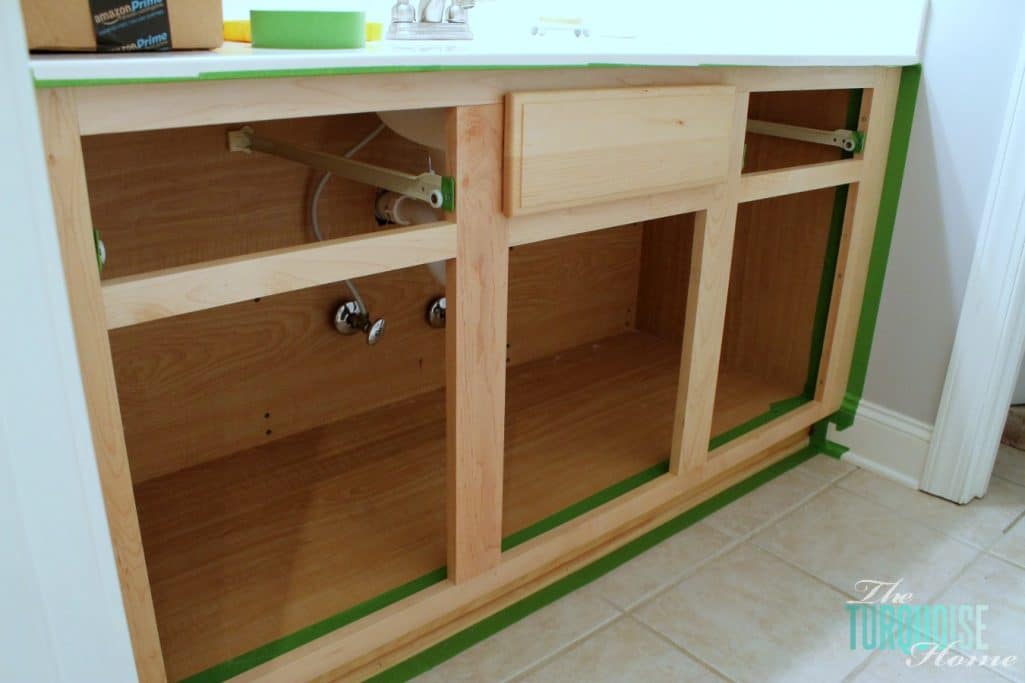
I didn’t want to paint the insides of my cabinets, so I taped around the insides and taped the walls and floor. I didn’t think that middle faux drawer would come out, but my mom figured out that it snapped right off. Made for much easier priming and painting!
7. Prime everything
I normally don’t like to prime in the house, just because of the fumes and the smell. But, it was cold outside and since I had to prime the cabinet frame inside, I just set up shop in the bathroom – with the fan on. My mom came over to keep Miss A while I locked myself in there and worked quickly. {I moved everything out to the dining room to paint once the primer was dry.}
This is my favorite base primer: Zinsser Cover Stain. LOVE it!

8. Sand any drips or rough spots
I just lightly sanded any drips or rougher spots from the primer. Sand very lightly, because you don’t want to take the primer off.
9. Paint
Ok, now that all the prep is done, it’s time to paint. This paint is pretty runny, because it’s self-leveling, which is good.
So, you want to paint with very thin coats. Be sure to check back for drips frequently. So, here’s what I did.
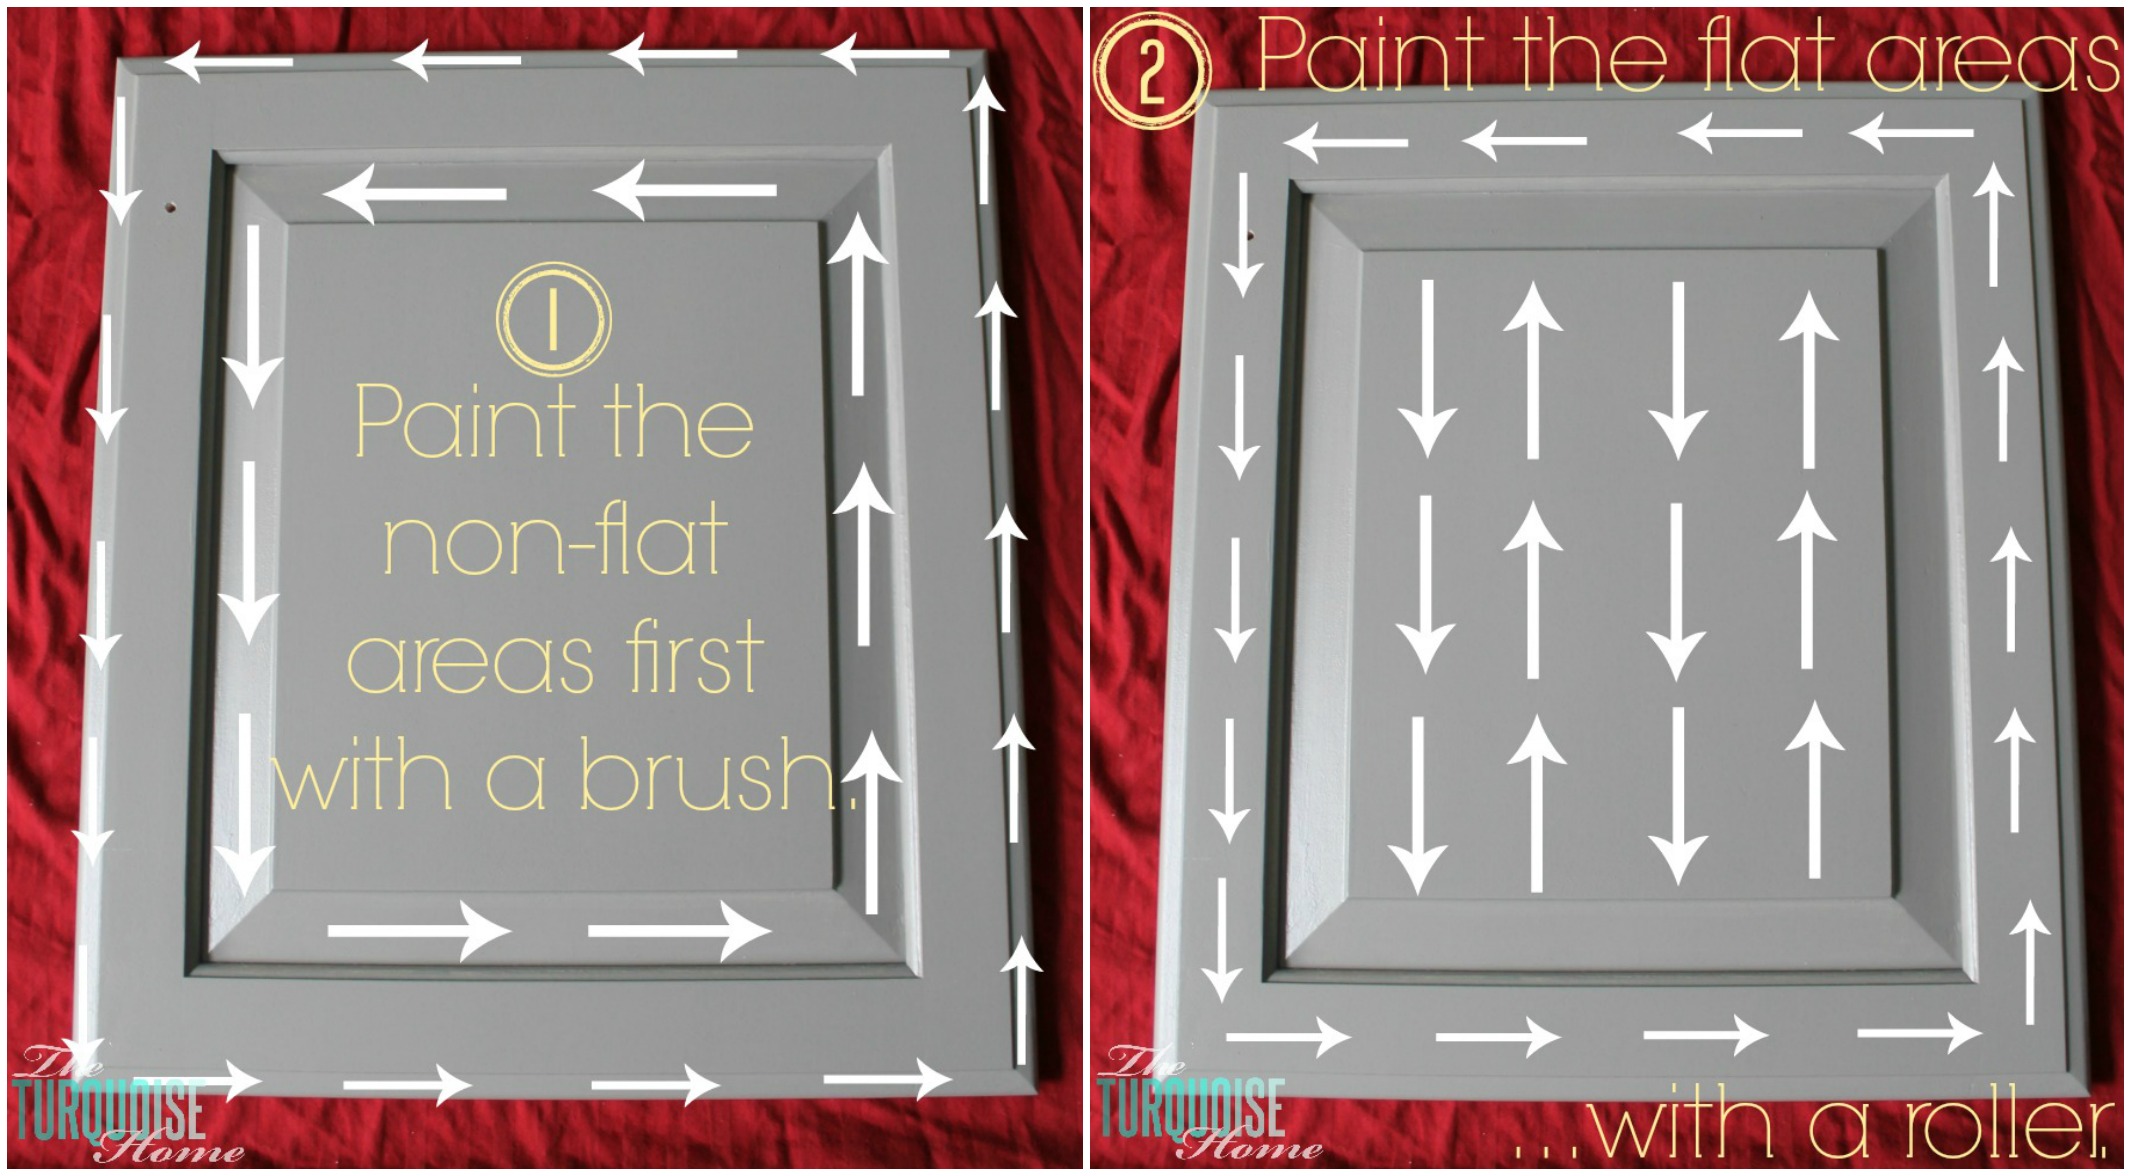
You’ll want to paint as much as possible with the roller because that gives the best finish, but the brush works too in the cracks, corners and crevices.
Like I said, let the paint settle for a couple of minutes and then look back over it for paint pooled in the corners or drips underneath the edges. The paint will still be wet enough to clean up those areas and will still level and dry flat. LOVE this paint!
10. Repeat, twice.
Yes, mine needed three coats. I didn’t sand between coats, but if you see some rough spots or drips, then sand them between coats.
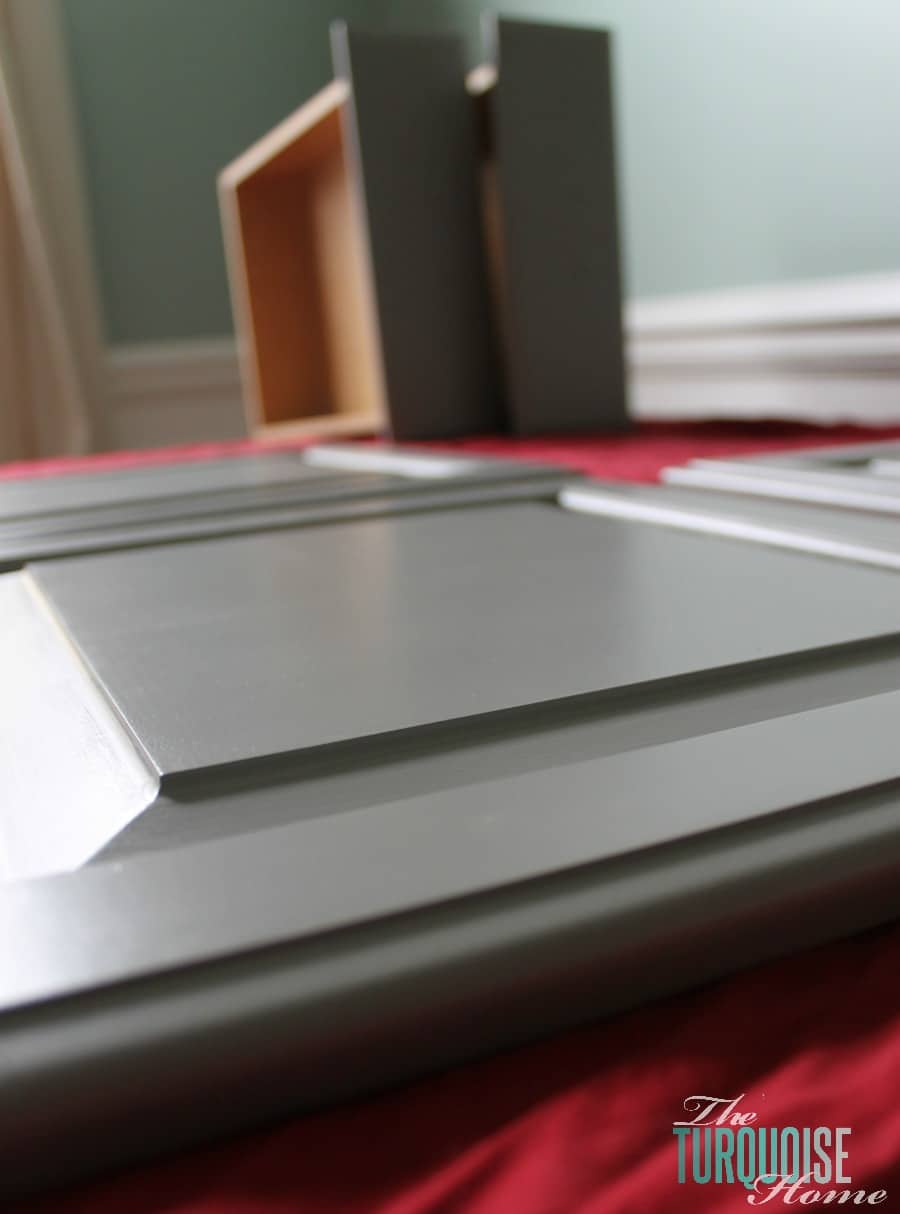
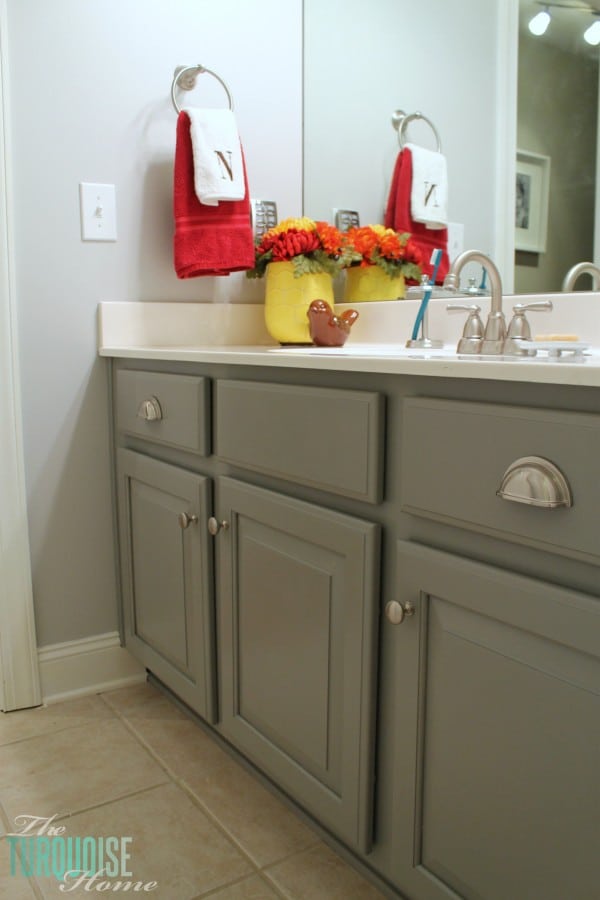
Plan on waiting 24 hours between coats and then as long as 48 hours before it’s completely dry. Believe me, this smooth, baby’s bottom finish is totally worth it!
It’s like glass, y’all!
If you’ve been scared, like me, then I hope this motivates you to try it. Let me know if you do!
And if you’re a cabinet painting pro, then please leave your favorite tips, tricks and tools in the comments. Girls like me need your help! 🙂

UPDATE: It seems like I left off a very important piece of information: the paint color. It’s Ominous Cloud by Clark+Kensington (Ace Hardware’s brand). I hope this helps!
Frequently Asked Questions
It costs about $7-$15 per square foot, depending on the condition of the cabinets, method of painting and the size of the project.
If the cabinets are wood you will need to prime them before painting. If you are using a water-based paint and the cabinets are painted in water-based paint, you can paint directly over them.
Test if the paint on the cabinets is water-based or oil-based paint by rubbing a damp cloth rapidly over the paint. If the paint comes off, it’s most likely water-based paint. If not, you’ll need a primer before continuing on to paint.
The best cabinet paint is a premium-quality waterborne alkyd paint that has excellent leveling characteristics of a conventional alkyd. I like Benjamin Moore’s Advanced paint in Satin or Semi-gloss finishes.
I tend to do both! I find it best to paint in the recessed parts of the cabinet door fronts and then use a roller for the rest of the door. I have a video on how to get a smooth finish on cabinets.
More Favorite Posts You Will Love:


Such a clear and useful guide! One kitchen painting tip I’d suggest is to always use a high-quality brush or sprayer for cabinets—cheap tools can leave streaks or uneven coverage. I’ve seen this mentioned on sites like shanecoatingsservices.com, and it really makes a noticeable difference in the final look.
I just buy a new home and looking for some ideas and truly it helps
I’m so glad, Robin! Thanks for stopping by!
Nice Post
This looks cool and I like your tips and guides. What paint color did you use? I will check and use this for my future needs. Nice job!
I got here from your July 20th post about painting your kitchen cabinets. So glad I saw this! I want to paint my son’s bathroom cabinets a navy color. You make this seem so doable. :o)
This looks awesome and I love this guide. What paint color you used? I am bookmarking this for my future needs. Great job!
Have you had any issues with chipping?
Can you use glaze over this paint for the glazed look??
Hi: Thenks for sharing your Kitchen Cabinet painting hints. Very helpful.
In your painting section you stated ‘Love this Paint’ but I did not see name of the paint you used like you shared about the Primer you used.
Thank you
Dinesh
Hi Dinesh, it’s Ace Hardware’s cabinet, door & trim paint! https://www.acehardware.com/departments/paint-and-supplies/interior-paint/cabinet-and-trim/1320654
Why would you paint wood? Wood is an elegant, warm, beautiful natural product of nature. I have spent hours removing paint from furniture, interior wood doors, windows and cupboards.
I personally love the look of painted furniture! I like some natural wood tones as well, but for me I liked paint better than this wood tone. 🙂
Because she likes the way it looks. Painted cabinets can brighten up and otherwise dreary space. To each their own.
Thanks for sharing your experience!
Great post! Thanks for sharing!!
I like your remodeling ideas! I especially liked your third tip. I think that it’s really important to have fun while designing the kitchen, and it shouldn’t be a chore.
I really enjoyed your tutorial. I’m just about ready to start on the master bedroom and am so glad I found the information about the self leveling paint. This is an old post so I most likely won’t get an answer. But i was wondering if I could use a latex primer? Working with oil based is such a pain. I couldn’t tell if the self leveling was latex or oil. Did you use oil based paint as well? Your cabinets turned out beautiful. Thanks.
What color are the walls?
HI! I found this via Pinterest and am excited to give it a try. I need to paint ALL of our home’s cabinets–like yours, they are honey oak. IN fact, my second bath looks almost identical to yours–the wall and door in between the sink and toilet/shower area? I have thought about ripping out that wall so many times . . . it seems so pointless to me. Anyway, I am a faithful chalk-paint user but have had reservations about using it on cabinets. I’m so glad to hear about this paint. Thanks for sharing a great post!
Great presentation and easy to follow instructions. Here’s my question: How’s the finish holding up? I wonder about scratches and nicks that happy all the time and everywhere in our kitchen. Will the finish be durable and/or easy to cover?
C
So far in our bathroom we haven’t had any scratches or nicks. It still looks great! And I think it would be easy to cover up. I can’t speak for the use that kitchen cabinets will get, but these seem to be holding up great!!
OMG.. so glad I found your site. I have been putting off doing my kitchen for 4 years. A previous owner put crackle medium over the oak and painted on top.. it’s been a lot of work removing it. Like you, I want them to look factory perfection and now… not scared! Thanks for posting this! It’s organized beautifully. Gives me a reason to go back to my neighborhood ACE. They are a bunch of sweetie people there.
Thanks for the tutorial on painting cabinets. I have been looking for a DIY site. Will be using the ideas for my bathroom and kitchen cabinets. My ex-sister-in-law stained the cabinets. Wanting to change from a stain to a color.
You mention filling in the holes if changing the hardware, what do you use to fill tem?
I use wood putty, something like this: Elmer’s Wood Filler.
Plastic wood is the best.Seriously The best.I also use caulking to fill any seams in gaps prior to painting. I paint a lot of cabinets.
Hi! I am getting ready to paint my kitchen cabinets gray! I didn’t know this paint existed. Unfortunately I do not have an Ace anywhere near me. Do you remember what color that was so maybe I can order the paint? Thanks!
Hi Caitlin, it’s called Ominous Cloud. 🙂
Jenny from anything pretty clued me in to this paint a few years ago and since then I’ve used it to paint all my honey oak trim and even refinish a dresser. It’s amazing stuff. Read her post(s) about it for even more tips. Like, don’t try to touch it up until it’s dry…the tackiness will ruin that spot! I’m going to be painting my bathroom vanity in high hiding white, straight out of the can. It takes a full 30 days to cure, so try and be gentle with it for a month. It’s such a nice, hard, enameled finish when it’s fully cured.
Yes … I’m so glad you like it too! I don’t touch it up unless it’s still super wet, and then leave it for a loooong time! 🙂 Thanks for stopping by!
How much did everything cost you?
It’s hard to say, because so much of it I had on hand or was given from Ace or other sponsors. The paint will cost you about $40 a gallon and I didn’t use even a whole gallon. All of the other supplies I had on hand. Sorry I’m not more help!
Thank you so much for all the great tips, I am just about to start on the painting my kitchen cabinets journey and your post was inspirational, thank you for sharing!!
Thank you soooo much for your ideas!!!! I am preparing to paint all my bathroom cabinets this summer. I would have done it all wrong if I had not come across your blog. I do have a question. Do you have any idea how to repair small nicks on them. I have three girls who are little monkeys, and overtime they have had minor damage. Can I use a wood putty for it, or is that only for exterior things? Also there is a little scrape on the floor of one cabinet, any idea how to deal with that? Thank you again! To anyone wondering where to get the primer… I have seen it at Walmart, Lowes, Home Depot, and Ace in Md. It was recommended to me by a professional, and I’ve been using it ever since!
I would just use wood putty, like you mentioned. 🙂 Should do the trick!
I just painted my bathroom cabinets and then I found this post. Too late!! 🙁 I didn’t prime or sand my cabinets. Do you think if I put a varnish on it, it will protect it? Sure hope I didn’t do all that work for nothing! Thanks for the tips!! Wll definitely use them for future projects!
Are your cabinets all wood? I’m mostly talking about the frame the doors are usually always wood. But I’ve been scared to tackle our cabinets because the frame isn’t all wood… I guess the primer works on everything?
My cabinet frame is wood. But, I think the primer will work on a non-wood frame just as well!
I hope I’m not repeating someone else’s hint; there are too many to read right now. My husband always puts the screws back into the holes of the hardware piece that he took it from. So, when he unscrews the top right screw he places that on the floor in a top right position. When all screws have been removed, he puts the screws back into the correponding hole and then tapes them down. That way the same screw goes back into the same hole. It does sound like a lot of work, but in the end is much easier to put back. And yes, I agree, keep hardware away from little fingers
Smart! Thanks for the tip!!
Just curious, did you use an oil based primer with this paint? The picture of the primer is an oil based, but when I went to the link for Ace Hardware, and it looks like water based for the cabinet paint. Just want to make sure I do this correct, and my husband was saying to not mix the oil and water based paints. Thanks!
I did use an oil-based primer and water-based paint. It’s never been a problem for me before …
I have been looking at different sites for suggestions on how to paint
Cabinets. I have been going between using chalk paint vs regular paint.
That both seem time consuming but yours looks great and the ace paint
Is what I had decided on as being the best. Just waiting for nice weather
To start.Doing kitchen cabinets so it will take me awhile
Thanks for the tutorial.
Thanks for this post! Found you on Pinterest. I painted our kitchen cabinets last fall and followed nearly the same process. But with a lot more trial and error than it looks like you had. Yours look great! I wish I would have seen this much sooner! I’ve got two bathrooms to do next and I’m going to consider that paint on the next go around. Thanks!
Great tip on the paint – thanks!
Just wanted to offer some info: your cabinets are actually maple. And gorgeous! They’re gorgeous painted, too, though. 🙂
Maple is what pro cabinetmakers typically use to make “paint-grade” cabinets, because it has such a smooth grain which allows for a very smooth finish. If you or your readers plan to paint oak cabinets, just be aware that the grain of oak is very pronounced, and it may show through the paint…not the color of the grain, just the texture. This look is actually very trendy right now, but if you don’t expect it, you may be disappointed.
I’ve been tempted to paint my own very ugly oak bathroom vanity..may have to take the leap and get it done!
Thanks Teri for shedding some light onto this subject! You know it’s funny, I called them oak, someone else told me they were cherry. So, I’m not quite sure what they are. But whatever they are, I like ’em now! 🙂
You did a fantastic job! I really want and need to paint the cabinets in my tiny kitchen. You described the paint as “self-leveling”. How does it self-level on the main frame? Did you have to be extra careful and watch for drips?
Thanks!
Great posting! Thank you so much for sharing. I am going to do the baby steps too, I will probably start with the powder room or the laundry room.
Here are my couple of questions for you:
1) Do you recommend using the electric sander versus hand sanding for the initial sanding step (pre-primer step)?
2) What grit sandpaper did you use?
3) I know you can get pulls just about anywhere, but I want those same pulls! Where did you get them?
4) Is this an accurate time frame: 1 day to remove doors, sand & prime (primer dries for 24 hours), 1 day for 1st coat of paint, 1 day for 2nd coat of paint, 1 day for 3rd coat of paint (this allows 24 hours in between each coat), after 24 hours of dry time for the 3rd and final paint coat you can reassemble everything? So approximately 5 days total?
Thanks again!!!!
Hey Cyndy! Hopefully I’ve got some answers for you! 🙂
1) I totally recommend the electric sander for most of the sanding. It makes it go so much faster. Just don’t put too much pressure on it and create grooves in the wood. Of course I had to hand sand any of the crevices.
2) I used that 220 grit sandpaper featured in the products picture for sanding in between the coats of primer and paint. It’s labeled “very fine.” I didn’t want to take off too much of the primer, just smooth it down in spots. And then I think I used a fine grit sandpaper (150 grit) to sand the cabinets before priming.
3) I bought the pulls from ebay: http://www.ebay.com/itm/Satin-Nickel-Cabinet-Hardware-Bin-Pulls-P-2769-SN-/370331754741?&_trksid=p2056016.l4276
4) That’s a pretty accurate time frame, but if you’re doing the front AND back of cabinets, you’ll need to add another 3 days for 3 coats on the back/front. It’s pretty time consuming, but so worth it!!
I was wondering also how this ACE paint holds up? Does it dry a hard finish? Just worried about chipping, etc. I’ve painted a cabinet before but used an oil-based paint and it has held up great.
Great tutorial! The cabinets look very smooth.
It does have a very hard finish. And so far mine hasn’t chipped at all!
Thank you for your reply! I’m going to try it on my daughter’s bathroom cabinets.
I’m confused, is the ace brand paint the ominous cloud color you used? Can it be tinted any color?
Yes! The Ace paint can be tinted, if you get the tintable kind. 🙂 It is tinted ominous cloud in my case.
Awesome, Laura–just what I’ve come to expect from you!! I love these “Average Girl” posts. Thanks so much for joining Grace at Home–I’m featuring you this week!
Aww, thanks so much Richella!
I have the same question as the previous poster. My cabinets are white. They are custom cabinets so I am sure they were sprayed at the kitchen cabinet builder place. Anyway, do I just give them a light sanding and then prime them? There are a few areas where the paint is chipped off. I don’t want to screw it up, cause my husband will kill me! I would like to save the $2500. it will cost to have them done by a pro, not to mention have people underfoot. I can do it myself and take my time and use the money for a new sofa! Anxiously awaiting your response, also going to use the same color. I love it!
Yes! Just sand them down … probably a little more than lightly, since they’re painted already. But then prime and paint!! Good luck!
Thanks for a great tutorial! We are moving to a house where the cabinets are white but they have a bunch of dings in them 🙁 Would I just need to sand them the best I could and then prime them? I am VERY new at this so sorry if this is a dumb question :/
Hey Deanna, not a dumb question at all. And you’ve got it! Just sand the best you can, use primer and then paint them again.
Your cabinets look great! Question: Did you use any varnish after the paint and primer? If not, so you think the paint will hold up?
Hi Caryn, I didn’t use a varnish, but so far the cabinets have been fine. The finish is very hard!
Your cabinets do look so smooth! My kitchen cabinets are my next project, just waiting for a few warm days in the forecast. I don’t think we have an Ace near us, though. I’m not so much skeeered as lazy lol. I know its a lot of work! Thanks for sharing your tips 🙂
My laziness is just below my skeeeredness. :)Thus why I still haven’t done my kitchen cabinets. I think I keep hoping we’ll find some extra money and be able to source it out! 🙂
Laura this is fabulous!! I professionally painted kitchens for years and it is such a pain! What a great post for the every day person who wants a custom look. I am sharing this post at my link party tomorrow. Thank you so much for sharing!
Thanks so much, Karen! 🙂
I have been looking for ideas on painting kitchen cabinets so I would not have to resort to using expensive chalk paint. However, I want to glaze the cabinets as well. I’ll ask the staff at Ace. Thank you, thank you for the post!
Cabinets look great!!! Can’t wait to try this! I saw someone else ask but didn’t see an answer to what color you used?!
Hi MandaKay, it’s Ominous Cloud by Clark+Kensington {Ace brand paint}. Love it!!
Thank YOU!!!
Your cabinets weren’t oak. They were natural cherry.
The cabinet came out great! Thank you for sharing the tutorial, didn’t know about that ACE paint 😉 Might have to give it a try.
Can you share a bit more about sandpaper? What grit do you use in between layers for paint drips? Also, have you tried liquid sandpaper for prepping the wood?
I used that 220 grit sandpaper featured in the products picture for sanding in between the coats of primer and paint. It’s labeled “very fine.” I didn’t want to take off too much of the primer, just smooth it down in spots. And then I think I used a fine grit sandpaper (150 grit) to sand the cabinets before priming. I’ve never heard of liquid sandpaper before!
Thanks for this post. It’s very inspiring! I’ve been wanting to paint my kitchen cabinets for a couple of years, but as you said, I’ve been too scared (plus, I’m not looking forward to the mess and time it will take). Hoping to do it this year. I think I’ll give that paint a try. Pinned!
That is a great tutorial. Thank you for taking the time to explain every detail. While I do a lot of crafting and DIY projects painting furniture including cabinets always feels a bit intimidating.
Stopping by from the linkup! Love these tips! Definitely useful for me when my husband and I start house hunting. Thanks! xoxo
Great tutorial! Can I just say how brilliant it is that you labeled the hinges! 🙂
You did a lovely job! Fortunately I wont need to do this soon, but I do paint furniture with doors, drawers and hinges so I do like to learn from lots of sources. You can never learn too many tips and tricks.
Love that there isn’t any fancy equipment needed. Your cabinets turned out great!
I too have been wanting to paint my cabinets. My dilemma is what do I do with the base boards and doors and trim. Looking at doing a dark(Black perhaps) cabinet but the rest of the mentioned wood is oak. Don’t think I want to paint it all black. Suggestions??
If the doors, trim and base boards are all oak, I would paint them white. And then paint the cabinets whatever color you want! Sky’s the limit! 🙂
this is JUST what I needed!! thank you so very much for the awesome tutorial ~
Great tutorial! Pinned this.
Awesome and informative post! Pinned it 🙂 Visiting from Craft-O-Matic Linky Party . . . have a great week . . . Gina
I love the finish on these cabinets. Thanks for sharing.
Thanks for this tutorial. I am getting ready to paint our bathroom and kitchen and wasn’t looking forward to it because of all the expense of all the professional tools I thought I would need. Your cabinets look great! Question…did you get your primer at Ace as well?
I honestly don’t remember where I got it, because I’ve had it for a while. Every Ace is independently owned and operated, so I’m not sure if all Ace’s carry it. But it’s worth a shot to check. I think most probably will.
I know Home Depot carries Zinzer primer… I just bought a huge 5 gal bucket (don’t think its oil based though) to cover Americana red! AMAZING primer!!
These look awesome! My issue is the opposite – I wasn’t scared, did it, and didn’t do it right (didn’t know about bonding primer yet!) and now my kitchen really kind of needs to be redone properly.
This looks great and I love the tutorial. I would love to know the paint color you used! Did I miss it in the post? Great job!
Hi Summer, the color of the cabinets is Ominous Cloud by Clark+Kensington {Ace brand paint}. I should probably put that in the post, huh? 🙂 Thanks for stopping by!!
Thanks! I was wondering about the paint color shade too! I love it, thanks for sharing!
Thanks for the name of the paint color from me too!
Would this work with vinyl cabinets? Yes, I have one of those OLD cabinets, maybe I should say formica. but with the zinser (which I love too) I would think it would I’ve just always wanted to know before I tried it.
Great job and you are right, I don’t see a streak anywhere. I have a night stand I’ve been wanting to paint so I will definately try this on that as well.
I think it would work on vinyl cabinets, as long as you can get the primer to stick!
Your cabinets turned out beautifully! I’m scared to try painting my kitchen table for the same reason – I’m worried about drips and I don’t have a paint sprayer. I wonder if this paint would work??
I think this paint would work beautifully! I painted a couple of end tables with some other paint made for this kind of thing and there are brush strokes all over it. But I think this Ace paint would definitely work. I’ll be using it on any future furniture painting, for sure!
Girl! I’m skeert too! But your tutorial is so awesome I am going to paint my teeny tiny bathroom cabinets this summer!
Those are some great tips!!! And they look like a professional did the job! Seamless!
I have been wanting to paint my cabinets for a long time now, but was skeeeered as you said!! LOL – I will be bookmarking this and making a trip across the border into Michigan to find this paint!! Thanks for sharing!
This paint is so worth it!!
I’ve been looking for a tutorial on how to paint bathroom cabinets!
Great help! Ready to get started!!
Thanks!