How to Install Board and Batten
Use this simple & easy DIY board and batten wainscoting tutorial to add tons of character to your home on a budget!
Now, I know that everyone and their mother has tried Board and Batten, or at least it seems that way. And I have been semi-stalking all things Board and Batten since we moved into our home last February. But what we have here is how I installed Board and Batten. You can learn from my mistakes and hopefully not repeat them!
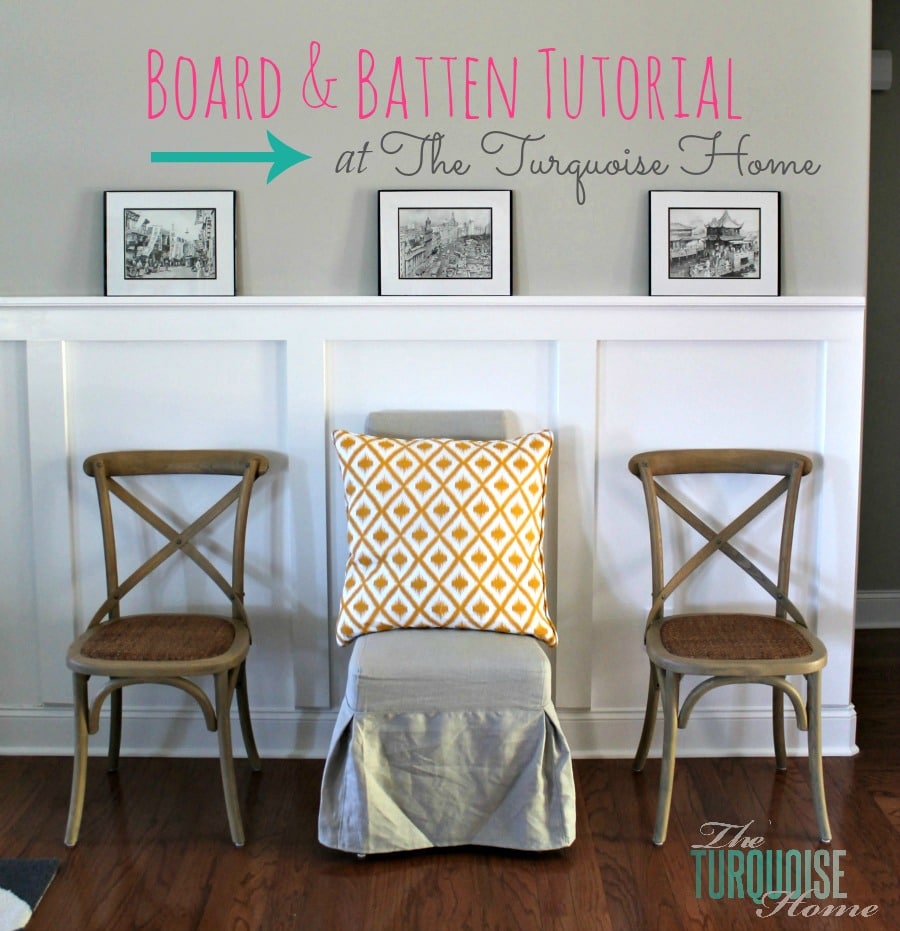
I installed board and batten in my living room because it is just this wide open space with tall ceilings and I thought it needed a bit more structure. I wanted to help define the space in an open floor plan. And I think it did just that!
Let’s take a look at the before and after side-by-side shot. You know, cause that’s what we do in the blogland. Errrbody loves and good before and after. 🙂 (You can find all of the glorious details about this room in my Living Room Reveal post.)
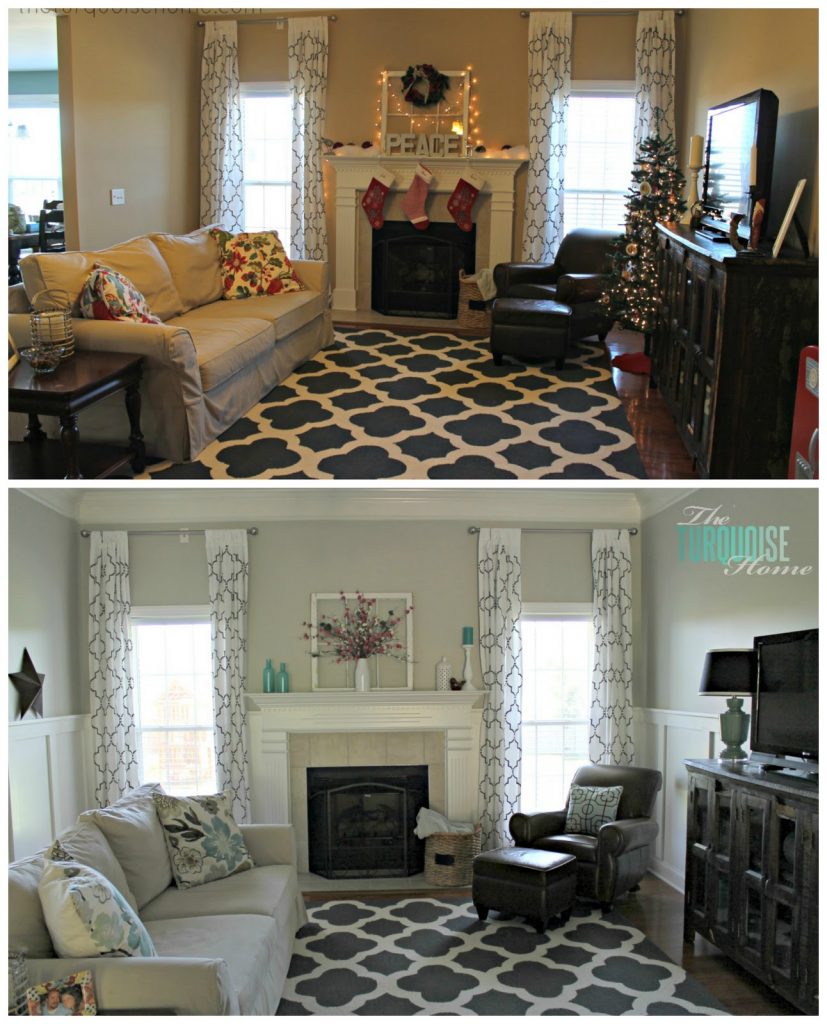
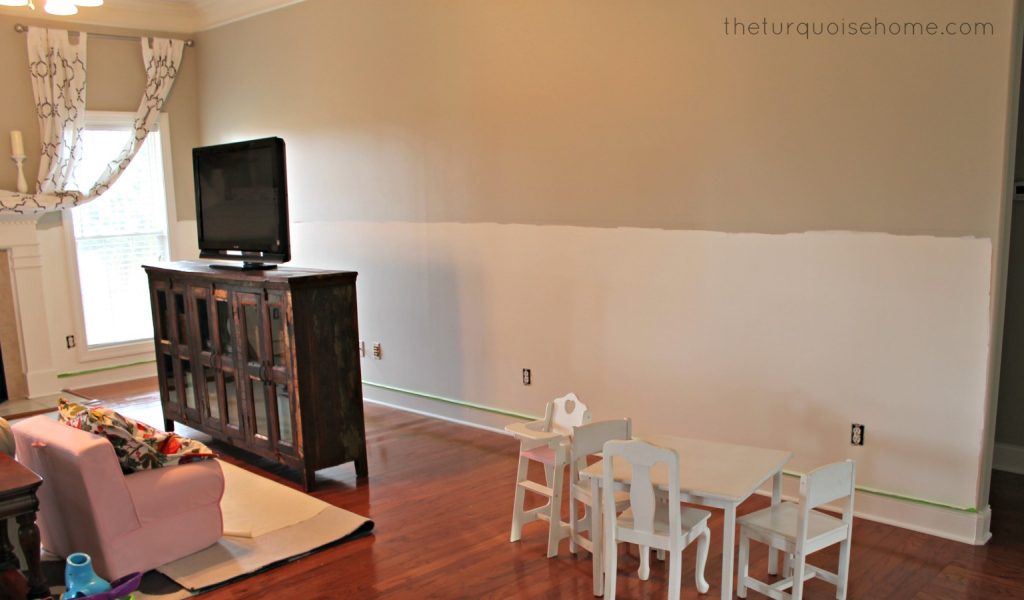
Here’s an even earlier before picture, right after we moved in …
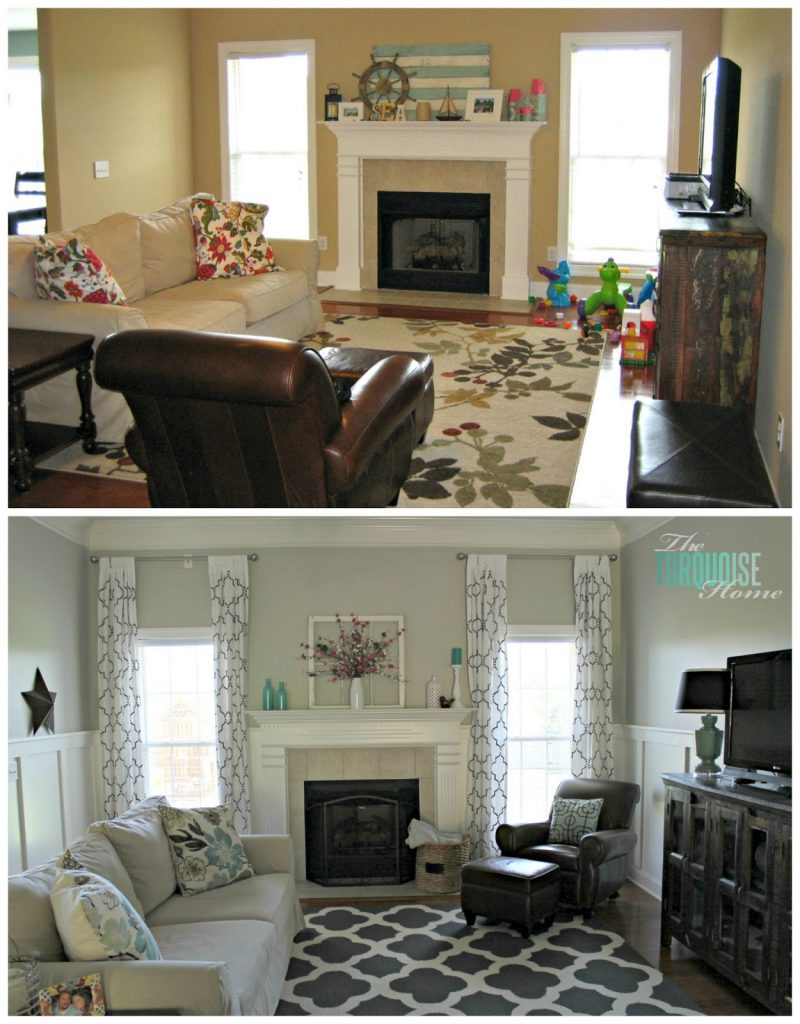
I think if you had told me last year that my living room would look like this, I wouldn’t have believed you. I just love it!
And since, like I said before, everyone and their mom has done this in their home, I’ll just share with you what I did. And while I wish I had done this project sooner, I knew it was going to be a big undertaking … and it was. Ginormous. (Of course it would take much less time in a smaller room, mine is just a big room.) I grossly underestimated the time it would take to get everything painted and nailed to the wall, caulked, spackled, sanded and painted some more.
A lot of the time factor was due to having to work around a 2-year-old. I couldn’t nail up the boards while she was sleeping because her room shares a wall with the living room. And I couldn’t use my nail gun while she was awake because it’s too loud and she cries. So, that was the biggest hang up … just waiting for a time when someone else (like my hubby or my mom) could take her outside or somewhere (anywhere) else while I put the boards up.
So, if you have a little one, plan to have your husband or friend take your child while you put the boards up.
How to Install Board and Batten
1. Decide the Height of the Top Board
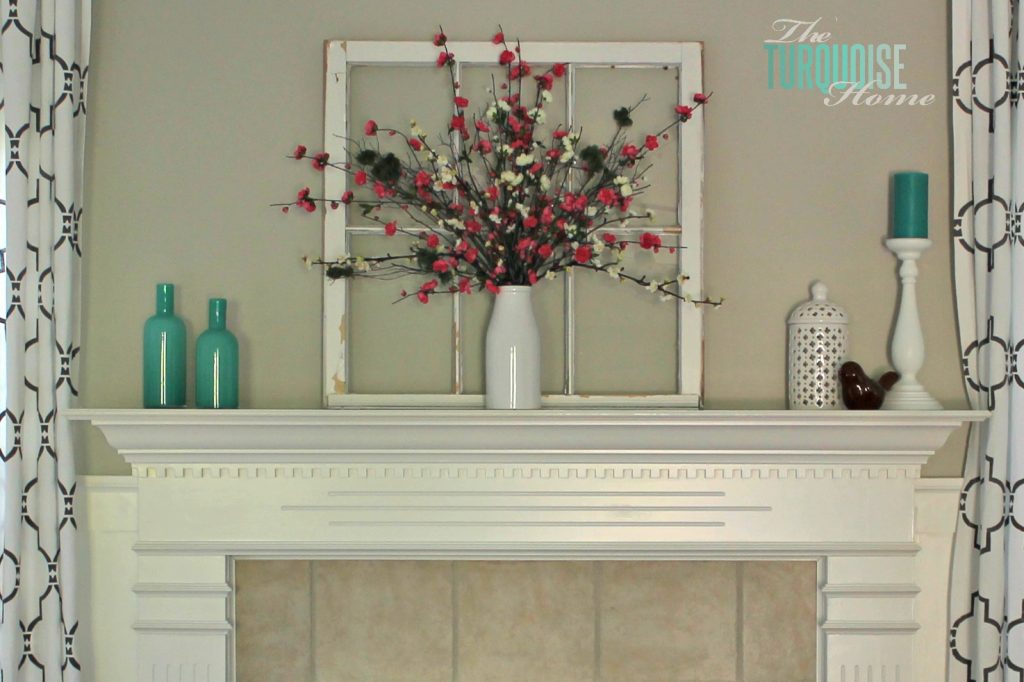
I figured out where I wanted to place the top of my boards. This was quite the decision because I had to work with the fireplace. I had originally decided to put the boards just above the fireplace, but I’m so glad a good friend of mine helped me re-think that decision. It would have placed the boards almost in the exact middle of the wall, cutting it in half. And we all know that design works best with the rule of thirds, right?
So then I decided to place the top board just below the “sticking-out-top, not-sure-what-you-call-it” part of the fireplace. I love how it still leaves the architecture of the fireplace in tact, and now divides the room not exactly in half. Design crisis averted! I think it looks so much better the way I did it in the end.
2. Draw a Level Line Around the Room Where the Top Board Will Go
Once I decided where to place the top boards, I drew a line around the room using my laser level (those things are awesome by the way!) and painted gray on top and white on the bottom. I learned from several other tutorials that is saves a ton of time and hand cramping to paint the walls first! So glad I did my research. (Read about how I Picked the Perfect Gray.)
3. Buy Your Boards
So at this point you have to figure out what boards you’re going to use. It’s probably best to figure out that first, but I’ll talk about it here. One night I went by myself (alone time, hallelujah!) to Lowe’s and priced out all of the options. I looked at furring strips, pine white board and MDF.
Furring strips are definitely the cheapest, but it’s hard to find straight boards. I was going to go with this option (and just search for straight boards by laying them on the floor and creating a huge mess in the back corner of Lowe’s), but at my store they all had rounded edges and I wanted a straighter line for my boards.
Pine boards were way too expensive for my large room, but would be my first pick if money was not a factor. And so I decided to go with MDF. I had the guys at Lowe’s rip it there. I bought two sheets and had quite a bit left over. (Perfect for my next room reveal!!)

Side note: I asked for them to rip it in 8 foot long 4-inch strips, but their saw wouldn’t cut it that way; it kept getting stuck. So, they ended up having to rip the boards in 4 foot long strips. Except they tried to rip a few 8 foot long pieces for me, and when it didn’t go well, they had to cut it the other way and I ended up with a bunch of 3 feet 4 inch long strips. And I ended up having to piece together a lot of places on my walls. (See step #8.) It made for a lot of extra caulking, spackling and sanding. I’d highly recommend making double double sure that they can cut them in 8 foot long strips before committing to the MDF. And if they mess up mid-cutting, I’d ask for them to start over with a new piece at their cost.
4. Cut the Bottoms of the Horizontal Boards at 45 Degree Angle
Because my vertical boards hung over the baseboards some, and I didn’t want to remove my baseboards, I cut the bottom of the boards at a 45 degree angle. It makes the boards look like they are resting on the baseboards, and not hanging over. I got the idea from Jackie at Teal & Lime. And I borrowed one of her pics to show you what I mean …

You should make sure to cut these before you paint them, unlike me. I forgot to do this and had to paint them twice. But I was so excited when I discovered this method of NOT removing the baseboards. It was such a time and money saver and I think it looks great!
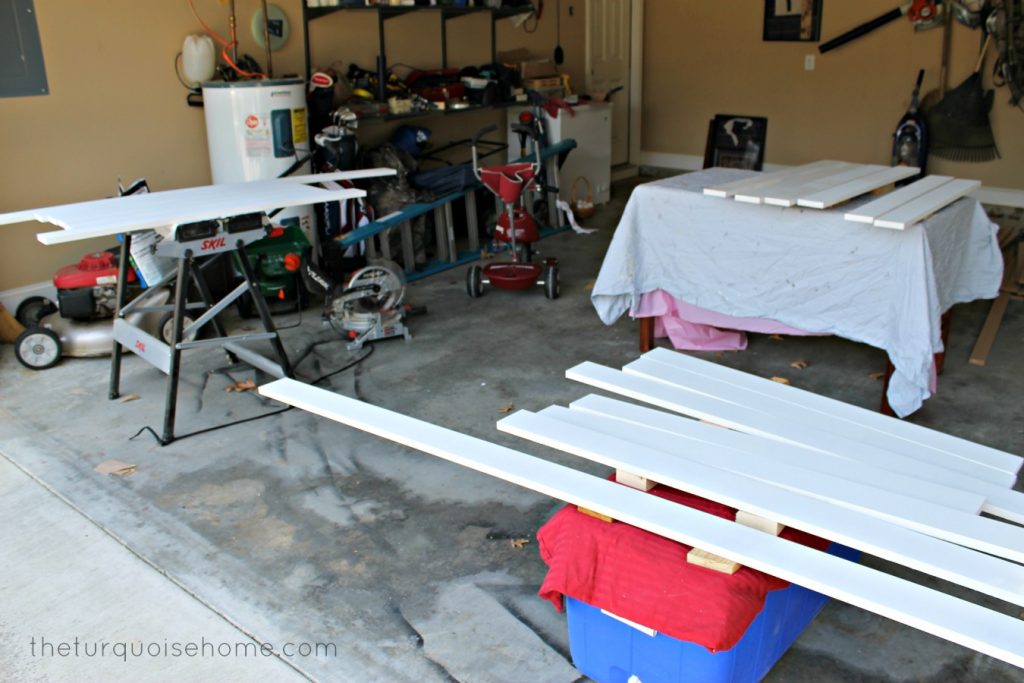
5. Prime and Paint Boards
Once I got the MDF boards home, I primed and painted them. I used my all-time favorite primer: Zinsser Cover Stain. You can get it your local home improvement store. And then painted them one coat of paint. (They got another coat of paint once they were on the wall.)

It might be fine just to paint them once you’ve put them up on the walls and caulked and spackled them. Maybe just as easy and less time-consuming. I’ll try it that way on my next project and let you know. 🙂 Don’t look at the messy garage. It’s on my to-do list to organize it this summer. I even started a new Pin Board last week: Garage Organization. 🙂
Side note: I thought I could just grab white paint from the shelf and go with it, but when I started to use it on the walls it was like fluorescent white. I HATED it. I don’t know the color of my trim since it was painted before we moved in and our home was a foreclosure. (No extra paint samples here.) And the trim and fluorescent white looked terrible next to each other.
So then I pulled out my paint swatches, my many paint swatches, and picked Benjamin Moore’s Simply White. I returned my off-the-shelf white and had Lowe’s color match to the paint swatch. Sooooo much better!!
6. Install Horizontal Boards
Once I had the first round painted {I had limited space to lay the boards as they dried, so I had to do painting rounds}, I nailed up the horizontal boards first. I didn’t get a picture of this, but you’ll want to make extra sure that your horizontal boards are level with your level.
Side Note: I don’t know how I lived before I had a level. Best tool evahhhh!
I didn’t get pictures because it took me and my husband to help hold the boards in place while I nailed them in with my nail gun and made sure they were level. 🙂 Don’t use your baseboards as a leveling guide because chances are they aren’t level.
7. Install the Vertical Boards
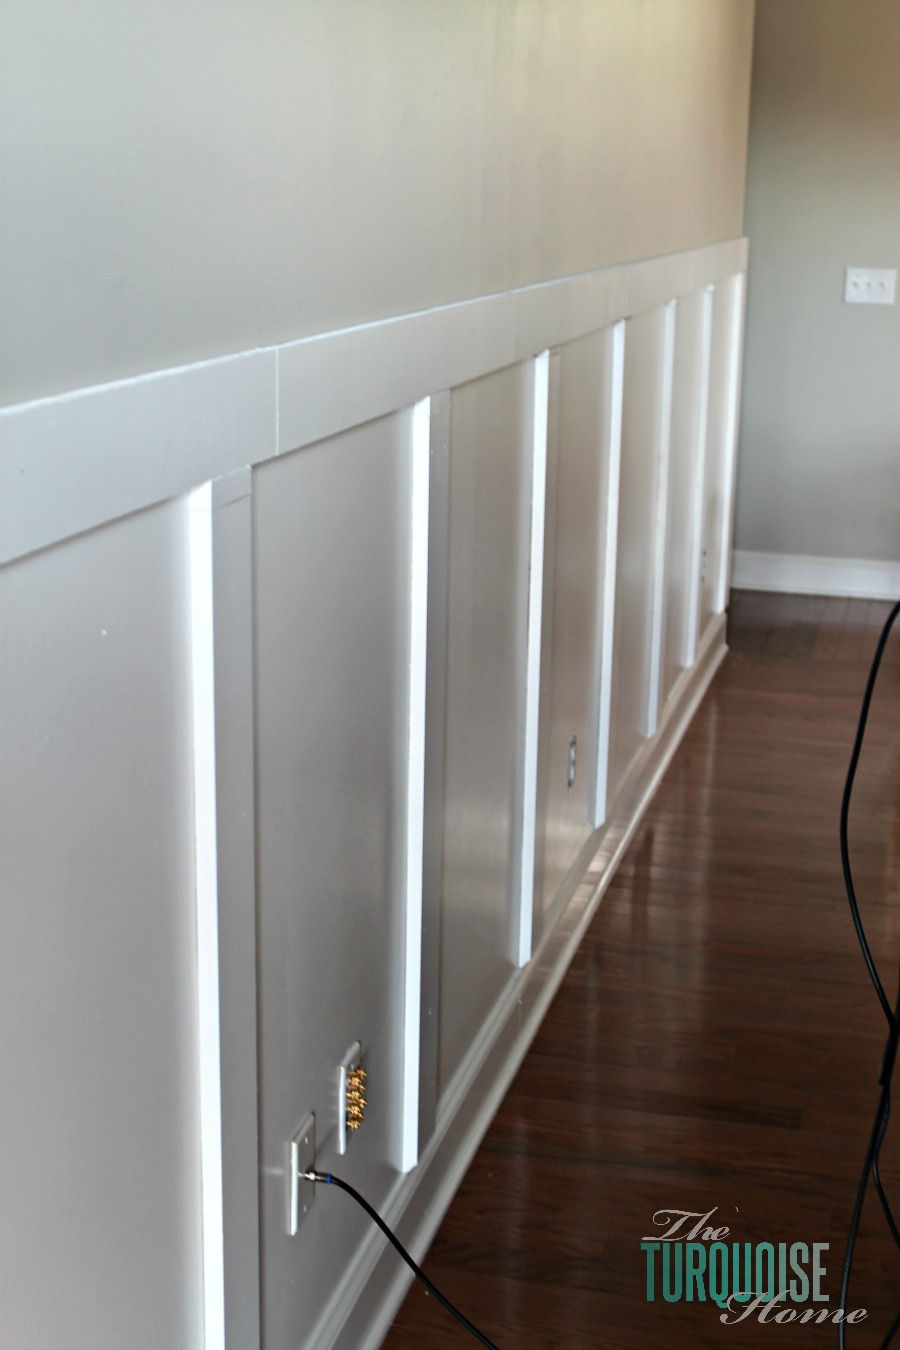
And then I nailed up all of the vertical boards with my nail gun. I made sure these were level as well. Nobody wants wonky boards, right?? For the spacing on the walls, I used 25 inches along the long wall with the TV. It just seemed the right space.
And then for my two shorter walls, I centered the boards according to the walls. I think they were something like 24 and 23.5 inches apart. It was close enough to 25 inches that I didn’t think it would be too noticeable that they were all different. And I think the smaller walls look better with the boards centered along the wall.

8. Fill in the Gaps
Once all of the boards were nailed up, I thought I was home free. Wrong, oh so very wrong. I can’t tell you how long I spent spackling, caulking and more spackling. Remember I mentioned in point #3 that the guys at Lowe’s had trouble with cutting my MDF? Well, it caused this problem when putting the boards up. They were just a tad too short and I had to cut individual, custom-sized pieces to fit. Not cool.

One thing to do before you spackle all of your nail holes is make sure they are all flush with the wood. I didn’t think this was an issue with my nails and didn’t drive them further into the wood with my nail driver. I ended up having to go back and nail in a bunch with the nail driver, and then RE-spackle and RE-paint.
So I spent a LOT of time with these friends: Alex and Dex …

9. Install Rail Cap Pieces
Finally, after all of the caulk and spackling dried, I put up the shelf on top. It used a 1 x 2 pine board (I did splurge on this one because the MDF was heavy and the ripped edges aren’t so cute!) I nailed it into the top MDF board with my nail gun.
And then I added some cove moulding under the top ledge. I attached the cove moulding with liquid nails and taped it up there to hold while the liquid nails dried. I didn’t want to damage the thin moulding with my nail gun. (And I can’t lie, I was tired of spackling nail holes at that point, too. Frog Tape to the rescue!!)

10. Final Coat of Paint
After every board was in placed, and all of the holes filled and sanded down, I painted all of the board and batten with one final coat. It actually happened one night as I was getting ready for bed. And I decided that instead of going to bed I was going to finish the board and batten.
I was soooo ready for it to be done. So, at 2 a.m. one Wednesday morning, I painted that last piece, and stood back and enjoyed all of my hard work. Of course I can see every flaw there is, but from the couch I think it looks great. 🙂 And no one is going to get up close and tell me they see a nail hole. At least they better not! ha!!

After all of the work and time, the final results are so worth it. I love it and it’s even better than what I pictured in my head 14 months ago when I walked into this house for the first time. Time consuming and tedious? Yes. But worth every patched nail hole and paint brush stroke.
Don’t forget to see all of the glamour shots in my Living Room Reveal!!
More Posts You Will Love:

A quick question – could you direct me to a previous post? I’m redoing our basement. I’m pretty sure I’ll be doing LVP for the floor – but now I have to coordinate cabinetry. Did you have a post on that?
Thanks!
Hi Mason, I do have a post on LVP flooring — https://theturquoisehome.com/luxury-vinyl-plank-flooring-review/. I don’t think I have anything about matching the cabinets to it, but maybe you just needed the flooring post. Thanks for reading! xo, Laura
Fabulous, what a blog it is! This website presents helpful data to us, keep it up.
It looks amazing, someday I will do this, I love it!
Makes such a huge difference! Love how it turned out. I have got to get busy doing this in my house!! I would love to have you join us for Centerpiece Wednesday linky party where tons of bloggers share their creativity, recipes, DIY projects and more…come on over and see and share with us. http://thestylesisters.blogspot.com/2014/04/centerpiece-wednesday.html
Karin
just curious about how much it cost to do this project?
Hi there! It’s been so long since I did this project and the prices have increased significantly. It’d be best to price it out for your own space with the current prices. (I do think it cost me less than $500 for this room, if that helps. But again, it was years ago, so prices have gone up quite a bit since then.) Sorry, I’m not more help! xo, Laura
I enjoy what you guys are usually up too. This sort of clever work and reporting!
Keep up the amazing works guys I’ve added you guys to our blogroll.
I just realized that I featured this a while back! But I’m glad you shared it again. I really must try this somewhere in my house!
Wow, that was a big job, but it looks absolutely beautiful!
MFC LovelyKana True Private Show video 24.03.2014
Download link: http://bit.ly/1gtyQMi
File name: MFC_LovelyKana_2014_03_24.rar
File size: 30.47 MB
Video length: 9:37
Video codec: H.264
Resolution: 800×600
Beautiful! What a huge difference!
Thank you!! Have a great day!
Wow, I love your room! A great tutorial …visiting from Keeping it Simple. Di@Cottage-wishes
Looks awesome! We are doing this in our dining room and so far, I’m loving it. Just gotta paint it.
It’s actually a great and useful part of data. I am glad for you to distributed this useful data about. You need to stop us up to date such as this. Thanks for sharing.
Looks great! I’m starting to work out how to do this in my dining room, and I’m wondering what sheen of paint you did your board and batten? My baseboards are glossy, so should the wall and boards be glossy as well? Thanks!
I was thinking of buying the strips pre-cut because I figured ripping the MDF sheets would mean I would need to sand them first. I was hoping to avoid sanding. But it looks like you did not need to sand yours. Is that right?
Hi Maryann, I didn’t have to sand them at all. There was a smooth side and a little bit rougher side where they were ripped. So, I was just careful to paint the smooth side. Good luck with your project!
Love this tutorial! I’m getting prepped to do this in my basement, so I love all of the free advice! Your living room looks gorgeous. I’m hoping that doing this downstairs will brighten it up a bit. It feels so dark right now. I need some brightness so I want to hang out down their with my hubby! 🙂 Great post!!
How awesome is this tutorial! Thank you so much for sharing at my party at Redouxinteriors.com!
I love this! So pretty 🙂
I’ve featured it today and I’ve pinned this post!
Such a beautiful room. Love everything in it. Where did you purchase the bureau the t.v. is on? It is so nice.
It’s from Nadeau … they have stores all over the place. Just check out their Web site and see if they have one close to you. http://www.furniturewithasoul.com
Thanks for taking the time to comment!
It looks gorgeous! I recently did this in my front room, and I know how bit of an undertaking it is!
Oh. Em. Gee! I love what you did with your living room! I used to be so anti-gray, but I’ve been loving it lately. This put it completely over the top for me. And I love the board & batten!! 🙂 Newest follower on GFC!
-andi
Thank you Andi!! I was anti-gray for a long time too, or at least very skeptical. But I LOVE it now, especially since most of my furniture is brown. I think they look great together instead of washing each other out. Thanks for leaving a comment and following!!
CONGRATS!!!
You have been featured at The DIY Dreamer. Come on over and grab your featured button, you deserve it!
Don’t forget to come by this evening to link up again 🙂
Thank you Christine! I’ve got your link up on my calendar, so I’ll be linking up every week. Thanks so much!!
How beautiful!!
Thanks so much for linking up at our weekly link party! I am featuring you on my blog tomorrow! (and I’m pinning it!
Ashley
Thank you so much Ashley!!
I featured you today!
Thank you so much Courtney … I appreciate it so much!
This is amazing. Totally worth the hard work. Love the colour scheme too – so fresh and calm.
Thank you!
Absolutely gorgeous! And thanks for all the details! I really need this somewhere in my house!!!
Thank you, Sharon!!
I am SO in love with your home!
Haha!! Thank you! (I kind of like it too. 🙂 )
It turned out beautifully! We just finished installing it in our entry hall and long hallway and have it in our ensuite too. Isn’t it addictive?? It looks so crisp and clean that you just want to put it everywhere! Great tutorial:)
Krista @thehappyhousie
It’s so true! I’m about to put it in our laundry room, and I’m thinking about putting it in our guest bathroom next. Ha! It’s super addictive.
Thanks for stopping by!
Fabulous, Laura! This gave the room so much character and charm. Thank you for sharing your project at the Open House party.
Hugs,
Sherry
Very awesome! I love it! Thanks for sharing at Pinworthy Projects.
This looks amazing! I want to do this so bad! Great tutorial! New follower from Shades of Blue!
Thank you, Rachel … welcome!!
Wow, what an awesome job! Everything look really nice! Following from HickoryTrail
Looks great! And very helpful tutorial! New follower!
It looks great! I’ve been wanting to do some good ol’ board and batten too! You are not the last person to do this… it will be me by far! ha! You have some great tips in your post, especially about getting the boards cut and using caulk and spackle to make up for a few mishaps. Love the project and can’t wait to get going on this in my home too!
You can do it!! It took me quite some time from start to finish … several week. Just pace yourself, ask for help, and you can do it!!
xo, Laura
What a project, but well worth it! It’s fantastic. New Follower.
Jody
Thank you Jody!
Amazing!! I love board and batten and I’m too chicken to try it!!! Thanks so much for linking up to The Weekly Creative! Pinning this project and featuring it next week! XOXO
Thank you so much!! {and don’t be chicken … 🙂 if I can do it, you can too!}
I have got to try this somewhere in my house. I have always loved the look. Everytime I see it I’m reminded of just how much I love it. Your room looks so cozy and chic.
Thank you … you’re too sweet!!
I think this living room is very stunning – I adore the color choices and just love all you did. Thanks for the tutorial – in my forever home – one day.
I just became your newest follower and maybe you can stop by when you have a chance
tina
one crafty mess
A lot of work but the results are stunning!
Gorgeous!
Oh your living room is gorgeous!! I want to install board and batten in our place – it would really make our front room pop.
So pretty! I would love to do this in my hallway! Thanks for sharing! Julia
looks great! i splurged and used pine in my entry way and love how it turned out. can’t wait to try the mdf method for a larger room
I saw your living room on pintrest and came on over. But that post didn’t say how you did the board and batten, so I continued clicking – so glad I did! I’m smack dab in the middle of my first board and batten – just pulled off all the baseboards before the 9 month old woke up. (and I considered not replacing the baseboards. But my house is 50 years old, and they are just yucky old and not my style.)
Yours looks awesome! I hope mine looks as good when I’m done.
One question: how wide are your pieces?
Hi Laree, they are 4 inches wide. Good luck with your project!!
Come back and link up if you post your B&B to your blog. I’d love to see it!
Hi Laura! You have done a fabulous job in your living room . . . your entire home for that matter. Being a turquoise lover myself the name of your blog had me from the start. Thank you for sharing the beauty you have created and blessings to you, Patti
Thank you Patti!! I’m glad you dropped by!
Laura this is fantastic! I would love to add some vintage charm to our home this way too. I would love for you to share with us at the Pretty Things party (live now!)
xo, Tanya
Wow! What a difference they make to the whole room! Adds so much character..love it!
Wow, this is amazing! I’d love it if you could link this up to our party, Give Me The Goods Monday! {1 party, 5 blogs}
Have a great week!
Jamie @ somuchbetterwithage.com
The whole room looks beautiful and the board and batten is the icing on the cake!
Thank you Natalie!! Thanks for taking the time to leave a comment!!
WOW! It looks SO amazing! We are thinking of doing board and batten in our bathroom, so I’m pinning this for future reference! Thank you for doing such a detailed and helpful tutorial! I popped over from Home Stories A to Z–thanks for sharing!
~Abby =)