5 Stencil Ideas using Contact Paper and a Silhouette
Get five tips for making contact paper stencils with a Silhouette. Shelf liner is great for lining shelves, but did you know it also makes for a great temporary crafting stencil, too?
I seriously love my little cutting friend. Oh, no … not like that! I’m talking about my Silhouette Cameo. 🙂 I could craft all day with this machine, but my favorite thing to do is to make stencils! And you know what? I use contact paper for most of my stencils. It’s cheap and works great!
5 Stencil Ideas with Contact Paper and a Silhouette
And these barely touch the top of the iceberg of Silhouette possibilities. The sky is the limit with this machine! And I’m just getting started.
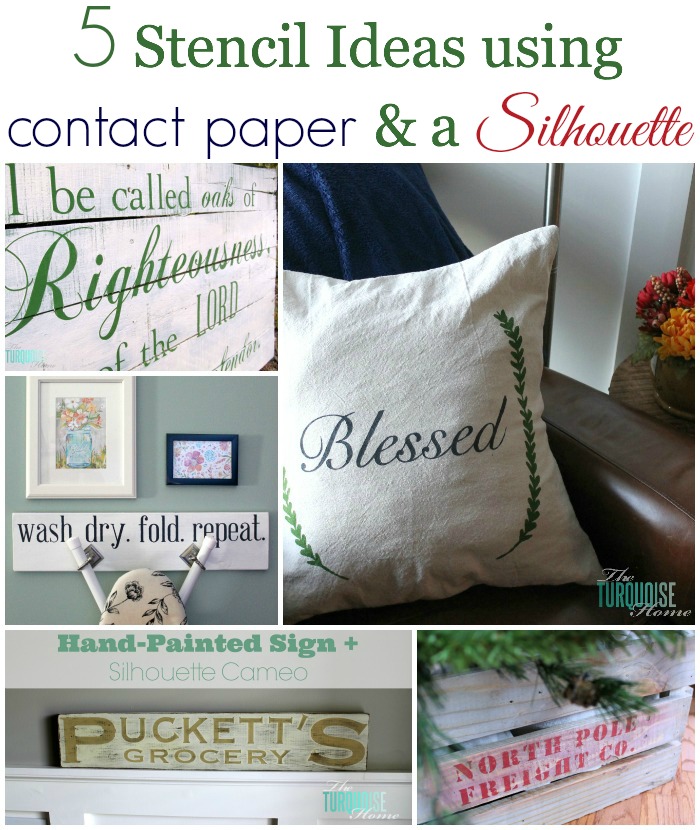
Pallet Signs / Ironing Board Hanger / Pillow / Crate
So far I’ve completed 5 simple projects. And all of them have been using contact paper (aka shelf liner) as a stencil. Actually with the “Puckett’s Grocery” sign, I didn’t use the adhesive paper. I used double-sided adhesive before I knew about contact paper. Thanks to the awesome reader who turned me onto a super cheap and easy solution for stenciling:! I’m kind of turning into a junky.
I may or may not sit around and think up new ways to use this fabulous machine. It’s just that good.
5 Tips for using Adhesive Shelf Liner and a Silhouette
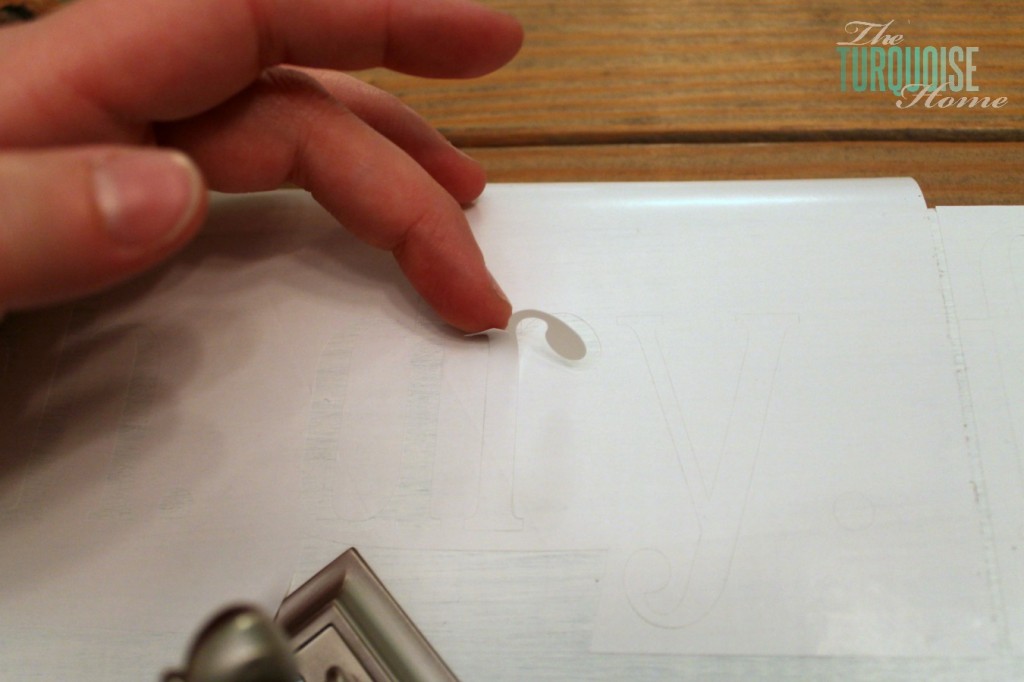
Here are some helpful hints I’ve learned along the way:
1. Settings. These are the settings I use every time to get a perfect cut through the top sticky layer, while leaving the backing in tact. Make sure to de-select “cutting mat.”
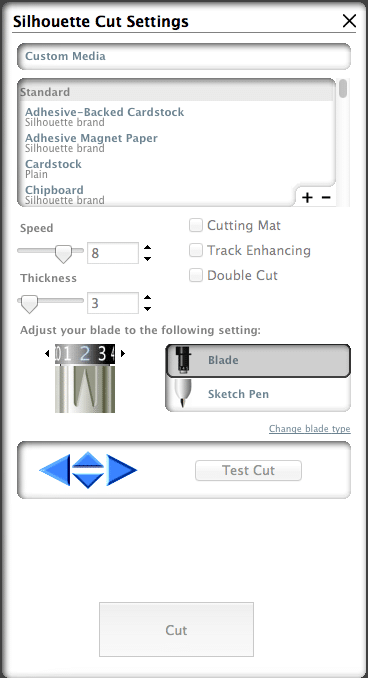
2. No cutting mat. I just feed the paper directly into my Cameo. It works great!
3. Keep it in tact. When peeling off the backing of the contact paper, keep everything in one piece. This will allow you to place your stencil down and not have to manually space everything out. (Update: I wrote this before I knew about the magic that is transfer paper. 🙂 )

4. Weed. Once you have the shelf liner paper in place, then weed out what you don’t need. “Weeding” is the Silhouette term for “take up.” 🙂 Who knew they had their own lingo?? There’s even a special hook for weeding.
5. Mod Podge. I paint Mod Podge around the lettering before I actually paint them. This makes sure that if the adhesive paper isn’t pressed down completely in some spots, then the only thing to run under the stencil will be the Mod Podge. And it dries clear. This gives you the cleanest lines possible when stenciling with contact paper.
Hopefully these tips with help you make stencils of your own!
If you need to buy a Silhouette Cameo, this bundle is a great option!
More Posts You Will Love:
Just wondering why all the words that say silhouette are crossed out? Maybe I’m not aware of something, or it could be my age!🤣 have you tried the new cameo 4 yet?
Thank you,
Stacey
Would you be interested in advertising that charges less than $50 per month and delivers tons of people who are ready to buy directly to your website? Reply to: [email protected] and I’ll send more details.
Thank you! That worked like a charm! No sticking in the machine, no frustration, no tears!
How do you keep the contact paper from slipping and moving without a mat? I am using the same brand you do with my Cameo 3 and it seems to always slide or jam.
I have had it slide if it bumps into something on the back side, so I just make sure it has plenty of room to move through without hitting anything. Otherwise I haven’t had any trouble. But seriously, if it bumps anything at all it will shift and mess it up. I also use the Duck brand adhesive paper, so maybe try that if you’ve been using something different!
Hi —I have also been using contact paper for my stencil –but I have noticed that it leaves a sticky residue on the wood has this happened to you? not sure how to get it off the wood without messing up the paint
Hi Gloria, this hasn’t been happening to me. Honestly my contact paper I use isn’t really sticky enough! It doesn’t stick very well, which is both troublesome and nice because then it doesn’t leave any reside. Maybe try a different brand? I use Duck brand contact paper. Thanks for reading! xo, Laura
Hi Laura!
I’m trying so hard to get my Silhouette to cut contact paper as you did! I have my settings at: blade 1, speed 8, thickness 3, no mat.
But the machine cuts through the contact paper & backing, I have to stop it because it all just gets stuck! Is there a certain type of contact paper I should be using? Please help!!
Hmmm, that stinks since you can’t set your blade any lower than 1. I used the Duck brand contact paper from Lowe’s. So, maybe that’s it? Let me know if you figure out how to make it work. I have found that different brands of materials require different settings.
I was reading your about using contact paper for stencils and I was curious about your process involving the Modge Podge. I currently own a business making family and military location signs and am using my Silhouette to cut vinyl for the stencils. Not only is this pricy, but there’s a large margin for error, as the vinyl doesn’t always stay down and bleeding sometimes occurs. This is frustrating, not to mention costly when I have to re-do the entire block. What is your process for “paint(ing) Mod Podge around the lettering before I actually paint them”? Do you paint the Modge Podge on the inside of the letters, directly onto the wood? I wanted to get your advice before I dive into this process. Your site is fabulous!
Hi Melissa, I do paint the Mod Podge directly onto the wood, making sure to brush under the contact paper or vinyl. That way if there’s going to be any bleed, then it’s clear Mod Podge and not paint. And then once the Mod Podge is dry, paint over the letters with your regular paint. I hope this helps!! 🙂
Thanks so much!
Laura
I wish I could see this on a video. I too am struggling to understand what you are doing. It sounds like you put the stencil down and paint over the lettering and then lift the stencil to paint under it? How does it stick back? Wouldn’t this adhere the stencil? I am sure it will be an ahhhh moment if I can see it, but I just don’t get it either. lol
Love this! I have wanted a Silhouette for 3 years or so, and FINALLY ordered one! I love your idea with the contact paper. I figured I’d be flying thru vinyl by using that as a stencil. I don’t quite understand the Mod Podge thing. So do you finll-in your stenciled areas completely with the Mod Podge? Or just brush it one, kind of outlining the edges of each letter?? Thanks so much!
Great tips, Laura! The one about keeping it intact is what blows my mind the most. Genius! Pinning this for future reference.
After Thanksgiving I will be trying my hand at the stenciling using contact paper, so glad I got to read up here on how to do it again 🙂 I have and love my Portrait! Need to start challenging myself to venture out of the vinyl world and try new things 🙂
Happy Thanksgiving!
Hi Laura, this looks like a much easier way than trying to free-hand the words; which is what I always think about doing, (but you should see my appalling hand writing!) I usually end up handing over the projects to one of my daughters who somehow managed to miss the bag handwriting genes…lol. Lovely visiting with you; this is the first time I linked up with the Creative Inspiration party and I’m really enjoying meeting the lovely gals. 🙂 Happy Thanksgiving.
Hi,
I am trying to access the Promo page through your link but it keeps saying “Page not found”… I would like to purchase one of the deals and I am not sure how to access it.
Hi Hetal, for some reason I can’t get the link to work correctly in the post. Here it is: http://www.silhouetteamerica.com/black
Thanks so much!!