Easy DIY Wood Planter Box Tutorial
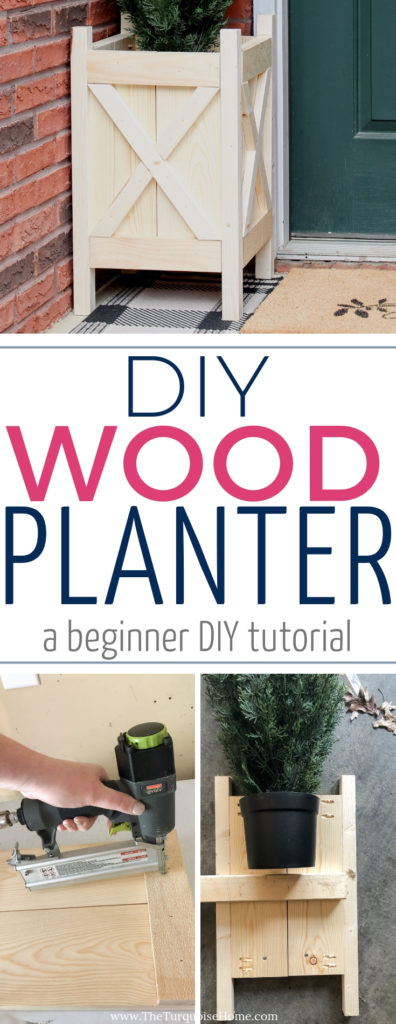
Looking to add a touch of charm to your outdoor space? This easy DIY wood planter box is the perfect beginner-friendly project. With just three tools and some budget-friendly materials, you can create a beautiful planter that brings warmth and character to your porch or garden.
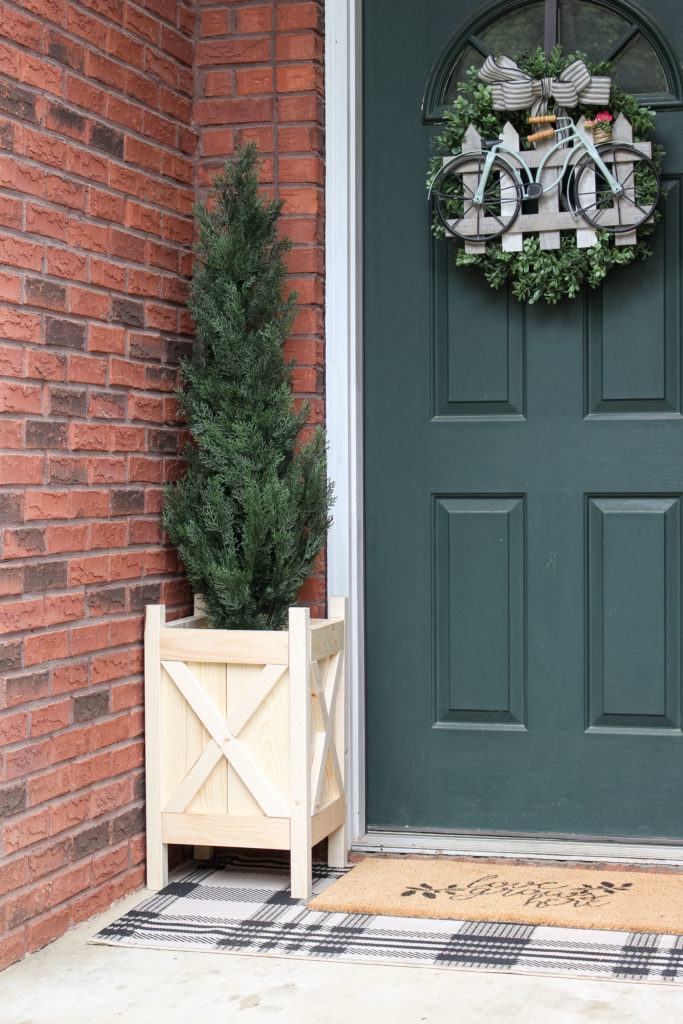
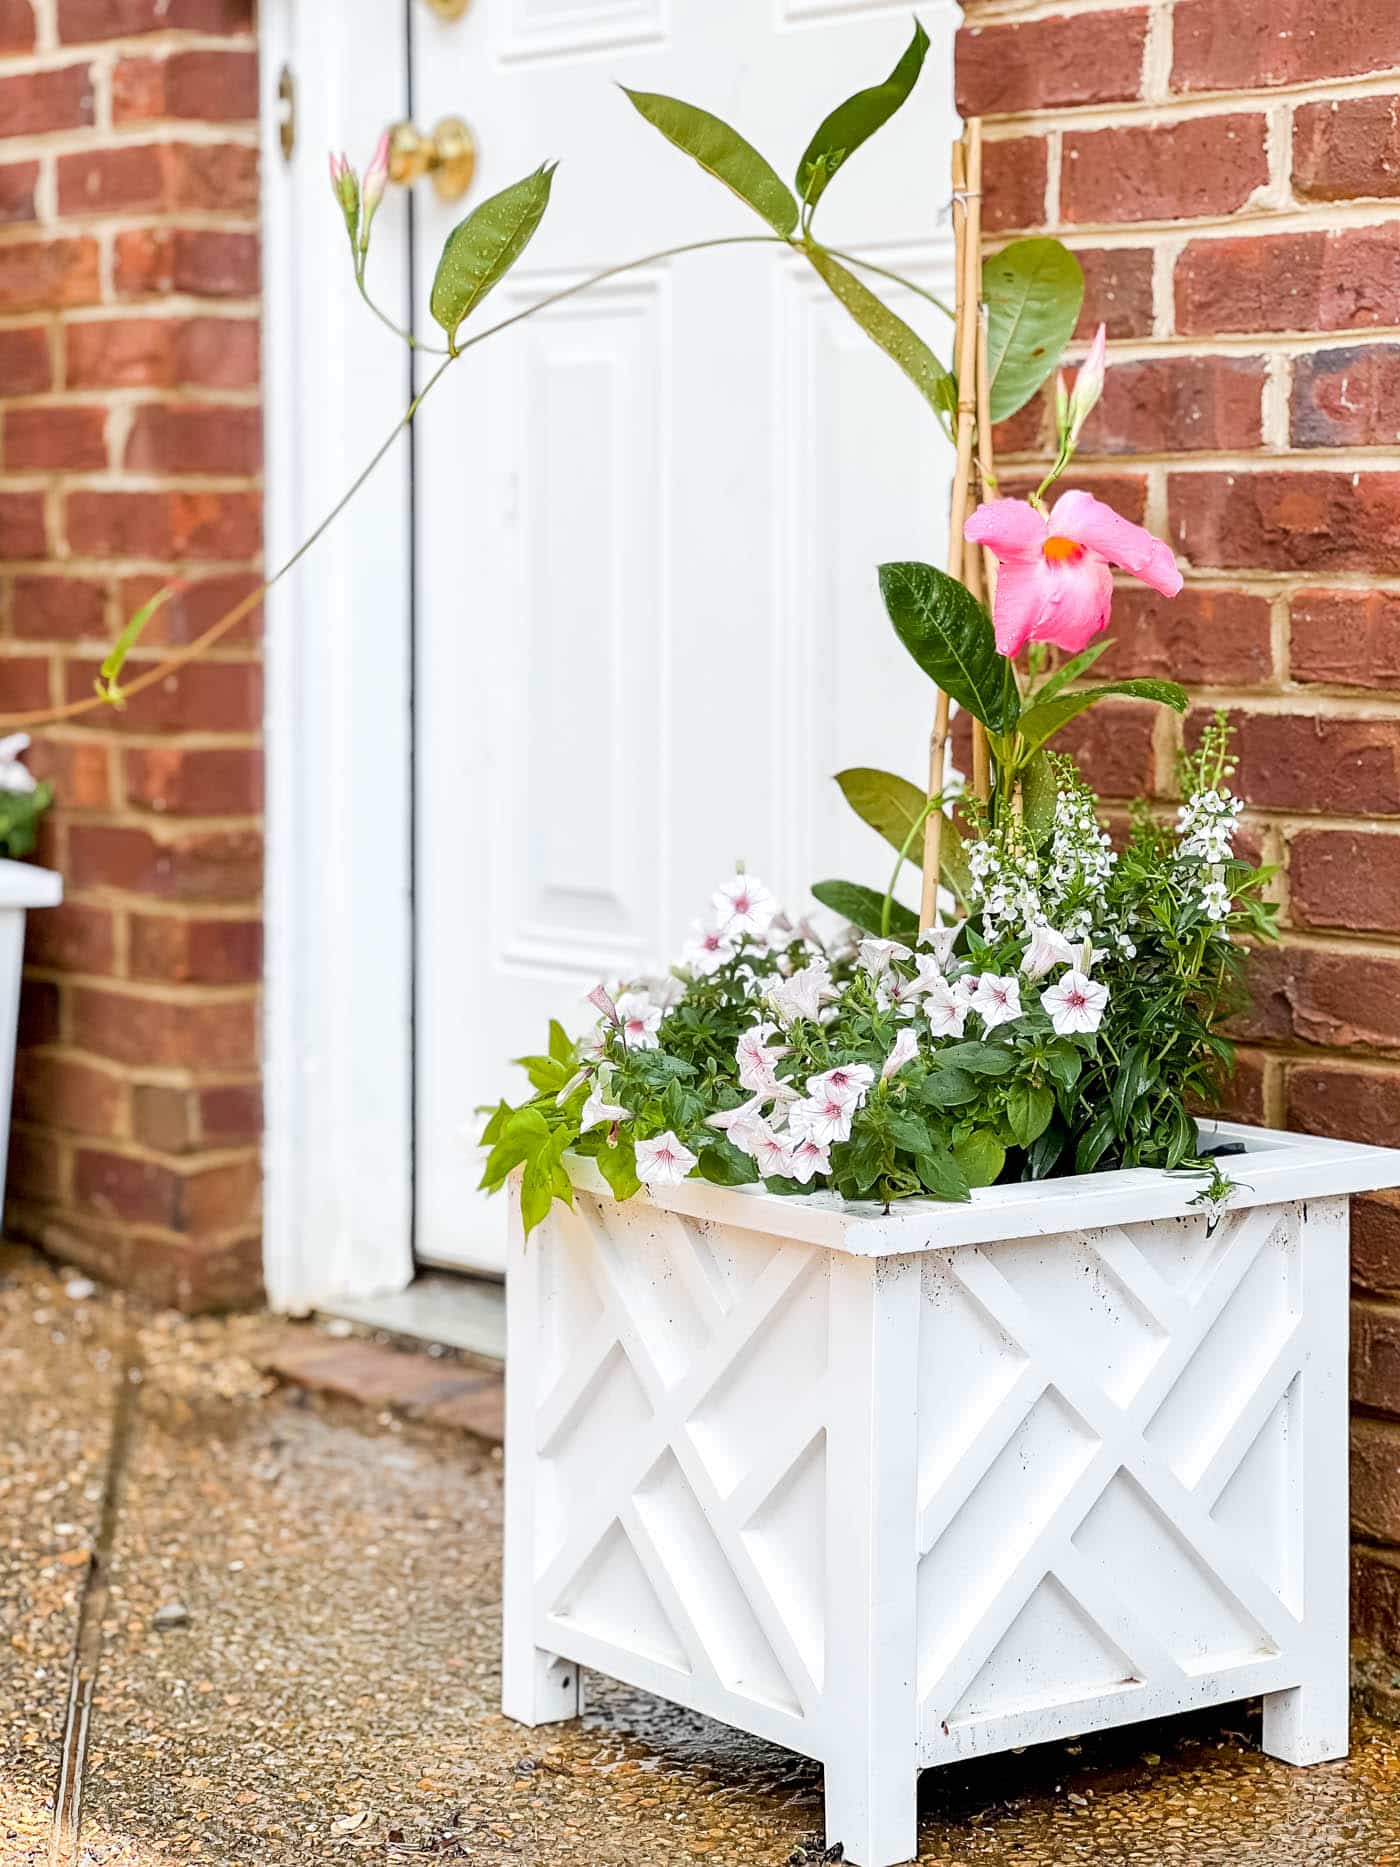
I’ve wanted to add some interest to my front porch stoop for a while now and just haven’t been able to find the perfect planter for my space. It’s a small space, so I needed a tall and narrow planter, which was hard to find. So, like anything else in my home when I can’t find the perfect thing – I figure out how to make what I want!
This DIY project is super simple and only requires 3 tools, which were the first tools I purchased when I started DIYing. And it would be hard to mess it up since you could only do straight cuts (if you don’t do the x’s on the sides). So if you’re new to DIY projects, this one would be great!
Another thing I love about this project is that it’s a great way to use up scrap boards. I have a rather large scrap wood pile and while I bought the wood needed for these planters, I ended up using a lot of the wood from my scrap pile and was able to return the unused boards back to the store.

I used Ana White’s planter box tutorial, but I tweaked it to fit my narrow space and added the x’s on the sides to give it a more farmhouse feel. So, I will share the dimensions and the board sizes I used, but if you want to see the original planter tutorial to tweak it for your space, check out Ana’s.
As with any DIY project you do, read through the entire process first before starting. Feel free to ask me questions in the comments and I’ll do my best to answer them!
Want to Save This?
Enter your email below and I’ll send it directly to your inbox!
This post contains affiliate links for your convenience. See my full disclosure policy.
Materials Needed for Your DIY Wood Planter Box
Note: These are the supplies needed to build one box. If you’re building two boxes, just double it, of course.
- 2 – 1 x 6 boards @ 8 feet long – for the side panels (I bought all premium pine boards, which are a little pricy. But I made up for it by using as many scrap pieces and I could and returning the uncut boards to the hardware store.)
- 1 – 2 x 2 board @ 8 feet long – for the planter “feet”
- 2 – 1 x 3 boards @ 8 feet long – for the top and bottom trim on each side panel
- 2 – 1 x 2 boards @ 8 feet long – for the “x” on the sides and the bottom & the floor
- 1 1/4 inch brad nails
- 2 inch wood screws
- 1 1/4 inch pocket hole screws
- Sandpaper
- Wood Glue
- Paint or stain you’d like to use & the tools for those (See how I finished my planters with a gray wash.)
- Outdoor water sealer
- Safety eyewear
- Faux evergreen tree (😜)
- Scrap Wood for the cleats
Tools Needed:
- Compound Miter Saw (I use this 12″ sliding saw, but my first miter saw was a more basic 10″ saw.)
- Kreg Jig
- Power drill (This is the one I use and have used for years. Love it!)
- Measuring tape
- Brad nailer/finishing nailer (or hammer and brad nails)
- Hand Sander (or you can use sandpaper and sand by hand)
Cut List:
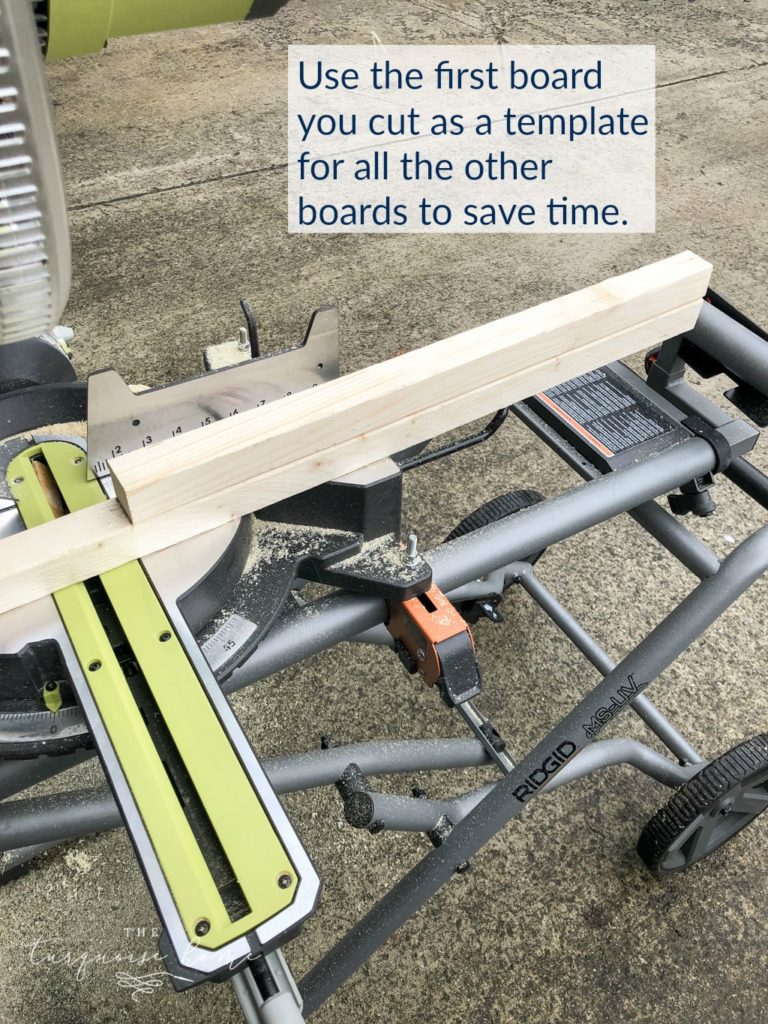
Note: I don’t usually feel comfortable cutting all of the boards before I start a project, but these don’t have to be exactly precise, so I cut the first three before I started my project. It made assembling them go a lot quicker!
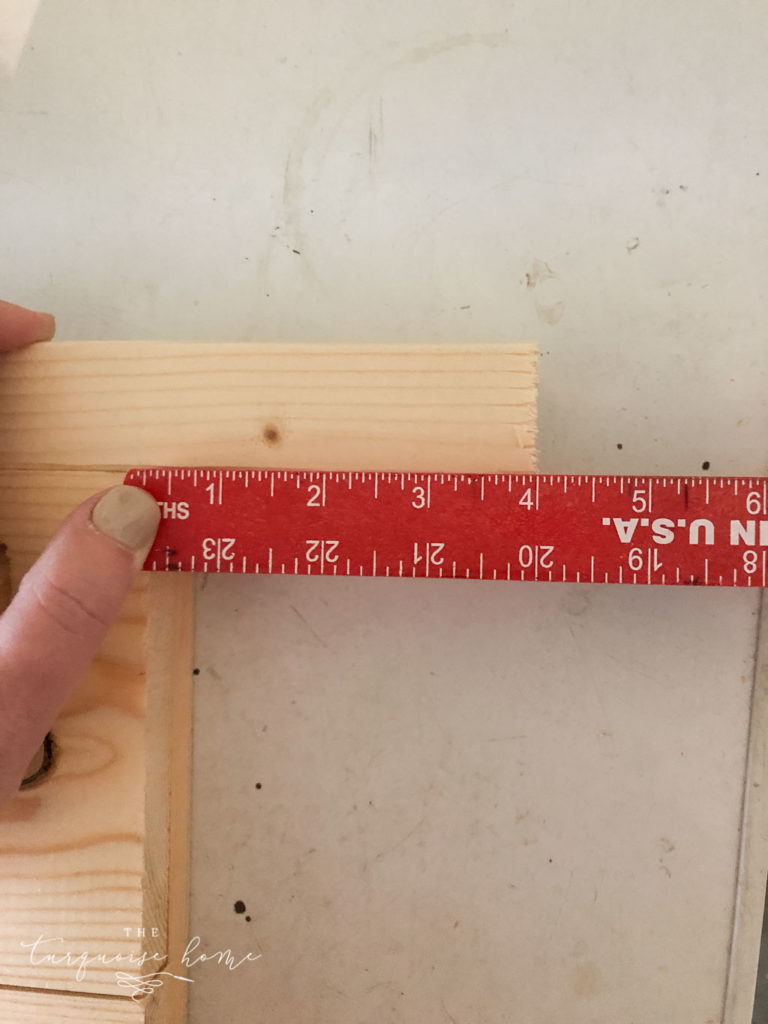
- Sides: Cut the 1 x 6 board into 8 pieces at 17 3/4 inches each.
- Legs: Cut the 2 x 2 board into 4 pieces at 23 1/4 inches each.
- Side trim: Cut the 1 x 3 boards into 16 pieces at 11 inches each.
- Cleats (for the bottom): Cut 2 pieces your scrap boards down to about 8 inches long.
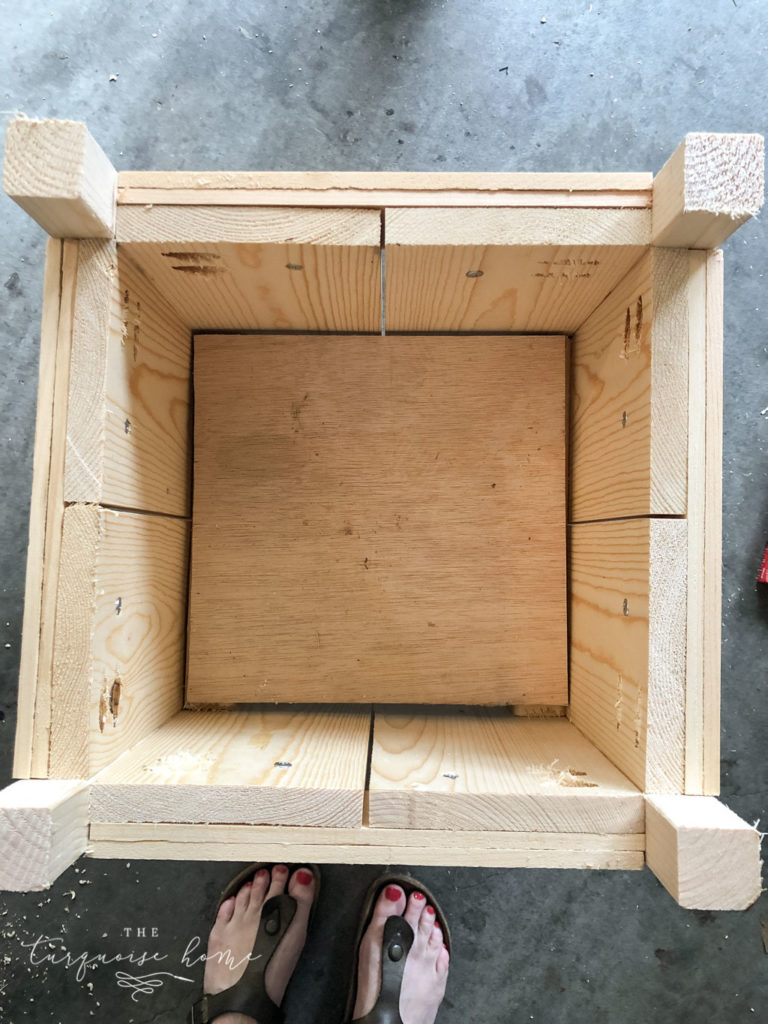
- Bottom: When you get to step 9, cut wood pieces out of 1 x 2 (or scraps) @ 11 inches long, or cut plywood to fit into the planter to make a bottom piece. (You’ll see my plywood in the photos below.)
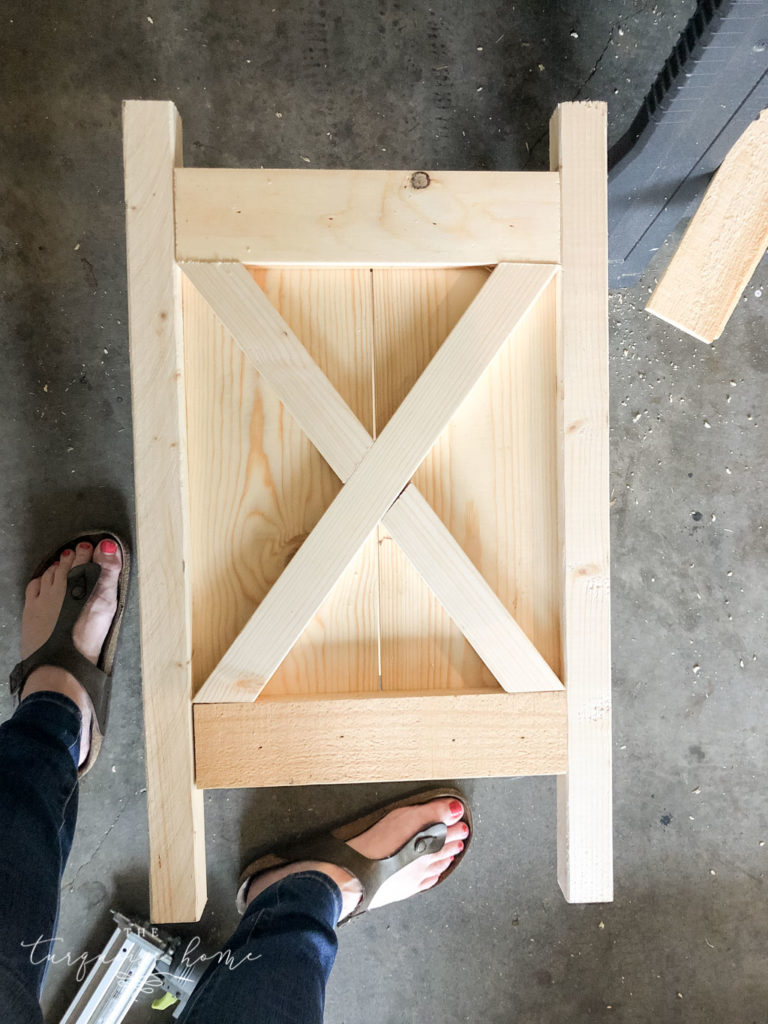
- Once assembled, cut the 1 x 2 boards per your planter’s side panel angles to make the x’s. I used 15º angles and 36º angles on my miter saw to cut my “x” boards.
Step-by-Step Guide to Building Your Wood Planter
1. Cut all boards from the first four bullets on the list above.
Use the first board cut as a template for all of the other boards.
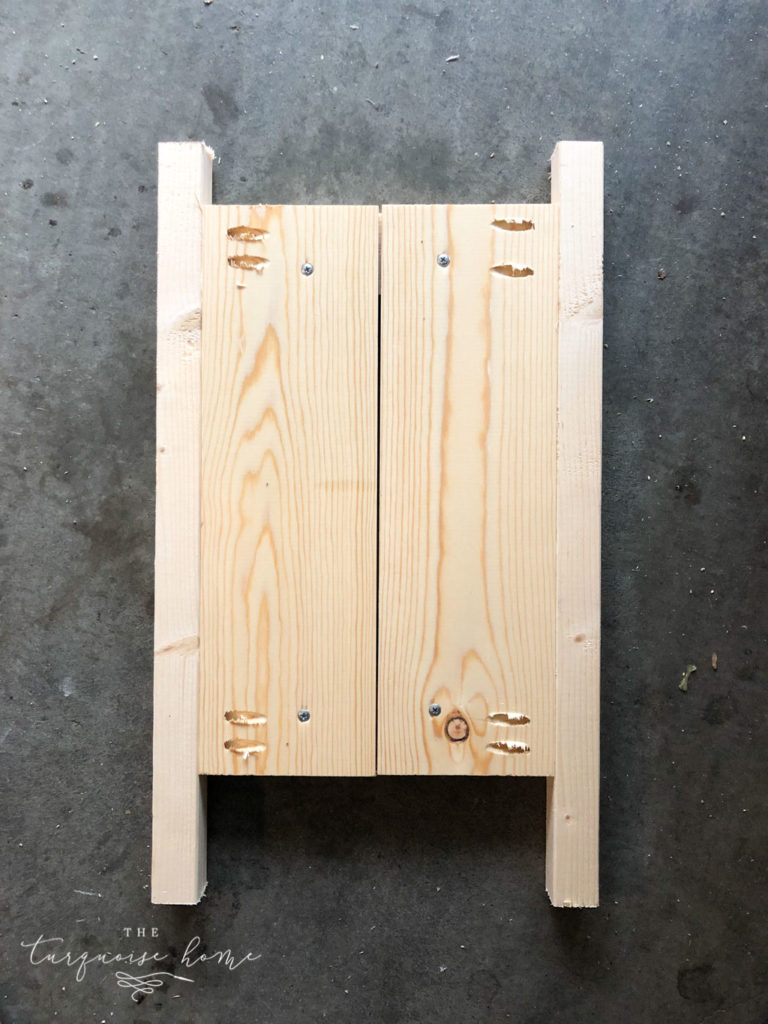
2. Create the First Side Panel
Take 2 of the 1 x 6 boards @ 17 3/4 inches each and place them next to each other.
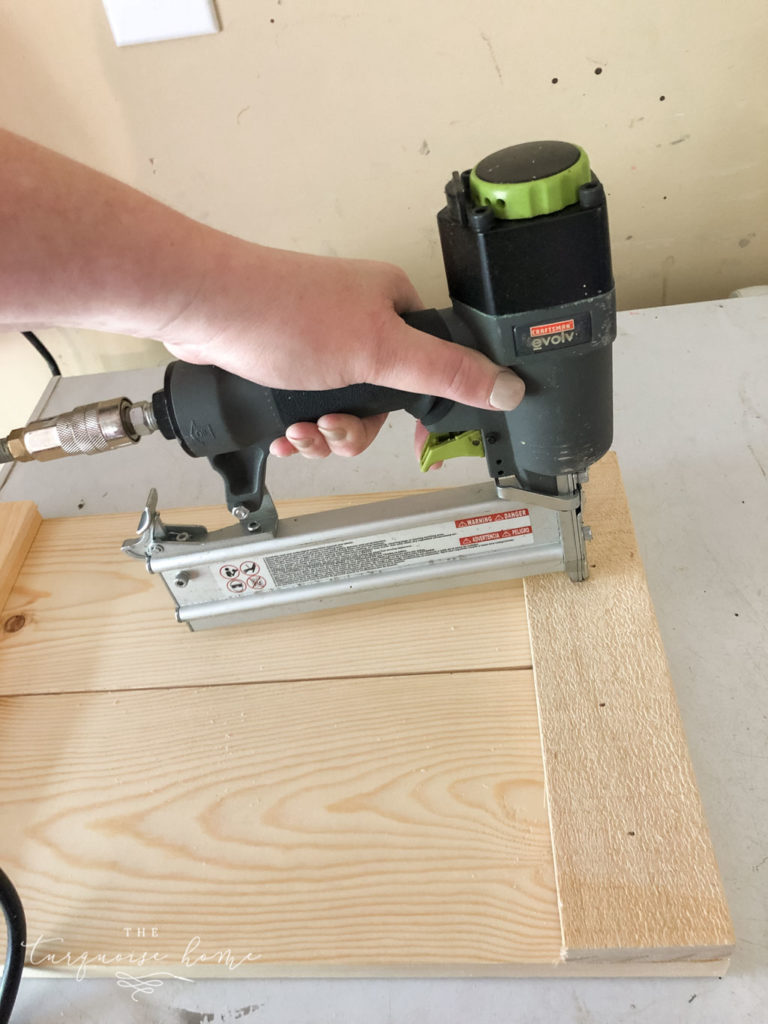
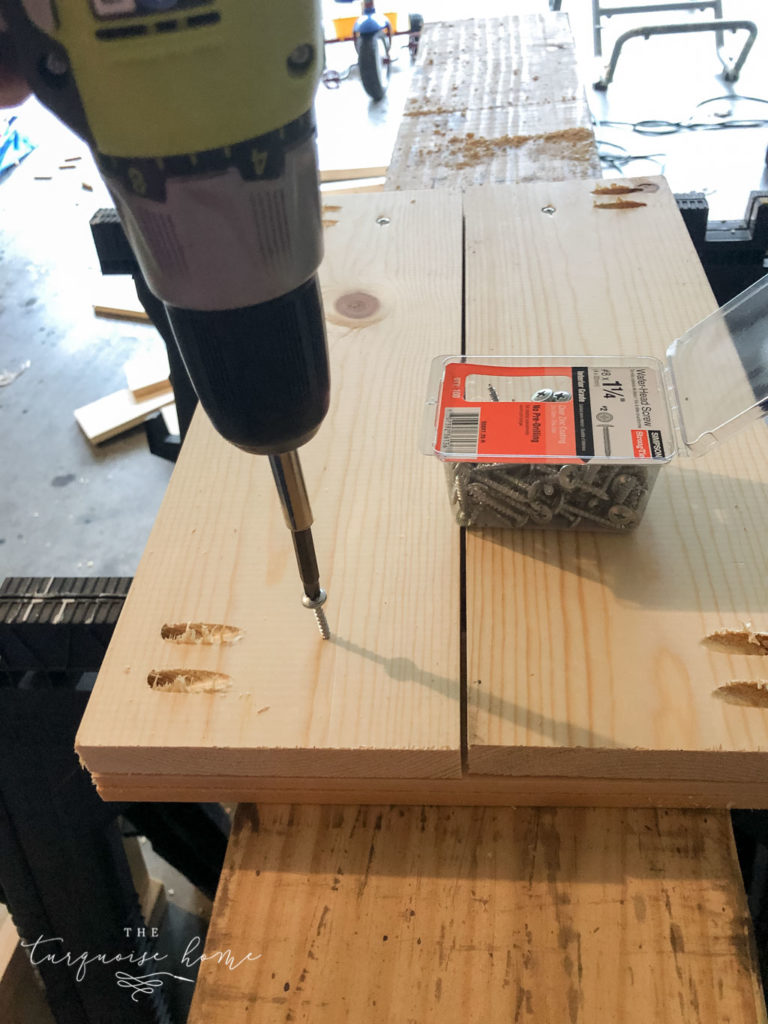
Then use a nail gun/brad nailer to nail 2 of the 1 x 3 @ 11 inches to the top and bottom of the boards, flush with the top and bottom. The side with the 1 x 3 board is the “front” of the first side panel.
I doubled up the 1 x 3 pieces, as you’ll see in photos below so that the depth would match the depth of the corner pieces.
3. Secure the 1 x 3s from the Back Side of the Panel
If you want to make sure the panels are extra secure, flip it over to the back and screw a screw into the back side of the panels through the 1 x 6 into the 1 x 3, but make sure not to break through the other side! I used 1 1/4 inch wood screws.
4. Drill Holes for Attaching the Panel to the Legs
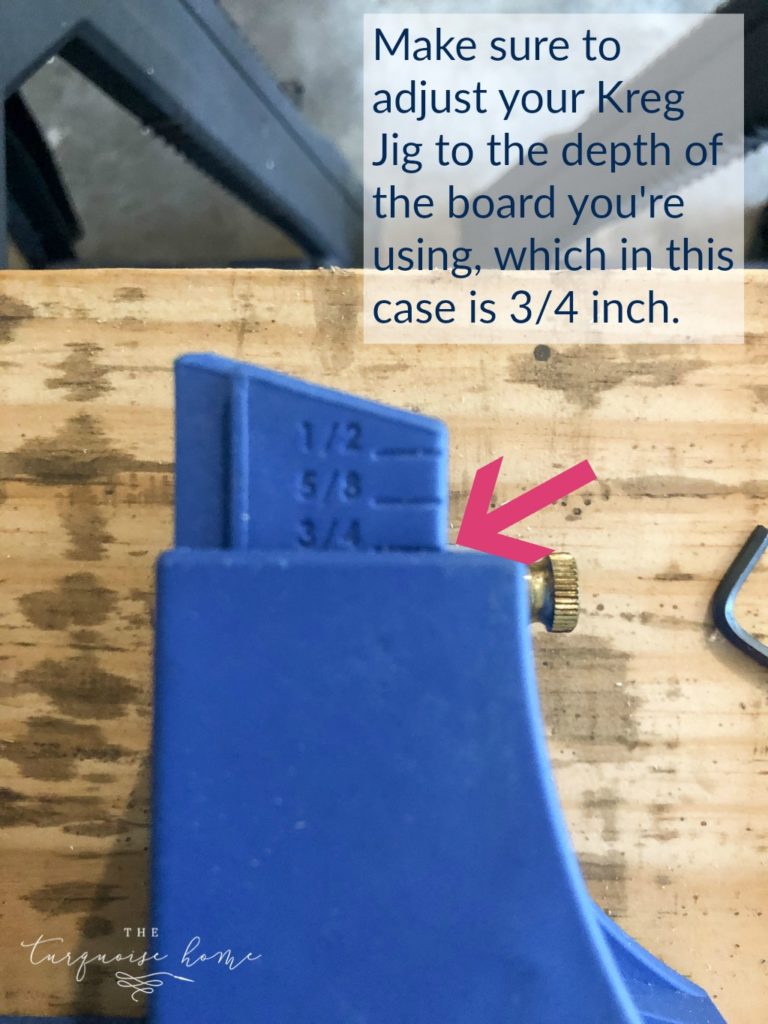
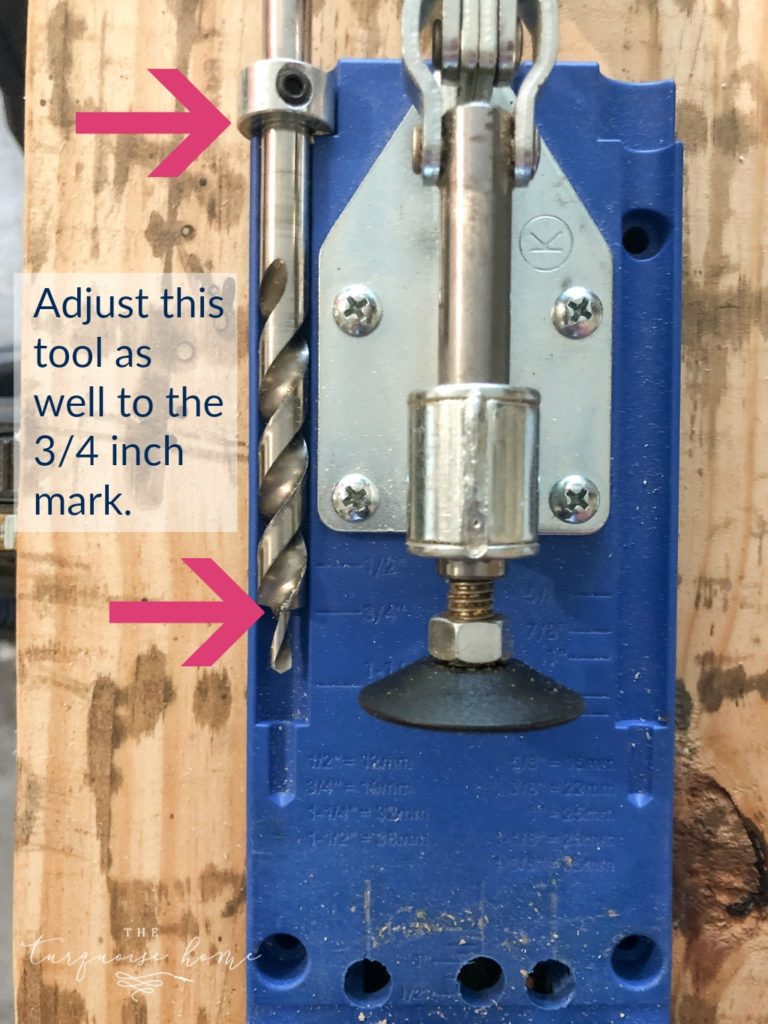
Use the Kreg Jig to put 2 pocket screw holes in the back side of each panel, underneath where the 1 x 3’s are located.
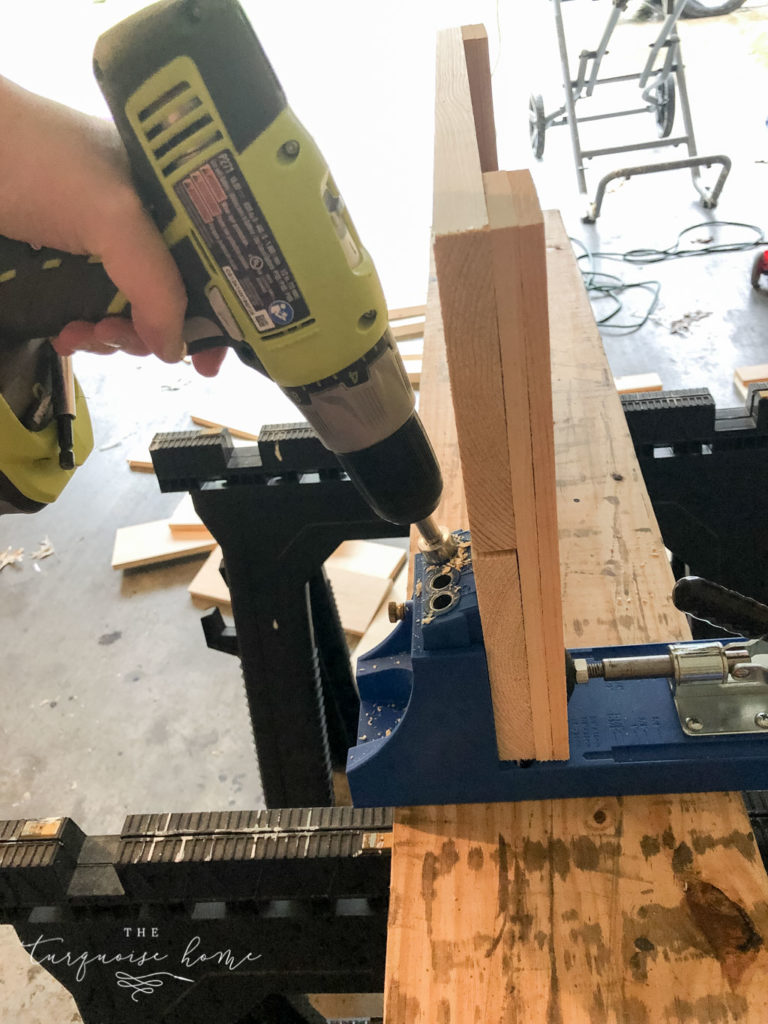
Note: Make sure to adjust the Kreg Jig and the Kreg Jig screw tool to the depth of your board, which would be 3/4 inch in this case.
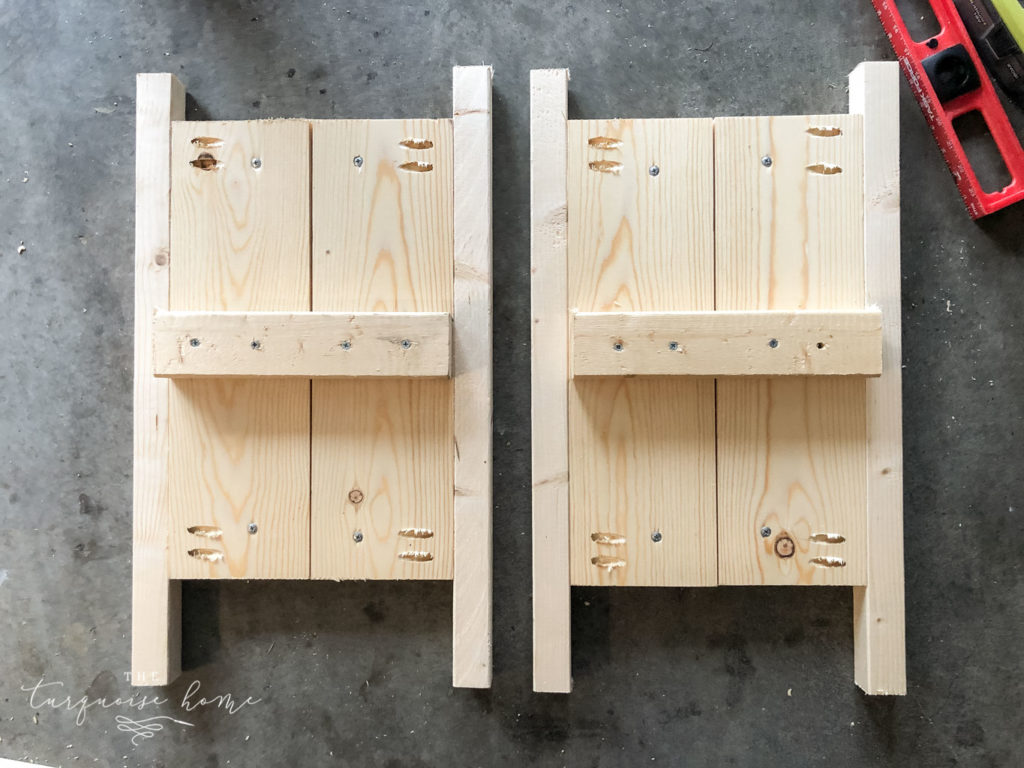
5. Repeat Steps 2-4 to Create 3 More Panels.
6. Attach One Panel to Two Legs x 2
Measure 4 inches up the side of the 2×2 legs and attach a panel to two of the feet with the 1 1/4 inch pocket hole screws.
I measured up 4 inches from the bottom of the legs for placement of the side panel.
Repeat with a second panel and two 2×2 feet pieces.
6. Attach a Cleat to the Panels Attached to the Legs
Add the cleats @ 8 inches long to the inside of the panels attached to the legs. I measured 7 1/2 inches down from the top to place my cleats, because that’s how big the plant is that I’m using. But you would want to make sure your plants will fit in yours, so adjust for what you’re doing.

Measuring 7.5 inches from the top, screw one cleat into the inside of the panel. Repeat with another panel.
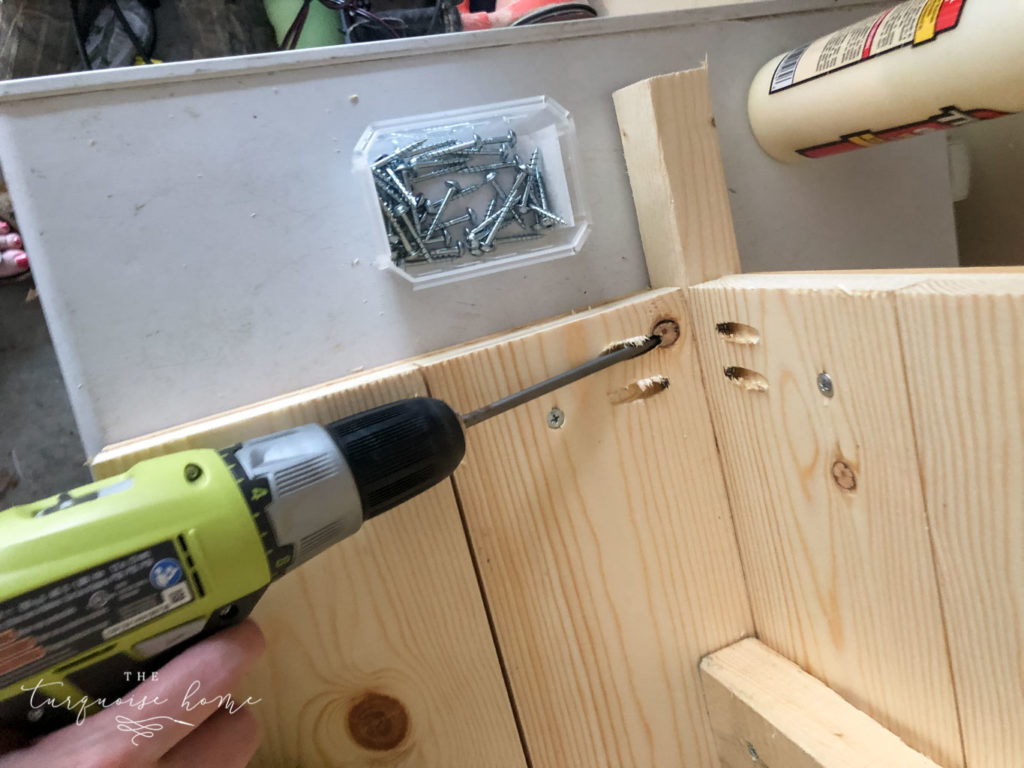
8. Attach the Remaining Two Panels to the Wooden Planter Box
Attach the two remaining side panels to the legs with wood glue and pocket hole screws and panels you just created.
9. Make the “Floor” of the Planter
Either cut 1 x 2 boards to fit into the planter, or make it out of scrap pieces of wood.
I cut a scrap piece of plywood to fit into mine, but you could also use several pieces of wood cut to 11 inches to place across the cleats. (See Ana’s plans to see how she did it that way.)
Place the “floor” onto the cleats inside the planter.
10. Add X’s to the Sides, optional
Now, if you choose, you can add the optional “x” on each side with the 1 x 2 boards and brad nailer with wood glue. I recommend checking the angles of your box and cut accordingly, because it will probably be different than mine.
11. Finish the Planters with Stain, Paint and/or Sealer
Finally, you will want to paint or stain the DIY wooden planters (or leave them natural) and seal them with an outdoor water sealer to keep them from rotting or molding & mildewing. I think I will leave mine natural and just seal them with something like this.
I ended up putting a gray wash on the planters and I love how they turned out!
Then you’re done! It’s a simple and basic DIY project that anyone with any skill level can do.
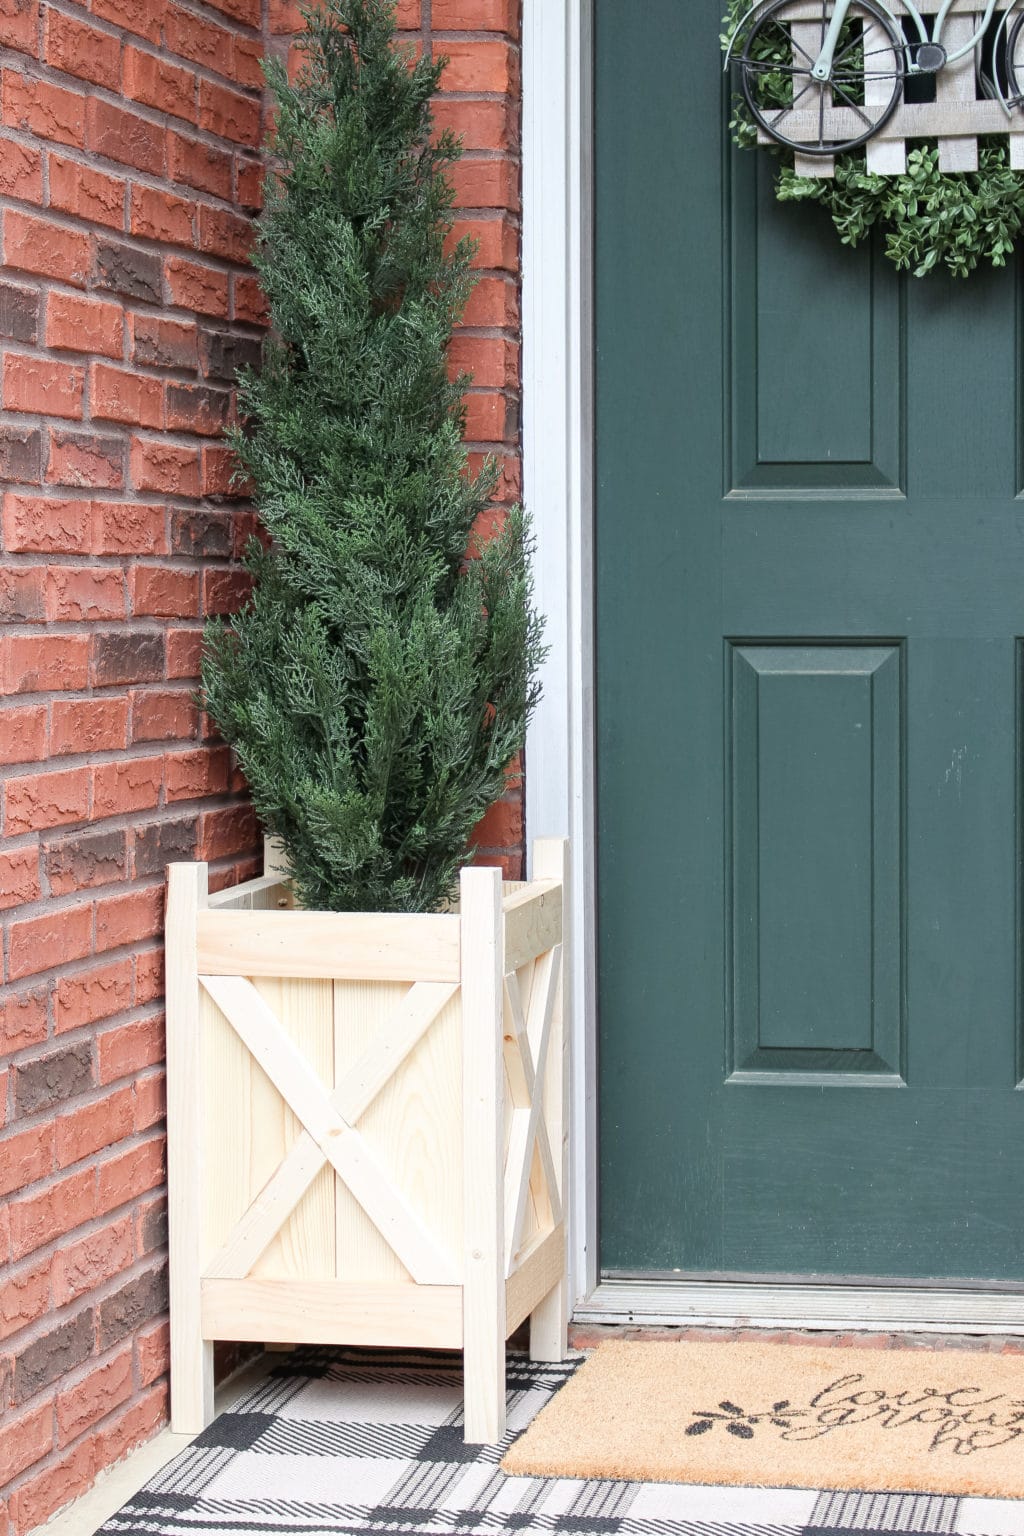
Oh, and about that plant… It’s a total fake evergreen tree. If you look closely, then it will be obvious, but I think it looks great on my front stoop.
I’m just thankful I don’t have to water it or worry about it dying! I did use real potting soil in the planter, so that it gives it a little bit of a real effect. 😜
Frequently Asked Questions About DIY Wood Planters
Q: What type of wood is best for a DIY wood planter?
A: Cedar and redwood are excellent choices due to their natural resistance to rot and insects. If using treated lumber, ensure it’s safe for plants.
Q: Do I need to seal my DIY wood planter?
A: Sealing your planter can extend its lifespan, especially if it’s exposed to the elements. Use a non-toxic sealant if you plan to grow edible plants.
Have you built your own DIY wood planter? Share your experience in the comments below!
More Posts You Will Love:


Love the planter! Did you end up painting it?
Definitely making this planter AND using fake tree (only way to go here – windy, dry and very cold in the winter. Could you please tell me where the wreath came from – particularly love the bike and picket fence in the center. Thank you for sharing.
This planter is darling, Laura! Love it!
It looks so good, Laura! I need some for my front door too!
Hugs, Jamie