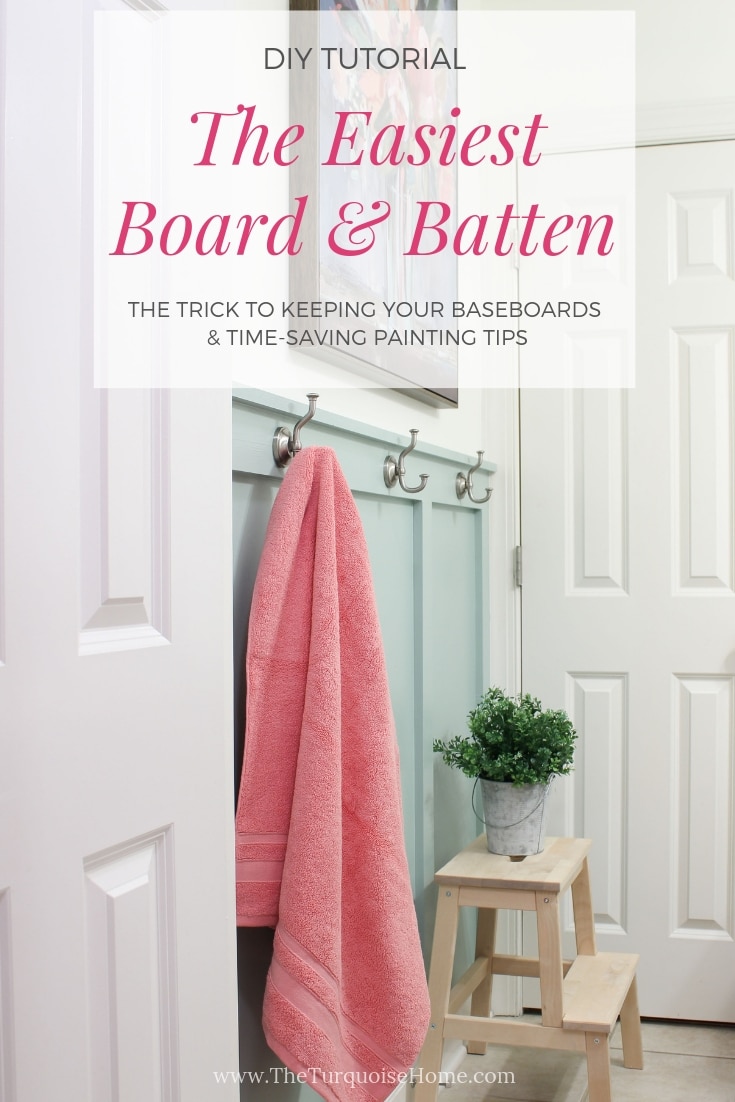
DIY Board and Batten in the Girls’ Bathroom
Learn the simple & easy way to do board and batten in your home with easy tips for keeping your baseboards & time-saving painting tips! You will love the impact this easy DIY will make!
I originally did DIY Board and Batten walls in my living room back in the stone ages of my blog. LOL It was a huge project to tackle because I was a new DIYer and it’s a huge room. But I’m so glad I tackled it because not only is it a simple project (just took forever with that much space) it makes a huge impact in the room.
More than 5 years later it’s still one of my most favorite posts.
So, when I was thinking about my girls’ bathroom refresh I knew it needed high impact in the tiny space – and also a functional place for hooks! So a board and batten project was a win/win for this room.
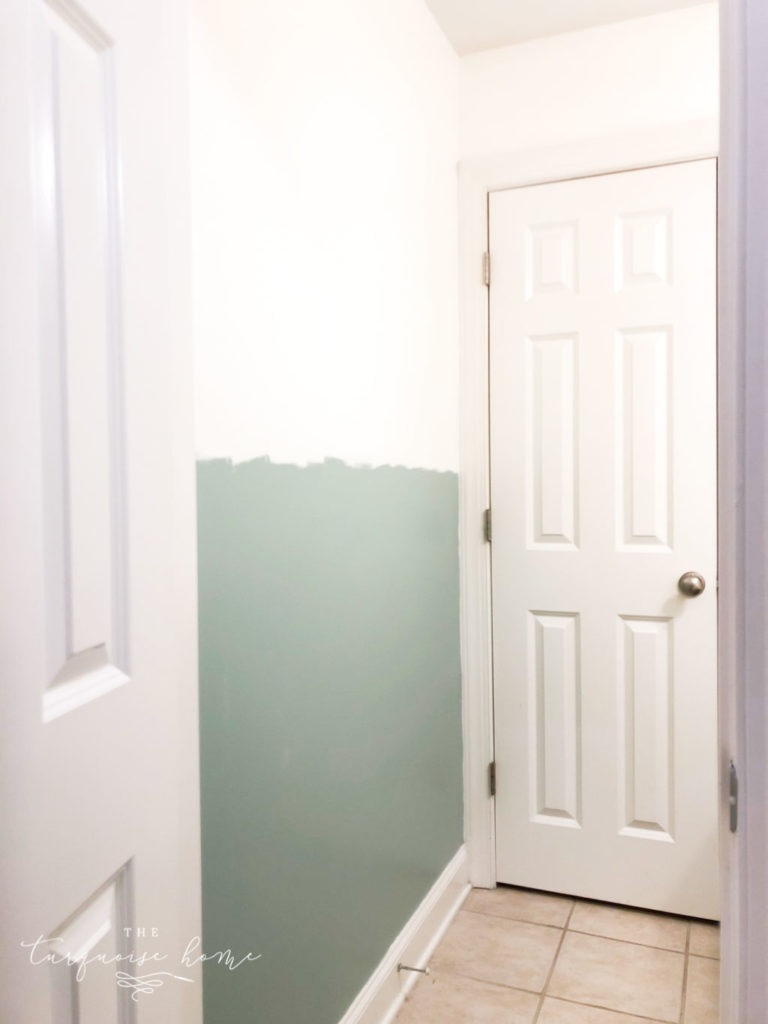
I originally was going to paint it all white – the walls, the board and batten, everything. But while I like white, I’m a pops of color girl at heart. As I was painting the walls (painting over gray), I just had a nagging feeling that it was going to be TOO much white. I needed some color.
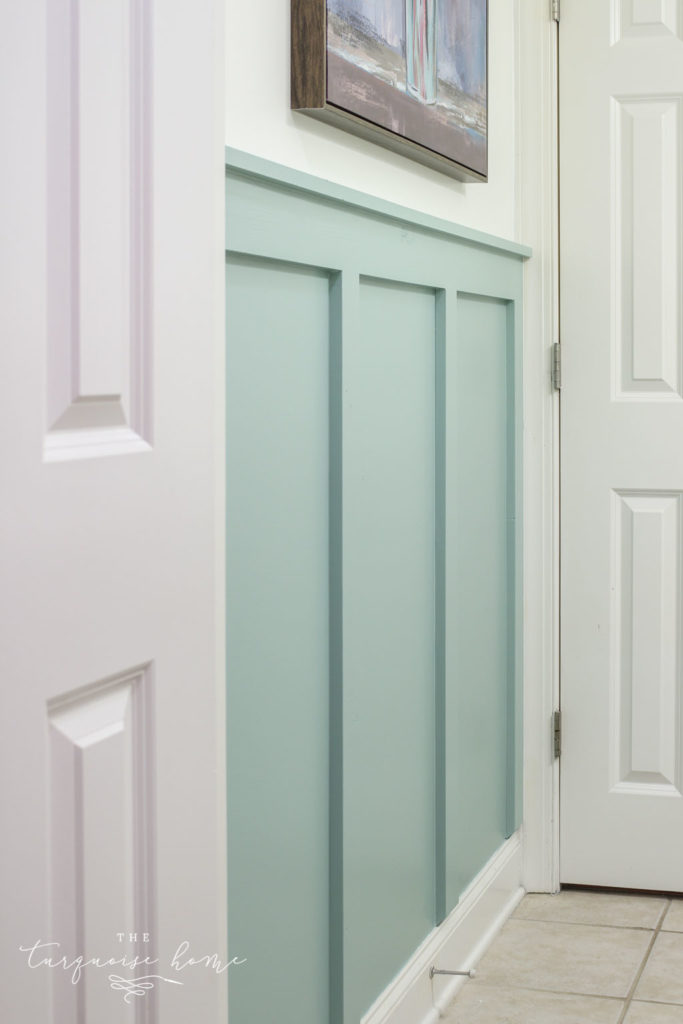
I took a few days to ponder how I wanted to incorporate color and it dawned on me that I could paint the board and batten blue for an extra pop of color. (See this post for more about how I came to my decision.) I didn’t know how it would turn out! It was hard to find any inspirational photos, but I decided to go for it.
And I’m IN LOVE!!!!!!
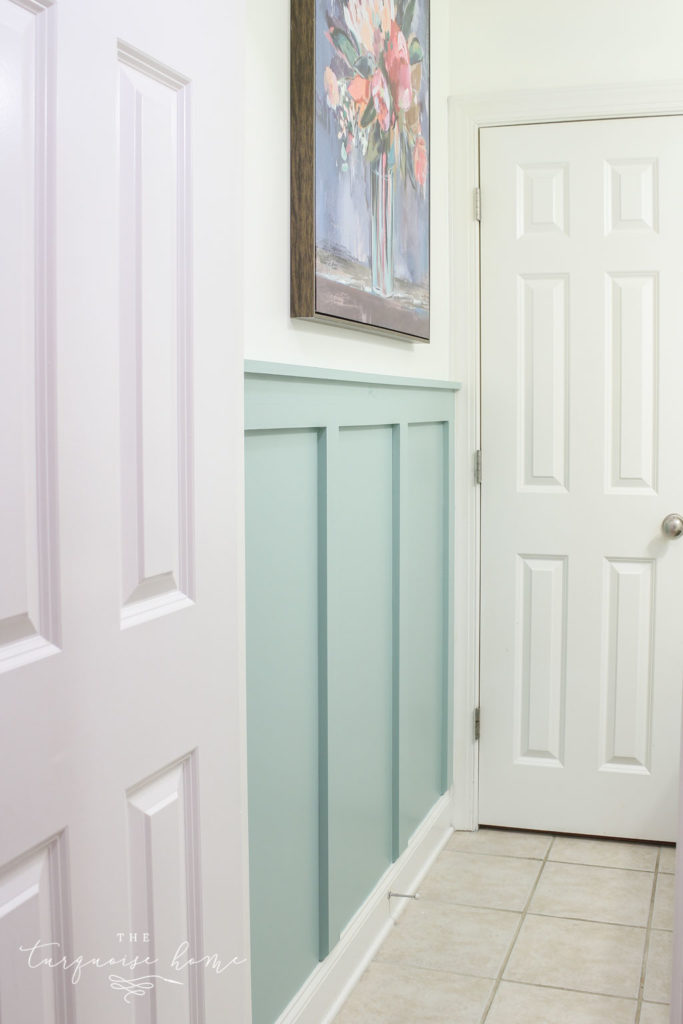
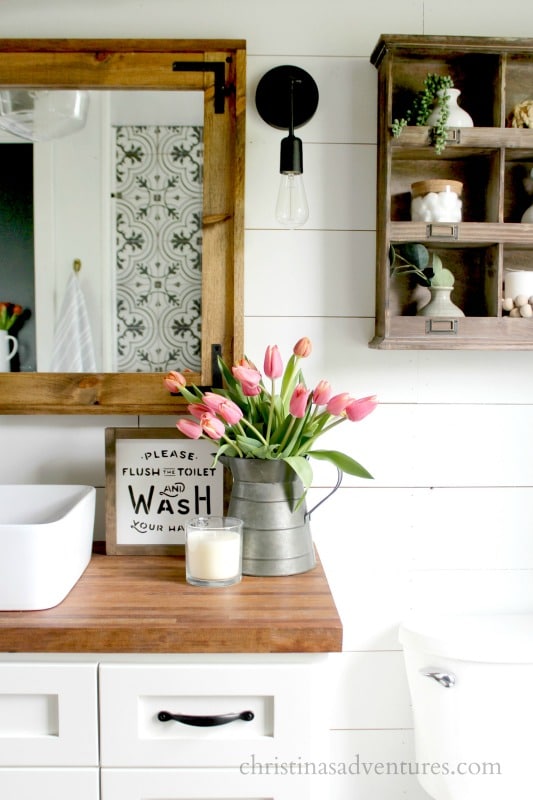
Floral Art above the DIY Board and Batten
It could not have turned out more perfectly. I absolutely love it! So, if you want to do things a little differently, flip your colors!! It’s so fun for a small space like a bathroom, laundry room or closet! Go for it if you’re loving this look as much as I am!
This is part of the whole Girls’ Bathroom Refresh, which you can find all of the plans here. Now that the painting is all done, I can’t wait to add the vinyl floor tiles and the finishing decorative touches!
Want to Save This?
Enter your email below and I’ll send it directly to your inbox!
How much did the board and batten project cost?
If you’re wondering about the cost of the project and the financial commitment you’ll need, the total cost of my boards and the paint was $42.
Breakdown:
$25 for the boards
$17 for the paint
I used common pine boards, but that would be pretty costly if you were doing a large space.
There are definitely ways to get the look for cheaper, like use furring strips or have MDF boards ripped down, or use lattice for your “battens.”
In the end I decided to use the more expensive common pine boards because they are usually straight (check them before you buy them) and have nice squared off corners. I didn’t want to have to worry about boards that weren’t straight or something I’d have to rip down. And since it was such a small area, it was fine. But if you’re putting this in a larger area, try one of the suggestions above.
The Planning Phase
Before you ever start your project, you will want to draw out your plan – or at least think about it. Ask yourself these questions:
- Will you use board AND battens or just battens? Traditionally board and batten is using flat boards on the whole surface of your walls to create a smooth surface and then adding vertical “batten board” to achieve the effect. The tradition way is best if you have textured walls. But if you have smooth walls like I do, then you can skip the boards and just to the top trim and vertical battens. It’s cheaper and easier if you can pull it off!
- What color will you paint your board and batten? I used Simply White for the board and batten in my living room and Wythe Blue for the board and batten in the girls’ bathroom. Both colors are from Benjamin Moore. And I just get them color matched at Lowe’s.
- What height will your top board be placed? I have some suggestions below in Step #1, but do you have any factors that will play into your decision like a permanent fixture in the room (like a fireplace or built-in bookcase), or decorations that will be hung above the board and batten? It’s important to visually think about this line going all the way around your room.
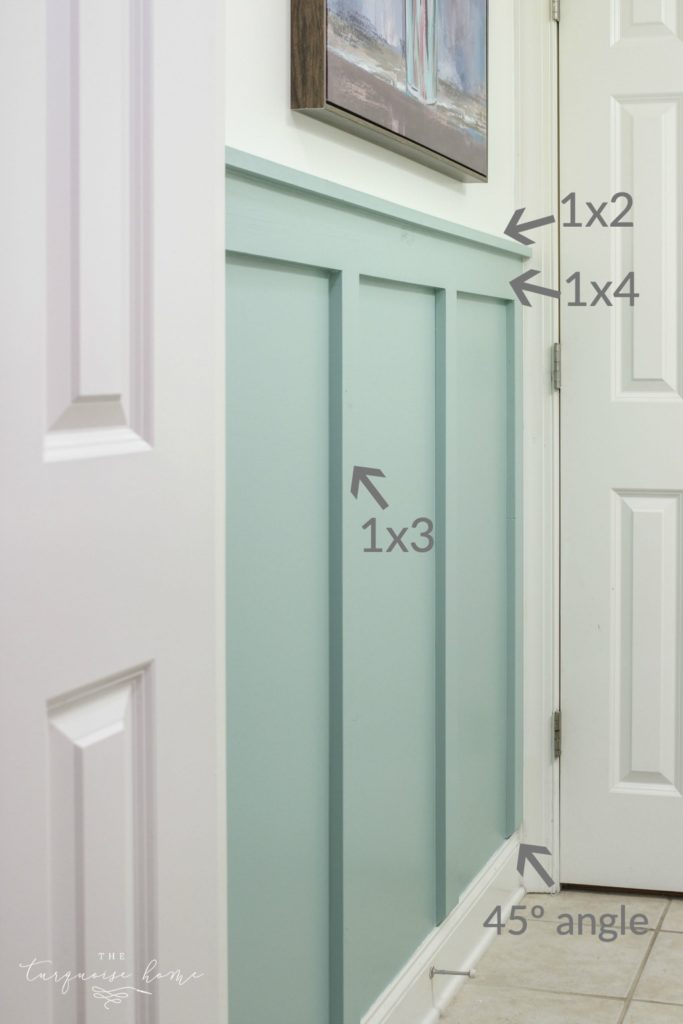
- Will you keep your current baseboards or replace them entirely? I keep mine in place and cut the bottoms of my battens at a 45º angle to make them look like they are resting on my baseboards instead of overhanging them. If you have chunkier baseboards, you may not need to angle the bottoms of your boards. Or you may want to replace your baseboards with chunkier boards. It’s up to you!
- Will you use large, chunky boards or thin boards like lattice?
- Will you have one horizontal board or two?
- Will you place a horizontal board at the bottom of the wall on top of your baseboards or in place of them?
There are so many options and ways to personalize board and batten. So be sure to think through exactly what you want before starting the process!
As always, I would recommend reading through the entire process and all of the steps before you start this project. You may find that you want to do things differently than me and will need to do further research.
This post contains affiliate links for your convenience. See my full disclosure policy here.
Supplies for DIY Board and Batten
- Boards, per your space and preferences. If you want to duplicate my look, I used:
- 1 x 4 board for the horizontal piece
- 1 x 3 boards for the vertical pieces
- 1 x 2 board for the top ledge “shelf”
- Paint – I only used half a quart of paint, but you’ll need to adjust for your space. (Paint colors I used: Simply White & Wythe Blue both by Benjamin Moore.)
- Primer – for priming the raw boards before painting them
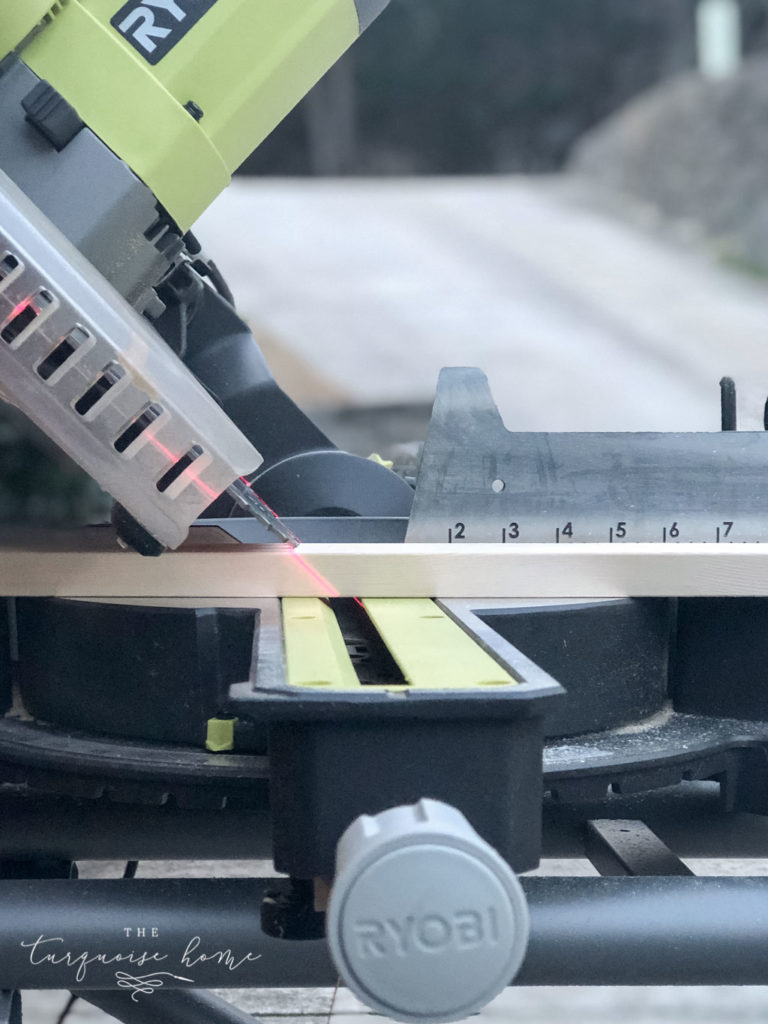
- Miter Saw (You can use any saw or you can have the hardware store cut your boards, but I prefer to cut my own with my miter saw. This saw also makes my 45º angle trick for the bottoms of the boards pretty easy!)
- Brad nailer – (I have an older brad nailer that works great, but if I was buying one today, I’d get this one!) – also you can use a hammer and nails if you can’t get a nailer.
- 2″ brad nails
- Level
- Laser Level
- Spackling compound
- Paintable caulk
- Medium to fine grit sandpaper
- Liquid nails, optional
This is an easy DIY project that uses very basic power tools, so a beginner can do it!
Instructions for DIY Board and Batten
1. Figure out the height of your top board & mark it.
I typically would recommend either placing it at a third of the way up your wall or two-thirds of the way up your wall. Thirds is visually more appealing to the human eye than anything else, so it will just look nicer. If you have other factors to consider, then just place it where it makes the most sense.
I knew I wanted my board and batten to be at a height where I could put hooks and my girls would be able to reach them to hang their towels. I also had to take into account the huge piece of art I was going to hang it above it.
So, my top board is 42″ above the top of my baseboards.
This is the line you will paint up to when you paint the wall in Step #4!
2. Decide how many battens (vertical boards) you want & how far apart they will be.
This will determine how many board you will need. It’s a great idea to nail them into studs, so a great way to help you make your decision is to use a stud finder to locate your studs and then those will be your boards.
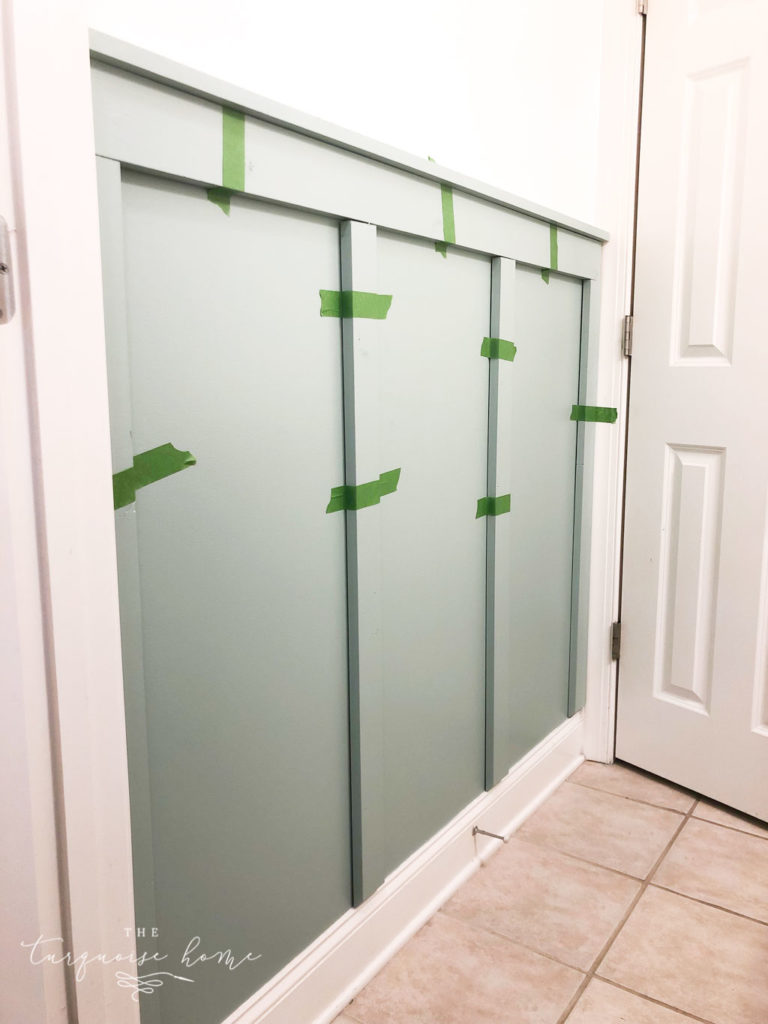
Most studs are either 24 or 16 inches apart. Luckily mine were 16 inches apart and fell perfectly on my wall, so I could have even boards nailed into studs. I also decided I wanted to have boards on the ends of the wall and I really like how they finish it off!
3. Cut your Boards
I find that if I’m working with a large space, then I like to measure the boards individually because baseboards aren’t necessarily level. So, you would measure each vertical board individually and cut to that measurement. I only had 4 boards, so I made one measurement and cut them all to that number. It worked out fine!
NOTE: If you are keeping your baseboards, like me, and the boards you’re putting up will hang over the baseboards, I recommend cutting the bottoms of the boards at a 45º angle. This will allow the boards to look like they are resting on the baseboards instead of hanging over. If you use thinner boards, like lattice, then you won’t have to cut them at an angle.
4. Paint everything first!
BIG TIP! I highly, highly recommend painting the wall AND the boards before you nail anything to the wall. This will save so much time in the long run, because you won’t be having to paint around all of the cracks and crevices multiple times.
I paint the wall twice, and prime the raw wood boards once and then apply two coats of paint.

Priming the boards first in the garage!
This way, when it’s time to paint over the spackling (from covering the nail holes) and caulk in the seams, you’ll just need one quick coat to cover any spots, then you’re done!
5. Mark where you will place each board.
I recommend doing this before you nail up the top rail board. I will even put everything in place and hold it up with painter’s tape to get a visual idea of how it will look.
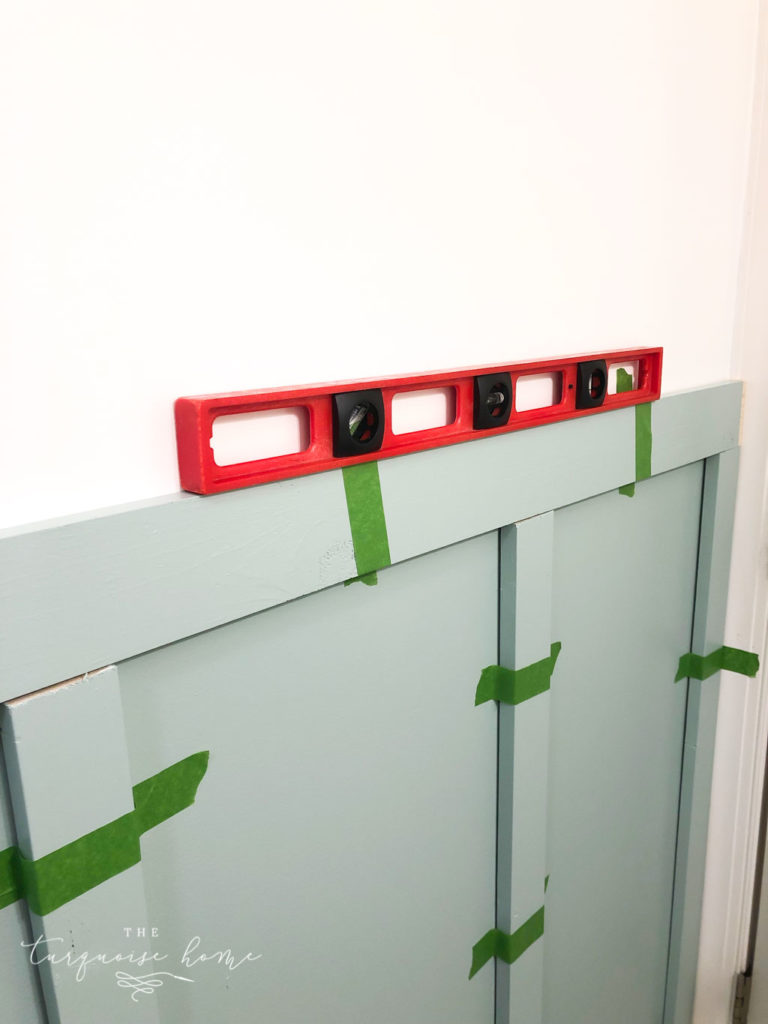
6. Nail up the horizontal board first.
Use a laser level along the wall if you need to nail in multiple boards at the same height. I only had one board this time, so I just used my manual level. But I nailed up many boards in my living room and the laser level came in handy!
It’s crucial that you use a level when nailing up any of the boards – horizontally or vertically. The eyes can play such tricks on the mind that I would never nail up a board without checking to make sure it was level first!
Using 2″ brad nails (or 2″ regular nails), nail each board into studs whenever possible. You can also use liquid nails on the back of your boards if you want them extra secure. I’ve never used liquid nails, because if I ever want to take down the trim, I don’t want to have damaged drywall.
7. Nail up the vertical boards.
Using my nail gun and 2″ brad nails, I will attach each vertical board to the wall, making sure each one is level and on a stud if possible.
Just use enough nails to keep it in place. Don’t go to nail happy because you will have to patch every hole!
8. Patch any nail holes.

Once your boards are on the wall and secure, it’s time to patch any nail holes with sparkling compound. Since the brad nail holes are small, it doesn’t take much to cover each one.
9. While you’re waiting for the spackling compound to dry, caulk any seams between boards.
I run a bead of caulk along the seam and use my finger to wipe it down smooth. This isn’t the best idea because the caulk it’s not good to let the caulk come in contact with your skin. It will burn if you do it too long, but this small project wasn’t bad. I just haven’t found a more effective, better-looking way to make the caulk look good.
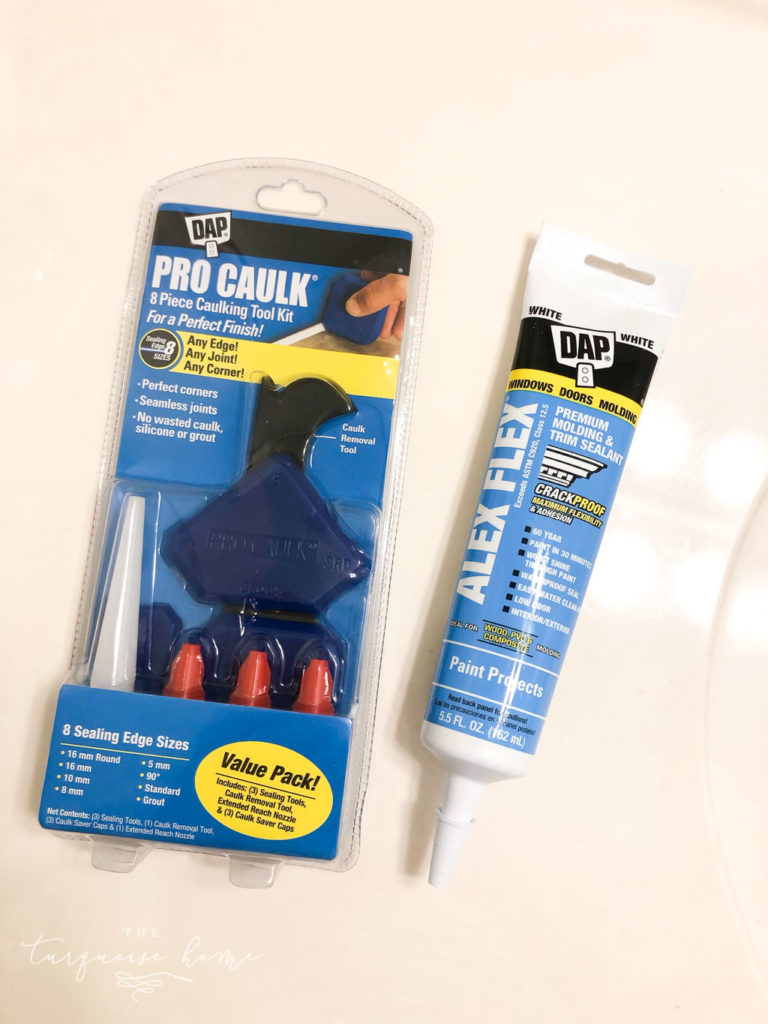
In the photo above you’ll see a caulk finishing kit, but I couldn’t get it to work well for me, so I wouldn’t recommend it. If you have any better tips, I’m all ears! 😊 Just leave them in the comments below.
10. Once dry, sand the spackling compound until it’s smooth.
11. Paint over all spackling and caulk!
And you’re done with your board and batten wall treatment!
Whew, it seems like a lot of work and a lot of steps, but it’s not as complicated as it might seems. It’s actually a very basic DIY project that would be good for an experienced beginner like I was 5 years ago when I did it in my living room.
You can always tackle a small space like your bathroom first to get the hang of it!
More Posts You Will Love:

I am obsessed with how this turned out! The color is so cute. We are doing some this week, and after that I would loveeee to do this in our dining room. Thanks so much for sharing!!!
Oh yay! That makes me so happy to hear! It really is such an easy way to add a lot of architectural interest to a room!
I’ve always used a piece of cardboard to smooth out caulk. The excess builds up on the card board and it leaves behind a smooth finish. I just run the cardboard down the length of the bead.
I love what you’ve done here! Looking to duplicate this look in my guest bathroom. Wondering if you took the board and batten all the way around the bathroom or if this is the only wall. I have a wall just like this in the guest bath that runs from the doorframe over to the shower stall and that is the only place I wanted to add b & b. Will it make the room appear off balance or is that what you did? We removed the towel bar along that wall. The placement was so off so thought hooks on the b & b would serve as a nice replacement.
Hi Mary,
Yes, only that one wall has board and batten. However, this bathroom is actually 2 separate rooms. The room with the B&B has the vanity and sink, and there is a separate space for the toilet and shower. Because of the 2 rooms, it looks balanced. For what it’s worth, I think it would look fine to have it on only one wall in your bathroom. It’s a nice statement wall. Hope this helps!
What color is this? Love it!
Hi Kiah, the board and batten is Wythe Blue by Benjamin Moore!
We have open concept living are with vaulted ceiling and dark baseboards I love the look of board and batten in white but don’t want to change those out (expensive) can I still do this with white painted board and batten
What sheen of paint did you use since it is in a bathroom? Satin?
Yes! I use satin sheen in bathrooms, eggshell most everywhere else! xo, Laura
Hi. What type of flat board would you recommend to use on a textured wall? I read that to achieve the smooth surface look in between the vertical battens, you suggested a flat board to use on the entire surface of a textured wall, which is what I have. Any suggestions? Thank you!!
So I’m not a fan of dusting, and as much as I love the look of this, I’m wondering how much extra dusting maintenance this requires.
Lovely! For caulking, I’ve had good experiences wearing gloves. Dishwashing gloves worked well for me. I kept wet paper towels handy for wiping off the excess and then rinsed them off in the sink when I was done. You could wear disposable gloves, but the dishwashing gloves are nice because they’re sturdier. They stay in place on your finger, and don’t get all wrinkled up when you’re smoothing the bead. Also, mine were bright yellow, so it was easy to see where the caulk was. Alternatively, you can just use a damp paper towel instead of your finger. I don’t like this method as much because it’s hard to see when the towel is covered in caulk, and you have to keep replacing your towel. For a small job, though, it works fine. Hope that helps!
So smart!! I’ve tried the basic rubber gloves and it just made a mess, so I ended up using my finger. But honestly for a large job, it’s not good to have caulk on your skin that much. It starts to burn after a while. The kitchen rubber gloves is a GREAT tip! Thanks so much for sharing, Jenny!
If you are on a budget and looking for a dramatic update this is the project for you. I followed this tutorial with my husbands help and did a board and batten wall in my entryway foyer and it turned out beautiful. We are not anywhere close to professionals but we’re able to easily do this project. Thank you so much for sharing.
We recently tried this project in our small hall bathroom, which was white, white, and white. LOL. We kept ours a little shorter (8’ ceiling), and painted it a great saturated teal color. We also applied a matching pattern on the linen cabinet doors and added new bronze pulls. Finally I got a great, colorful new rug to cover the 50-year-old tile and hung a cleaned-up old window frame above the board-and-batten, with bronze knobs attached at the corners to serve as towel hooks. I’m absolutely thrilled with it! Some new teal towels complete the look. Wish I could show you some photos!
Love the board and batten, I have a small bath, I’m going to do the walls I think it will make it look bigger and cleaner
Yes!! My bathroom seemed teeny before, but it’s made it feel larger because I’m using vertical space and pulling the eye up. I’m loving the transformation in more ways that what I thought I would! xo, Laura
I love this project!!! Board and batten is so much easier then people realize. We added it to our hallway and living room in our old home. It’s such an inexpensive, easy DIY that makes a home look and feel more custom.
Yes!! I totally agree! It truly makes a room!
What a great detailed tutorial, thank you!! You have certainly de-mystified the process and make it seem possible for a total beginner like me!
I’m so glad, Anu!! xo, Laura
Beautiful! Thanks for the explanation of board and batten. Love the shade of blue!
You’re so welcome, Evelyn! xo, Laura
This is so pretty! I was all for you painting the board and batten white and walls blue, but this looks great! I would like to try this in my small dining room, so thanks for the detailed tutorial!
Thank you, Vicki! I think it would look amazing in any room, but especially a dining room! xo, Laura