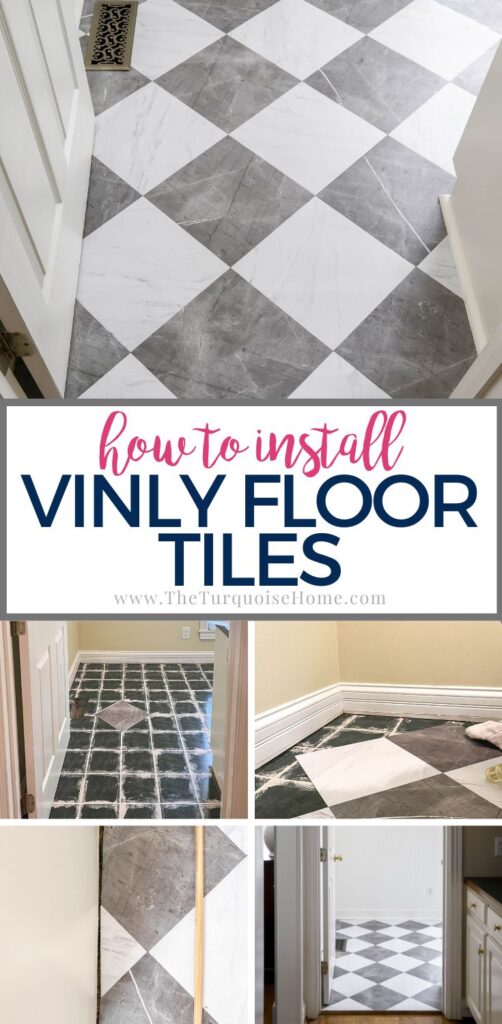
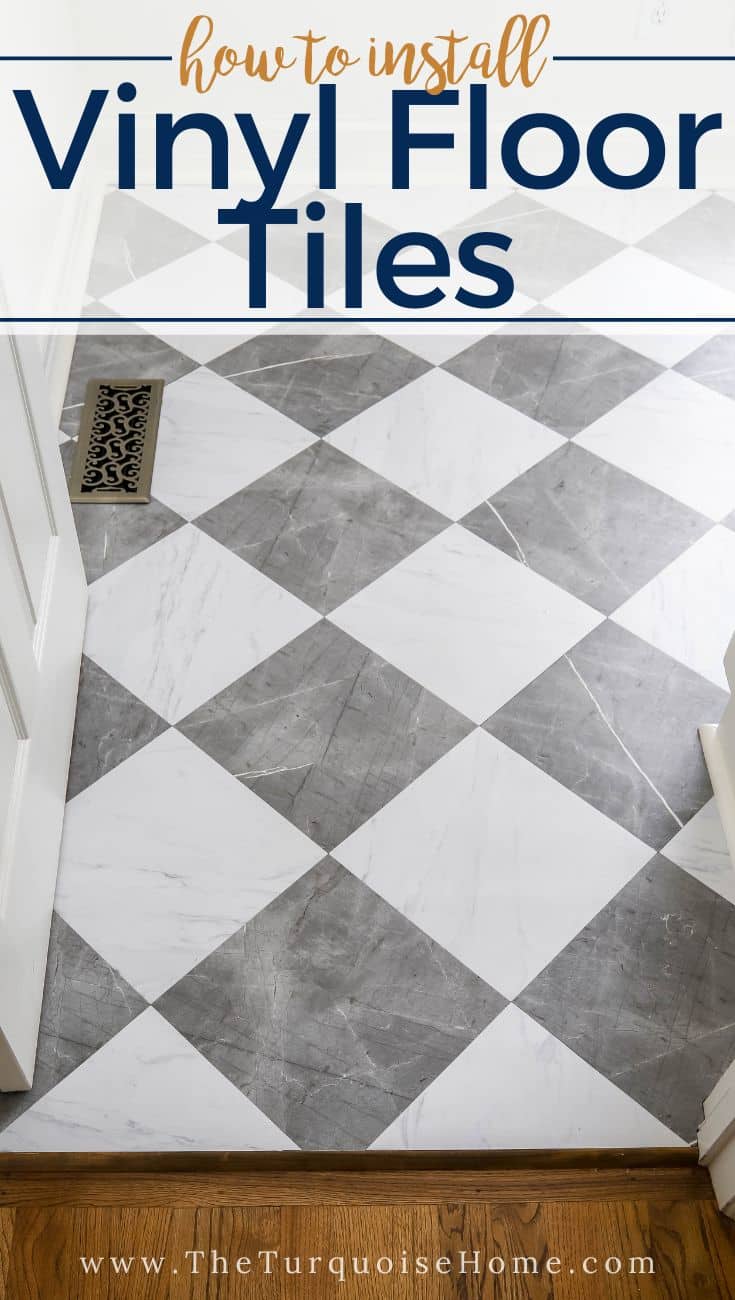
How to Install Peel & Stick Floor Tile
Flooring can be daunting and expensive to change. Try these peel & stick floor tiles for a quick, easy, inexpensive, and mess-free flooring solution! Simply peel and stick them on the floor and score your cuts with a utility knife.
I’ve recently covered the original, old hunter green tile in my laundry room with these marble-looking vinyl peel-and-stick floor tiles. And I am so happy with how easy it was to install them. The final look is even better than I could have imagined!
This post contains affiliate links for your convenience. See my full disclosure policy.
Let me share how easy it was! I used FloorPops flooring tiles for this project. These exact tiles are very popular and go in and out of stock, but check back regularly to see when they will be restocked. (Don’t forget to set your alarm to snag them right away when they do come back in stock!)
But honestly, there are many other beautiful flooring tiles available if you don’t want the black-and-white checkerboard look!
The flooring update is a part of my whole laundry room makeover. And so you’re getting a little bit of a sneak peek of some of the other elements as well. Enjoy!
Want to Save This?
Enter your email below and I’ll send it directly to your inbox!
What You’ll Need to Install Peel & Stick Floor Tiles
- Vinyl Floor Tiles – I used the Marble Bonneville Peel and Stick Floor Tiles
- Utility Knife – for scoring tiles
- Straight edge – to keep the knife straight
- Pencil
- Scissors – for cutting non-straight, precision cuts
- Hammer or Crowbar – for removing the quarter round
- Nail gun – for replacing quarter round
- Wet/Dry Shop Vacuum and floor cleaning supplies
- Caulk
- Nail gun
- Paint, if needed
- Quarter round, if needed
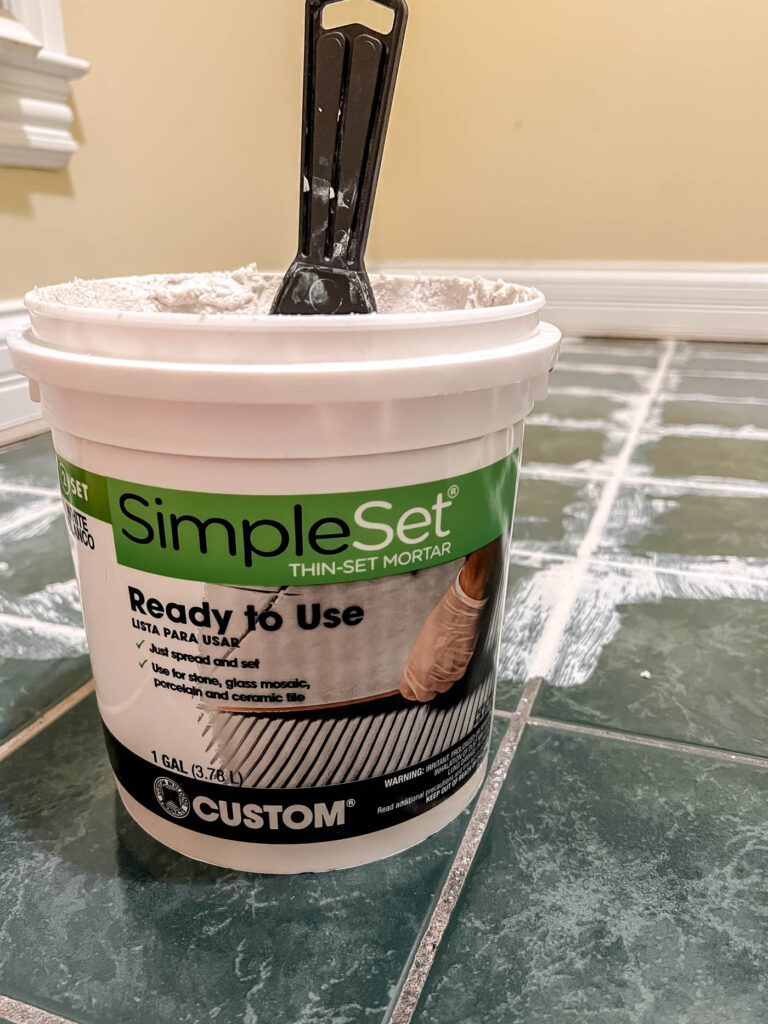
If you need to level the existing grout lines on your floor first, before installing the floor tiles, you’ll also need:
- Thinset Mortar – Get the premixed! It’s so easy.
- Putty Knife
- Sandpaper
How to Install Peel & Stick Floor Tiles
1. Remove the quarter round on the perimeter of the wall.
This tile is made to be installed with a gap between the edge of the tile and the wall, so you’ll want to remove the quarter round and replace it after you’re finished.
Remove every piece of quarter round by scoring the caulk between the quarter round and baseboard with a utility knife. Then once it’s loose, pry it off with a hammer or crowbar.
If you’re careful, you can usually keep the quarter round and re-install it when you’re done.
I had to replace my quarter round because the laundry room was used by the previous owner as a pet room, I think. And the quarter-round boards reeked of pet urine. Yikes! So, it was time to replace them … and bonus, the room smells even better!
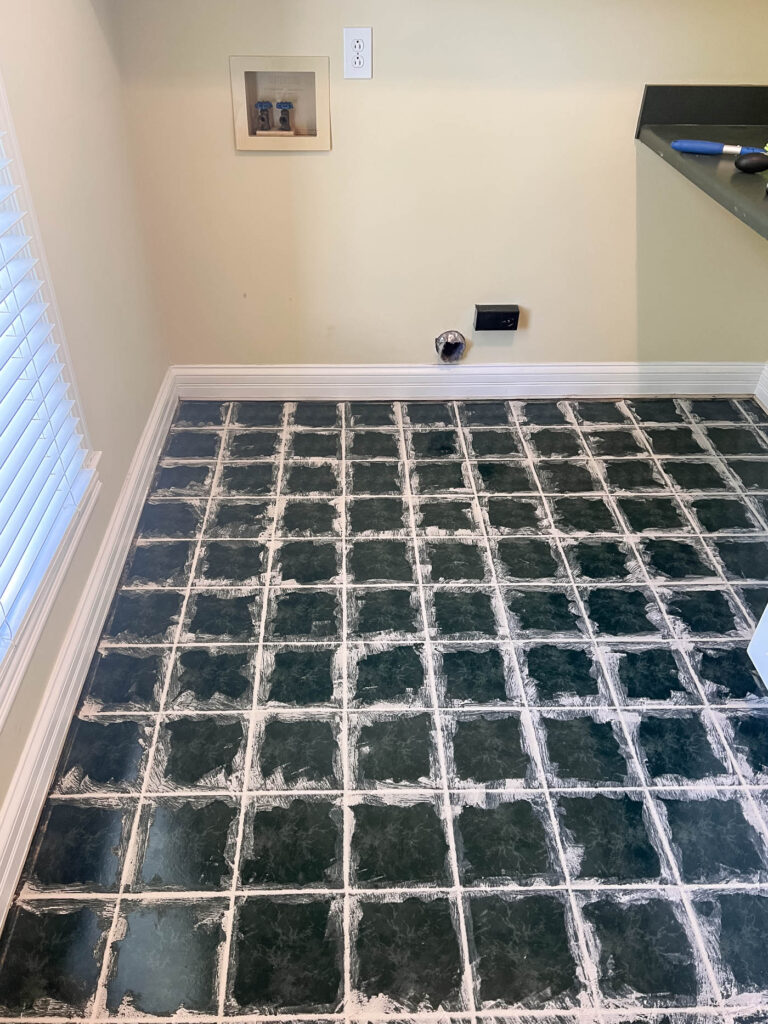
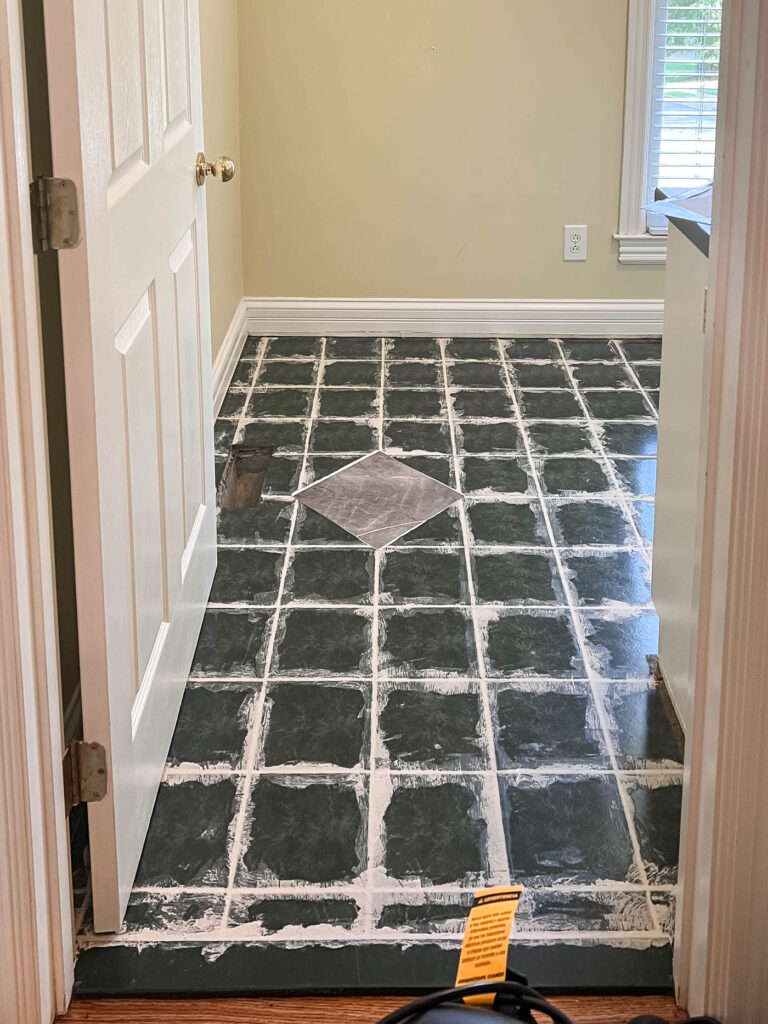
2. Fill in the grout lines with thin-set mortar.
I used a premixed mortar to make life easier. I simply scraped it on with my putty knife and tried to make it as level as possible.
Let it dry for the recommended time on the box.
3. Sand down any uneven spots with sandpaper
Use rough sandpaper to sand down any rough spots on the mortar once it’s dried. Try to get the floor as level as possible.
4. Clean the floor really well!
I used my wet-dry shop vacuum to get every bit of debris up off the floors. You can wipe them down as well, but I didn’t feel like that was necessary since the shop vacuum did such a good job.
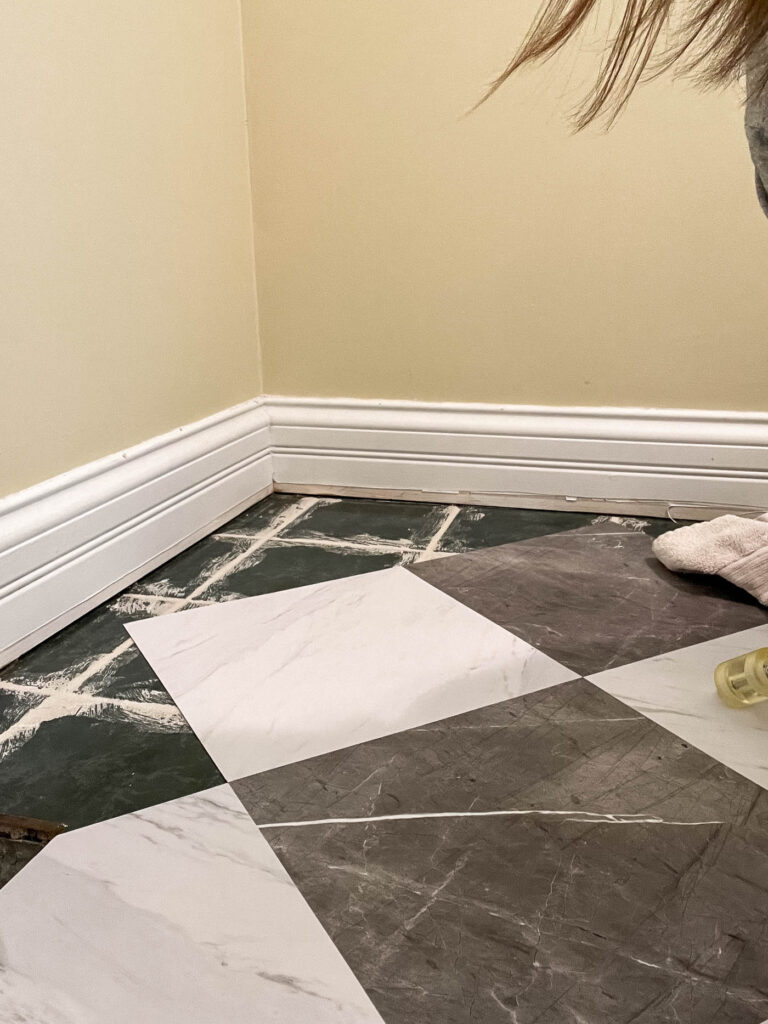
5. Lay out the tiles to visualize them.
Visualize how you will lay out the tiles by putting them down on the floor before you lay the first tile.
Try to adjust the tile so that you don’t have a tiny row of triangles left on one wall.
While I did a good job lining mine up to be even from right to left, I should have scooted them back just a bit to keep from having a small row of triangles on the back wall, as seen in the picture below.

Note: It’s also important to lay the tiles out before placing them down in order to vary the direction of the faux marble. Since this isn’t natural stone, they are duplicate patterns on the tiles. It’s important to make sure two identical tiles aren’t side-by-side.
6. Find the center of the room and start laying tiles
Find the center of the room and make a chalk line or pencil line down the middle. This will be where you lay the first row of tiles to keep everything even.
I wanted to start my tiles centered on the doorway, so that when I looked into the room, they would be perfectly placed.
Make a pencil or chalk line to follow in the center of the room, then lay your first row in the middle of the room and work out from there.
Be sure to read the directions on the box. It says to use a heavy roller to roll over tiles after you’ve placed them down. I would walk on top of them since I didn’t have a heavy roller.
7. Cut tiles down to size at the edges and around door frames
I would use the paper backing of a used peel and stick tile and trace out where I needed to cut. Then I scored the straight lines with a utility knife before snapping them along the scored line.
If I had an odd angle or non-straight cut, I was able to use my scissors to cut the flooring tiles.
Leave a small gap between the baseboard and the edge of the tile to allow for expansion through different seasons.
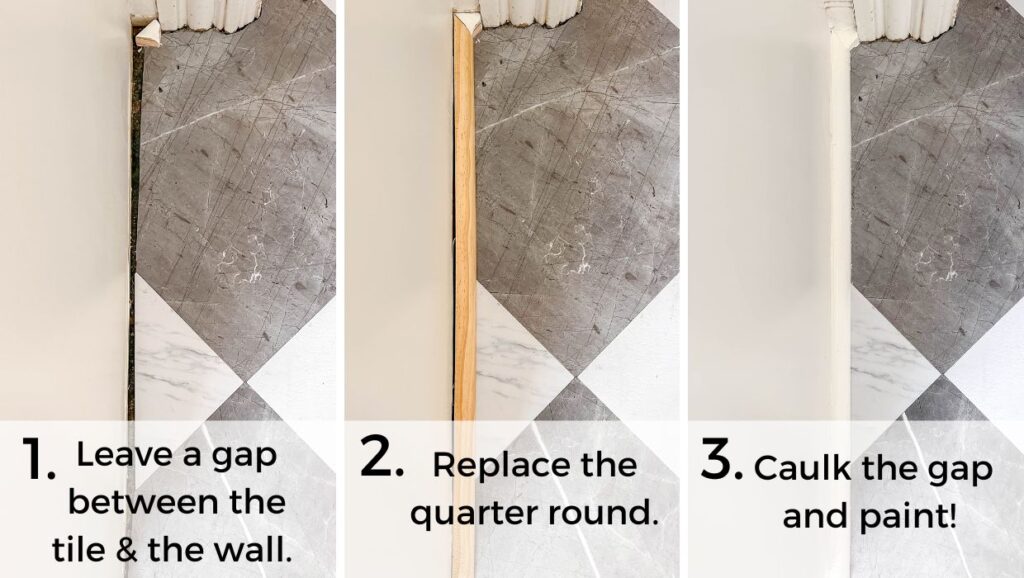
8. Replace quarter round
Once all of the pieces have been cut and placed down, it’s time to replace the quarter round around the edge of the room. If you’re able to reuse your quarter round that you removed, simply use your nail gun to re-attach it.
I bought new quarter round and used the old pieces as a template to cut them down to size.
Now you can paint the baseboard and quarter round, if you need to. And you’re done! Sit back and enjoy your new flooring.
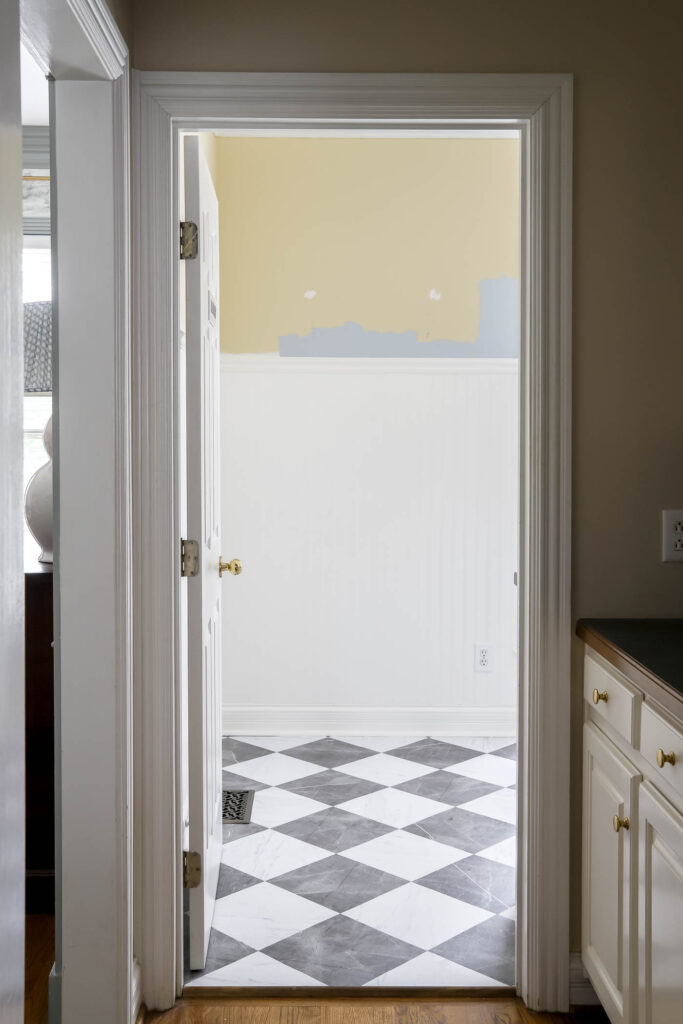

You can see the rest of the laundry room makeover plans here!
Vinyl Floor Tile Stickers vs. Vinyl Floor Tiles
You may be thinking, “Wait! She’s shared this tutorial before.” And in a way you would be right, but last time I used a thin vinyl tile decal. The vinyl floor tiles I used this time as are thicker and definitely more rigid.
Tile stickers are thin peel & stick vinyl decals that are easily removable and do not permanently change your floors.
The tile stickers I used before did NOT cover the grout on the original tiles. You order the vinyl stickers to be the same size as your old tiles and stick them on top of each individual tile.
These rigid vinyl floor tiles can be placed over any level surface and are much more durable than a vinyl tile sticker.
Since the laundry room had existing tile with grout lines, I had to fill in the grout lines to make the whole floor level. And once the floor was level, I simply placed the vinyl tiles over the old floor with the tiles butting up against each other.
Being able to place the tiles directly next to each other makes these vinyl flooring tiles water-resistant. Whereas the vinyl stickers are wipeable and water resistant on top, but water can definitely seep underneath the stickers. (This is why the first time my toilet flooded after I put down those tile stickers, I had to remove them.)
Is Vinyl Tile Easy to Install?
Absolutely! It was probably one of the easiest DIY projects I’ve done. The tiles are easily cut to size by scoring with a utility knife and snapping the excess off. You simply butt one up next to the previous tile.
And best of all, if one gets damaged, you just pop it out and replace that single tile!
How much does Peel & Stick Vinyl Tile Cost?
The cost of products needed to cover the floor in my 10′ x 7′ laundry room was less than $200. If course this does not include the tools I needed or already had on hand.
But what a cost efficient way to cover an old flooring style that you won’t love, especially if you don’t have the budget to rip it out.
Someday, I’d love to gut my laundry room and do a total renovation, but until then I’ll be enjoying these vinyl tiles!
More Posts You Will Love:

This is beautiful! Would love to do this in my small powder bath. My current flooring has some texture. Would it work to apply the grout sealer over the entire floor to get a smooth surface before applying? Or is there a product you would recommend for a smooth surface before putting tiles on top?
I’ve been thinking about using these same peel-and-stick tiles in my bathroom refresh. I haven’t seen them in person yet, but I wonder if they’d look more realistic if you used tile spaces and grouted in between? I’ve seen that done with smaller format LVP.
I bet they would! It’s totally doable, I just didn’t chose to go that route.
Hello, would this work on a step? I have one step In my entry i want to do small area. I wonder if it would look good on the edge of the step? I also painted my floor tile, can I just use primer so it sticks well. I painted it with Chalk paint.
Hi there! I’m not sure about a step. You would need a stair nosing piece to wrap around the edge of the step for it to look nice. If you tried to butt the two pieces together it would look strange and probably not stick very well. And I think primer on top of the chalk paint would work! Hope that helps! – Laura
Reading the blog on installing peel-and-stick floor tiles was like following a GPS with a sense of humor. Step 1: Peel. Step 2: Stick. Step 3: Admire your newfound expertise in advanced DIY wizardry. It’s so easy, even your pet rock could do it. Happy flooring, you DIY rockstars!
Hello! I love this look! Wondering if you think this would hold up in a main bathroom with shower?
Hi Corin, I think it would! I would maybe order some extras in case you needed to replace one or two along the way, but it’s moppable, so I don’t know why it wouldn’t work in a bathroom with a shower!
Love this floor and just bought it myself. We are getting ready to lay it, and I noticed you laid yours diagonally. I wondered, if by doing that you found that you had a lot more tile waste? or if it made it harder to fit the tiles? I love the diagonal look but I am concerned that I will somehow run out of tiles because of the waste from cutting them to be diagnal, if that makes sense?!
Hi Kendra, I don’t think it had any more waste going diagonally because I could use the excess on the other side, does that make sense? I kept the triangles that I cut off and used them when I needed another triangle piece. I hope that helps! Just use your scraps! I also bought more than I thought I would need, and had plenty! It’s the BEST product. And I’d use it over and over again if I had another place to use them!
Hello! Love your work! What did you do for the transition from the tile to the wood floor?
Hi Michelle, the original tile was maybe 1/4 of an inch higher than the wood floor. So, I knew it would look weird when I put the peel and stick tile on top of the old tile. I thought long and hard about what to do before I ever installed it. And I ended up staining a piece of wood quarter round to match the wood floors. And I used a couple of brad nails to nail it into the wood floor. It looks like it’s always been that way and it’s a pretty nice transition! I hope that helps! xo, Laura
Looks great!
Thank you, Vicki!!
Wow, Laura! Love this look. Thank you for sharing. I’ll be on the lookout for your new laundry room reveal.
Thank you, Paula! I can’t wait to finish it and share it soon!
Beautiful job! Can’t wait to see the finished laundry room!
Thank you, Jeanine!