How to Make a Farmhouse Wooden Pumpkin
Make a simple farmhouse wooden pumpkin with scrap wood and craft pieces you have around your home! It’s so cute!
Do you have scrap pieces of wood and fabric just taking up space? Show your love for fall by revamping wood scraps and materials you probably have laying around in your house – and turning them into beautiful farmhouse wooden pumpkins!
Create your own rustic pumpkin decor to decorate your home with this fall. They look great on the mantel or in a vignette!
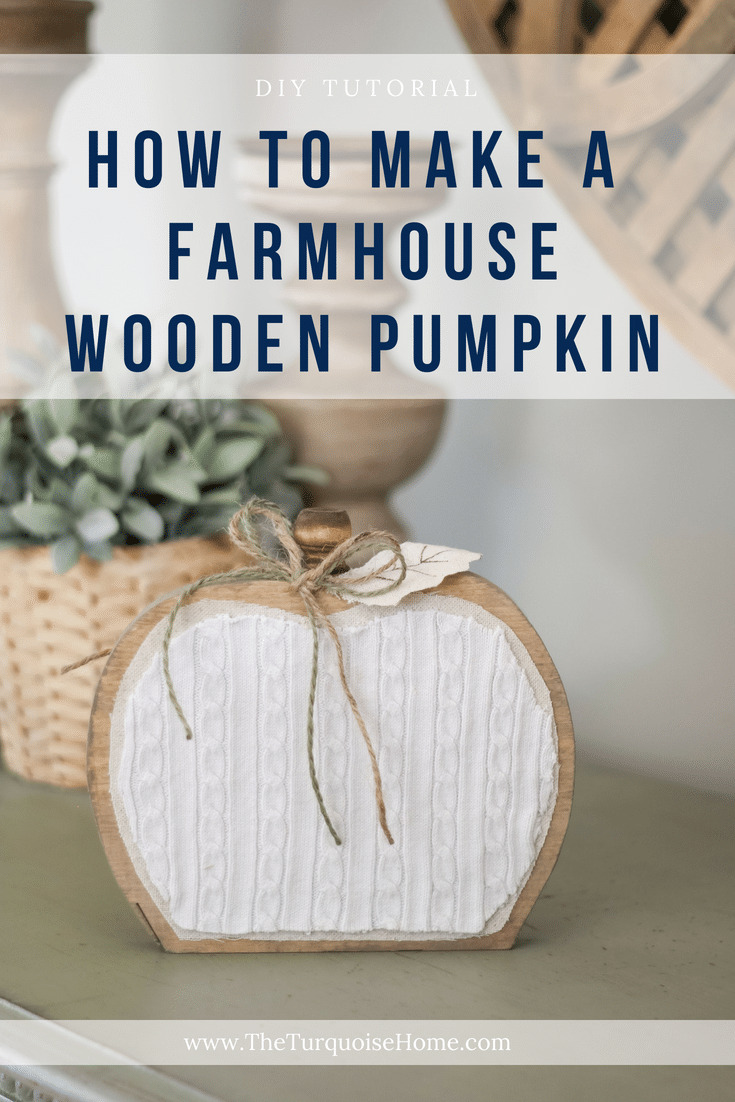
I am a sucker for a pretty little wooden pumpkin. I don’t know what it is, but I love them. It’s probably because it’s an easy way to make your home look like fall, but it’s not cartoonish, especially when they are cozy, wooden pumpkins.
I’m also a sucker for making a craft only with supplies I already have on hand. So, hopefully you have a similar stash like mine, but feel free to change yours to use whatever you have on hand!
Wooden Pumpkins for Purchase
And if you don’t feel especially crafty or don’t have the time to make your own pumpkin, I found some great options for sale online!

Supplies & Tools Needed to Make Wooden Pumpkins
- 1″ x 8″ board ~ 1 foot long {Use whatever you have, but if you use the printable template, you will need at least an 8 foot wide board.}
- Mod Podge
- Sandpaper
- Stain (& brush)
- Burlap or Drop Cloth {or whatever fabric you love. I used an old piece of drop cloth.}
- Cable knit sweater {or any other fabric you like}
- Finial Dowel Cap {Make sure the cap is an appropriate size for your board.}
- Hot Glue Gun & Glue
- Jigsaw {I use an old jigsaw that we inherited, but if I were to buy one today, I trust this brand and this brand.}
Steps to Create Wooden Pumpkins
1. Draw a pumpkin outline on your board.
I made a template for you to use if you want it. Click here to download the template.
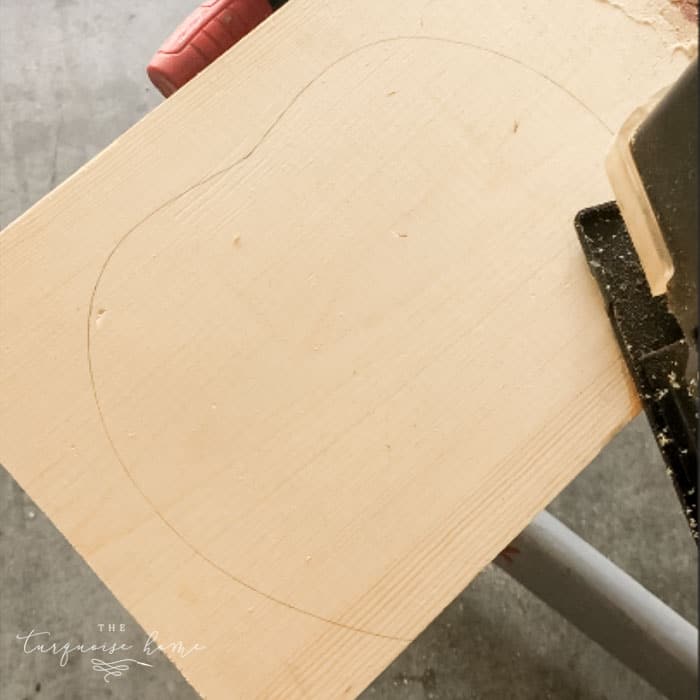
Make sure the bottom is flat. I used the side of the board for the bottom of my pumpkin so that it didn’t have to cut a straight line for the bottom of the pumpkin.
2. Cut the pumpkin outline with a jigsaw
I use an old jigsaw that we inherited, but if I were to buy one today, I trust this brand and this brand. Use some sandpaper to sand down the rough edges if needed.
3. Stain the pumpkin

I used my favorite stain, which is Old Barn Milk Paint stain in Weathered. It goes in like paint, so you just want to apply a thin coat and let it dry. But the color is so nice! It’s my favorite stain color in the history of ever!
I also love Minwax’s Early American stain, if you don’t have the weathered stain.
Allow the stain to dry before proceeding to the next step.
4. Cut out burlap or drop cloth in the shape of the pumpkin
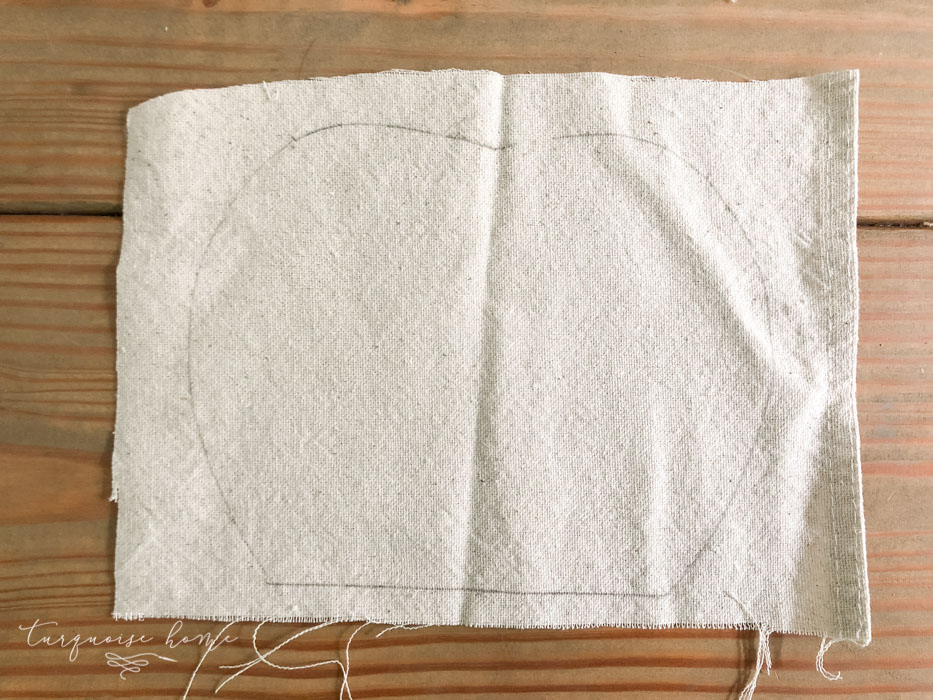
I used the wooden pumpkin to trace an outline on the fabric and then just cut about a quarter inch inside the line so that it would fit inside the outer edge of the pumpkin.
5. Glue the burlap or drop cloth to the wood with Mod Podge
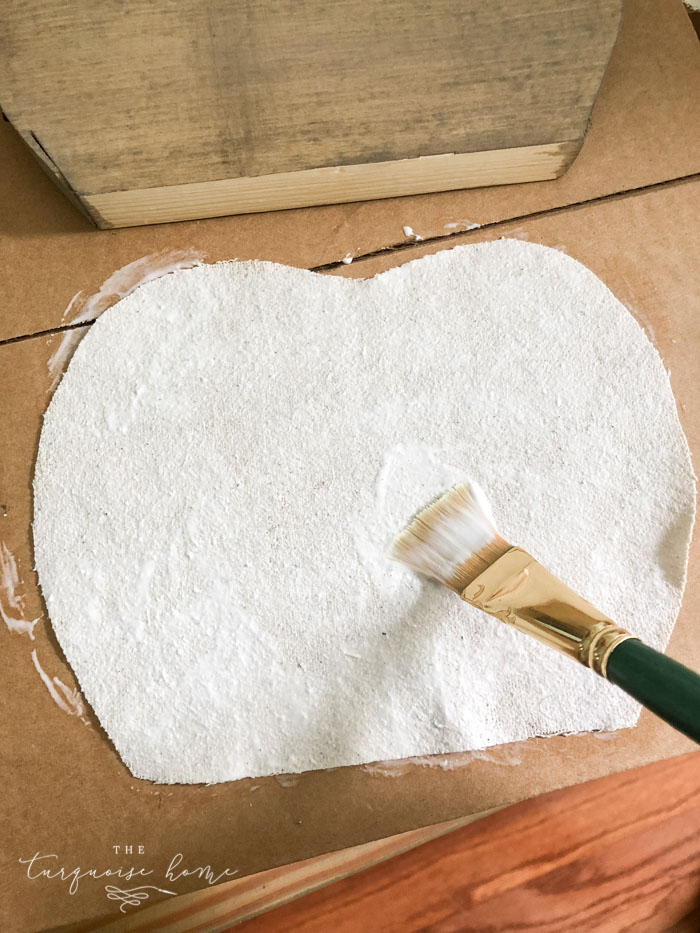
I applied Mod Podge to the back of my drop cloth and stuck it on the pumpkin. Press down to get any creases or bubbles out.
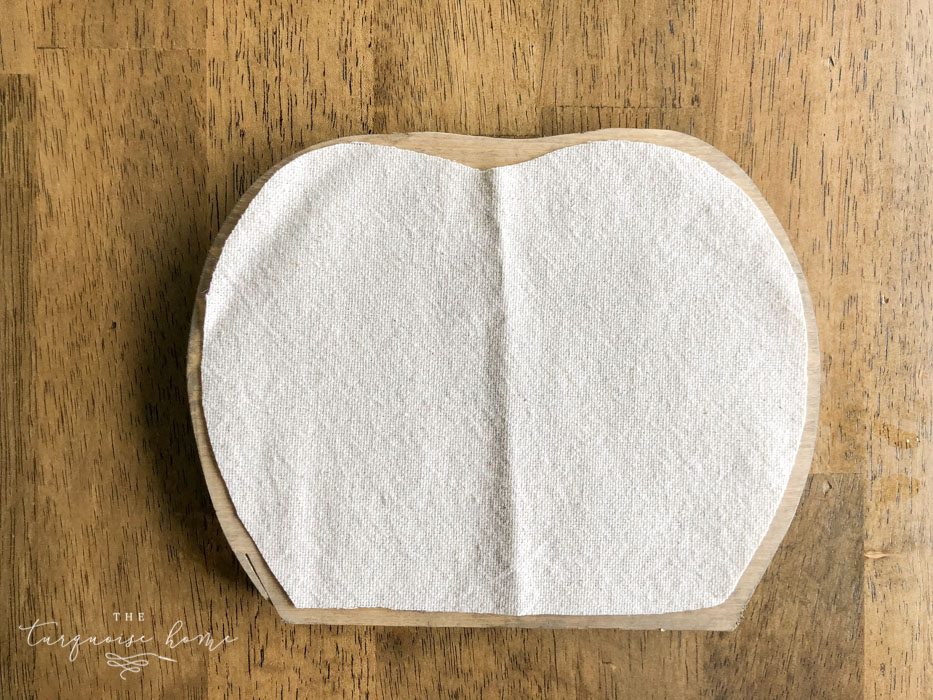
6. Repeat steps 4 & 5 with the sweater
You can use any kind of material you’d like, but I took one of my daughter’s old cardigans that she had outgrown and cut out the shape of the pumpkin.
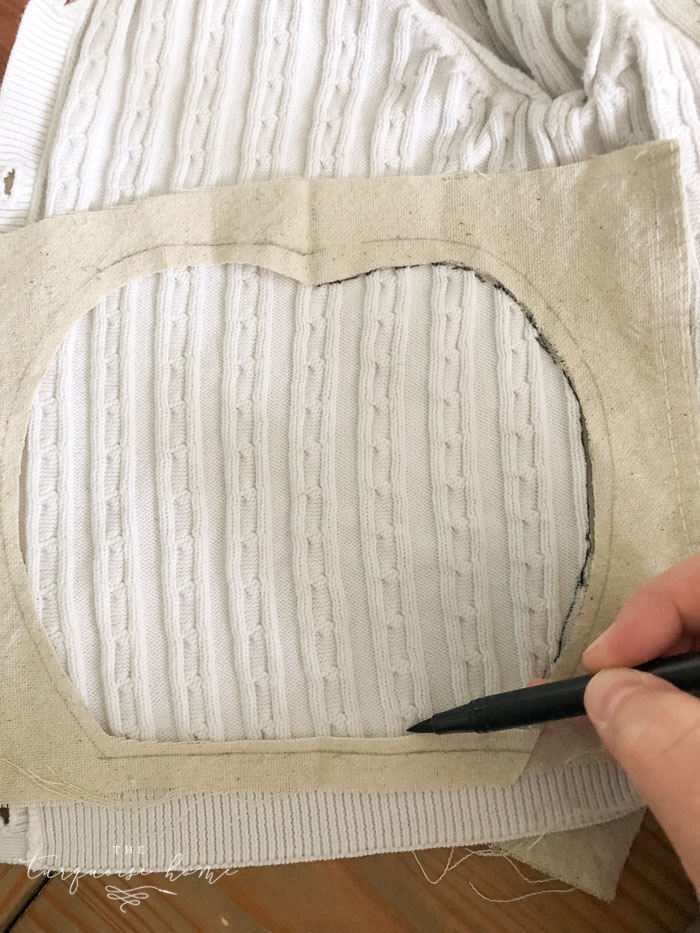
I used the drop cloth leftovers to use as a template for my sweater and traced with a fine tip marker. Then I cut it inside the line to make it a little bit smaller than the drop cloth.
I used Mod Podge to adhere the sweater to the pumpkin as well. Hot glue would work too!
7. Stain the finial and add as the stem of the pumpkin
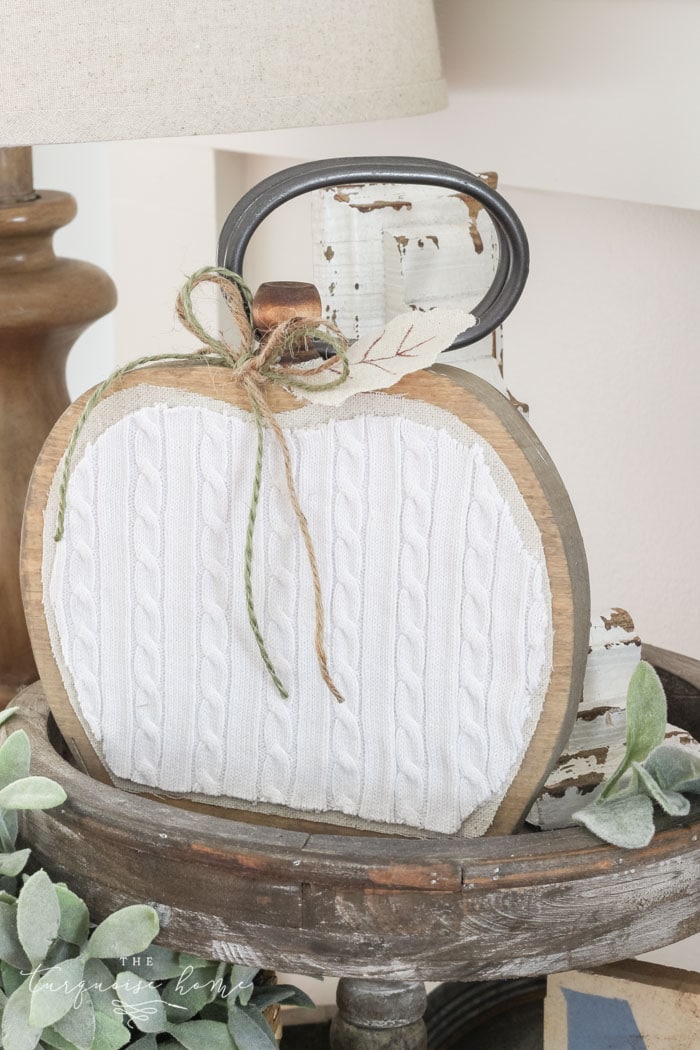
I stained my finial with “Early American” by Minwax and attached it with my hot glue gun.
Isn’t it just adorable?!
8. Add other embellishments to your wooden pumpkin
I made a jute string bow and added a leaf made from the drop cloth. I drew some leaf “veins” on it with a brown sharpie marker.
You’re all done! What do you think!?? I’d love for you to save this to Pinterest here, or by clicking the Pinterest icon to the left of your screen. Then when you make your pumpkin, upload it to Pinterest comments section so everyone can see!
More Pumpkin related posts:
- DIY Lighted Pumpkin Candy Holder
- Mason Jar Lid Pumpkin Craft
- “Scrappy” Pumpkin Fall Decor
- Pumpkin Chocolate Chip Muffins Recipe


“Oops! You made a typo: “you will need at least an 8 foot wide board.”
Cute pumpkin!
Thank you!!! Off to change it!
Love your pumpkin, it is adorable
Thanks so much, Colleen! xo!
I notices that you crossed out that your favorite stain was weathered by old barn living. Is there a reason for this? Thanks!
I love what you did here, and now that is approaching, I want to learn how to make some of these for our home. How pretty!!!
So cute! Just one question, you said you need an 8 foot board… do you mean 8 inches? Cuz that would be one huge pumpkin!
Hi Amy! The 1 x 8 is the depth and width of the board, so 1 inch deep by 8 inches wide. I said you need about a foot of that size, so it’s not as big as it seems. 😊
These are so cute. I love all your projects.
I have a question that may seem kinda dumb. How difficult is it for a middle-aged petite woman to use a jig saw, or some of the other power tools that you use, that has never used or has been decades since they used? :\
Thank you Debbie Gail! Not dumb question at all! I think you could totally use a jig saw or any of the other tools I use. I’m not petite, but I’m not exactly in the best shape of my life 😂 so I don’t think I have any super special strength going on. LOL I will say, the one thing I like for my husband to use is the reciprocating saw when I am taking apart pallets. They take a lot of strength. But cutting a 1 inch board with a jig saw isn’t hard, in my opinion. Just watch your fingers and make sure the board is tightly secured to something before you cut! Happy DIYing!
Thank you for the advice. My age is catching up and I’m learning that I cannot do some things as easily as I used to. So, I was afraid to try some things. But, I will “put my big girl pants on” and give it a try. I’ll let you know how it goes. 🙂 Thank you for all the wonderful posts.
Very cute! Love the finial as a stem!
Thank you, Christy!! 🙂
Super sweet! Great use of scraps. I bet it would cute with denim and flannel from old jeans and a plaid shirt.
Ohhhh!! I think that would be so cute!! I might have to make a “twin” set! 😉
So adorable, Laura! It looks like something you would buy at Hobby Lobby or Kirkland’s.
Thanks girl! 🙂
Beautiful!! I love the layers and pretty texture!! Perfect for neutral Fall decor!
Thank you, Heather! 🙂
So cute, Laura! I can’t believe you DIYed it!! Way to go, girl – and thanks for being part of this hop!
Thanks girl! It was so super easy! 🙂 Thank for for getting this together every year. LOVE it!
Adorable! I love all of the different textures!
Thank you, Jennifer!! 🙂
Excellent work making something out of nothing as I always say!! So completely adorable!
Thank you, Leslie! 🙂
These pumpkins are so cute! What a fun project and I love the texture that the sweater material adds to them!
The sweater is my favorite part! It’s more fun than having to tag it to consign it later. Ha!!
So very cute ,isn’t it fun to make it all come together .
It’s my favorite part of DIYing! Taking a leftover pile of something and turning it into something cute and pretty!
Perfect for farmhouse decor.
your wooden pumpkin is gorgeous!
Thank you, Kristin!